
Configure Expenses
Applies to: Maxio Core
Last updated on Aug 28, 2026
Configure expense items, item groups, and admin settings before you start recording expenses in Maxio. These settings determine how recognition, amortization, and billing behave for every Expense Transaction you create afterward.
Admin settings
To modify these settings, go to Admin > Expenses Settings > Update Settings.
- Mark Bills as Paid by Default: Enable this setting to populate a payment date equal to today's date for any bill created when a new Expense Transaction is created. This is recommended if you do not plan to track bill payments in Maxio.
- Enable Expense Tab on Contract: Enables the Expense Transactions tab when viewing a contract.
Expense Items
Expense Items represent the types of expenses you track in Maxio, for example, commissions, software, or rent.
To create an Expense Item
-
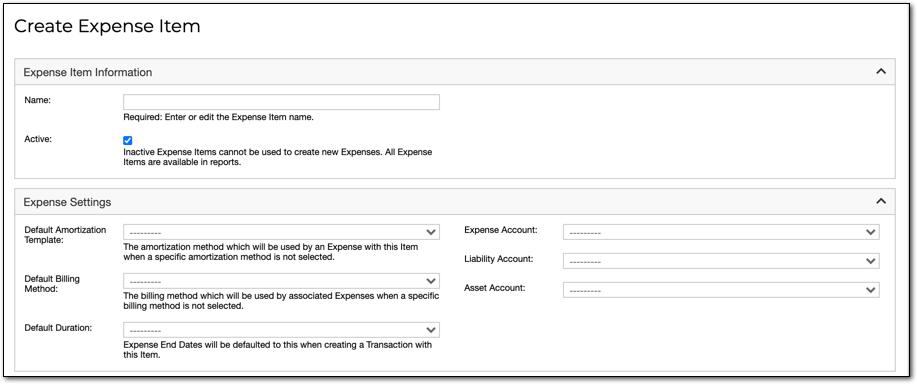
Navigate to Admin > Expense Items and click Add Expense Item.
-
Enter a name for the item and make sure the Active box is checked.
-
Select one of the following item types:
- Prepaid: Use this type when the asset account to be capitalized is the same account to be decreased during expense recognition. Typical examples include prepaid software, rent, or other recurring costs paid in advance.
- Commission: Use this type for the same accounting treatment as Prepaid, applied to capitalized commission expenses, such as sales commissions recognized over time.
- Fixed Asset: Use this type when you need two asset accounts: one for initial capitalization and one for accumulated depreciation. Ideal for items such as computers, equipment, permanent fixtures, or other assets exceeding your capitalization threshold.
- Reseller: Use this type when you need a contra-deferred-revenue treatment. These items, when used with your revenue reports, will reduce your deferred revenue and revenue balances. Typical use cases include royalty or reseller commission fees where you report net (rather than gross) revenue.
-
Select the following configuration settings for the item:
- Default Amortization Template: The amortization method used by default when you create an Expense Transaction using this item.
- Default Billing Method: Defines how bills are generated when you create an Expense Transaction.
- Default Duration: When creating Expense Transactions, you can specify a start date and the system will calculate the end date using the item's default duration.
-
Assign the expense account, liability account, and (when applicable) asset account for the item.
-
Click Save at the bottom of the screen.
Expense Item Groups
Expense Item Groups are aggregations of Expense Items that you can use in Analytics reports. If a Transaction uses an Expense Item that belongs to a group, and that group is included in a report, the Transaction appears in the report dataset. Expense Item Groups simplify report creation by offering an alternative to filtering by individual items.
Related information
Once your Expense Items and admin settings are configured, see Manage Expenses to create vendors and record Expense Transactions.
For a full description of every field on the Expense Transaction screen, see the Expense Field Glossary.
For a conceptual overview of how expenses, vendors, and amortization work together in Maxio, see Understand Expenses.
Still need help?
Reach out and our support team will take it from here.