
Setup the NetSuite Integration
Applies to: Maxio Core
Last updated on Aug 26, 2026
Connect Maxio Core to NetSuite by creating the required NetSuite role, integration record, access token, and Maxio Core connection settings needed for secure data exchange. This process establishes the credentials Maxio Core uses to sync customers, invoices, payments, and items. Completing the connection is required before configuring NetSuite sync settings.
Before you begin
Before starting, confirm that you have the required administrator access in both NetSuite and Maxio Core:
- NetSuite Administrator access
- Maxio Core Administrator access
- Access to create or update a NetSuite role
- Access to create NetSuite integration records and access tokens
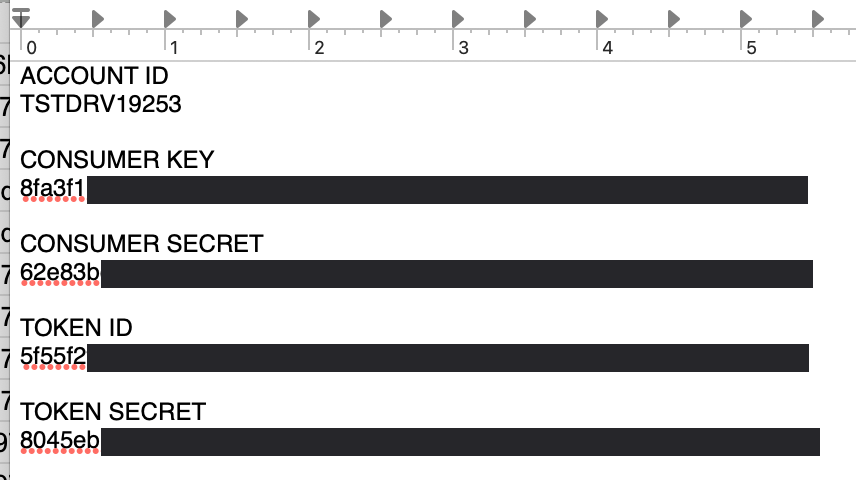
Important: During this setup, copy and save the following values in a secure text editor. You will enter them in Maxio Core later:
- Account ID
- Consumer Key
- Consumer Secret
- Token ID
- Token Secret
By the end of the NetSuite setup steps, your notes should include each of these values.
Prepare NetSuite
Step 1 - Enable SOAP web services
Maxio Core uses NetSuite SOAP Web Services to connect to NetSuite. Confirm that SOAP Web Services is enabled before creating the integration credentials:
- In NetSuite, go to Setup > Company > Enable Features.
- Click the SuiteCloud subtab.
- Check the SOAP Web Services box.
- Click Save.
Step 2 - Create a NetSuite integration role
Create a dedicated NetSuite role for the Maxio Core integration. This role controls what Maxio Core can read from or write to in NetSuite.
The role must have adequate privileges for your NetSuite integration setup. The required privileges vary based on the Maxio Core features you plan to use and the specific NetSuite field mappings configured in Maxio Core. For example, a read-oriented role may be sufficient if Maxio Core is being used for analytics only. If Maxio Core will sync orders, invoices, payments, journal entries, or other records to NetSuite, the role will also need the appropriate write permissions.
NetSuite permissions may need to be adjusted during implementation depending on your NetSuite configuration, enabled Maxio Core sync features, custom fields, subsidiaries, item structure, and field mappings.
- In NetSuite, go to Setup > Users/Roles > Manage Roles > New.
- Create a new role for the Maxio Core integration. A common role name is Maxio Core SuiteTalk Access.
- Configure the required permissions for the integration role. The permissions required depend on the Maxio Core features you plan to use.
- For a complete list of recommended permissions and implementation guidance, see Required NetSuite role permissions below.
- Click Save.
We recommend reviewing Required NetSuite role permissions before creating your integration role. It includes recommended permission levels, feature-specific guidance, and implementation best practices.
Step 3 - Assign the role to a NetSuite user
After creating the integration role, assign it to the NetSuite user that will be used for the Maxio Core integration. This may be an administrator user or a dedicated integration user, depending on your internal NetSuite access policies.
- Go to Setup > Users/Roles > Manage Users.
- Edit the user that will be used for the Maxio Core integration.
- Open the Access tab.
- Add the new Maxio Core integration role, such as Maxio Core SuiteTalk Access.
- Click Save.
Step 4 - Get account ID
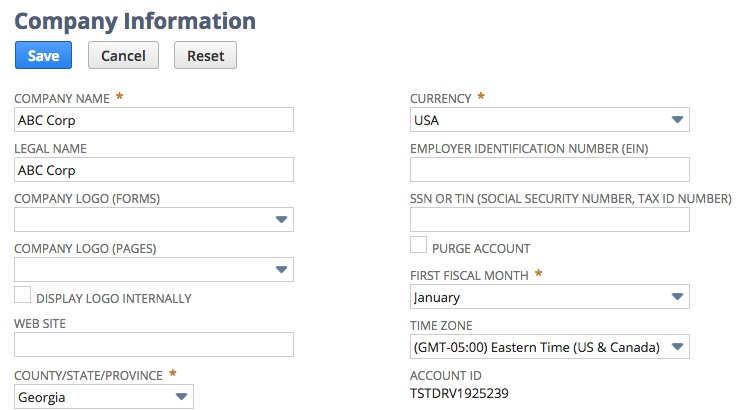
There are a couple of ways to find your NetSuite Account ID. You can find it under your account information, located in the top-right corner. Or, you can also do the following. In either case, record your Account ID in your text editor:
- Go to Setup > Company > Company Information.
- From the screen, copy the Account ID to your text editor.
Step 5 - Create the NetSuite integration record and copy Consumer Key and Consumer Secret
-
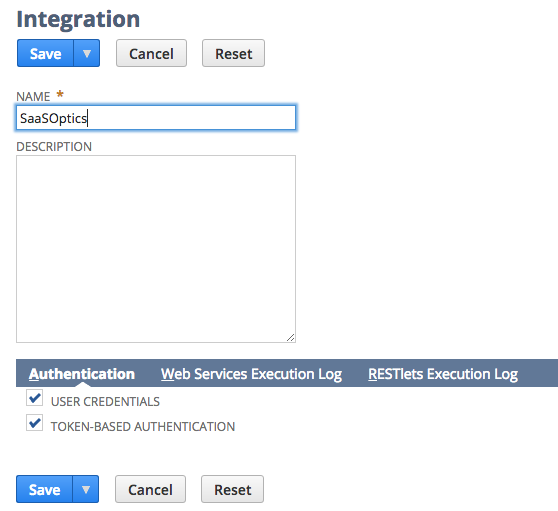
Go to Setup > Integrations > Manage Integrations > New.
-
Set fields as follows:
-
Name = Maxio Core
-
User Credentials = Check the box.
-
Token Authentication = Check the box.
These are the only settings that should be configured.
-
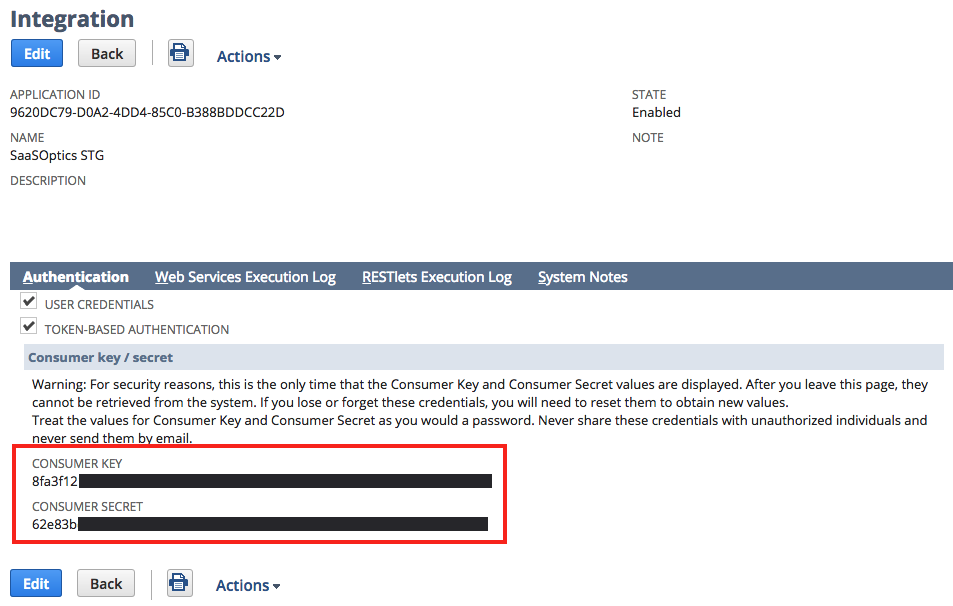
Click Save.
-
Copy the Consumer Key and Consumer Secret to your text editor immediately.
WARNING: You will not be able to access these keys once the screen has been exited.
-
Step 6 - Create the NetSuite access token and copy Token ID and Token Secret
-
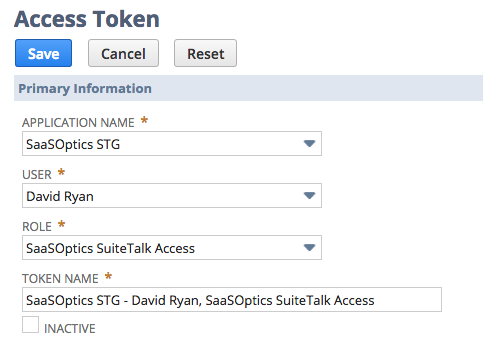
Go to Setup > Users/Roles > Access Tokens > New.
-
Set fields as follows:
-
Application Name = Maxio Core
-
User = Select the user assigned to the Maxio Core integration role.
-
Role = Select the custom role you created in NetSuite with the appropriate privileges to support the Maxio Core integration.
-
Token Name - Will be generated automatically based on the field input for the previous three fields.
-
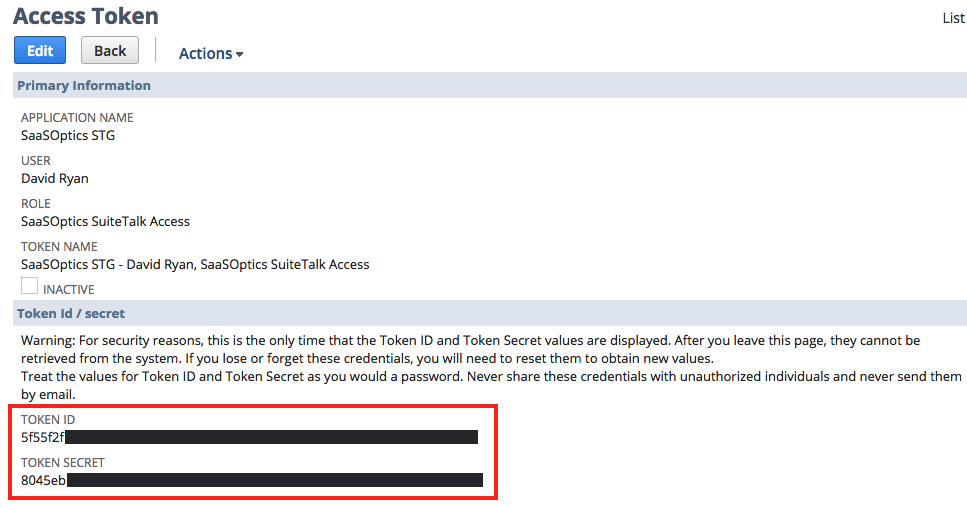
Click Save.
-
Copy the Token ID and Token Secret to your text editor.
WARNING: You will not be able to access these tokens once the screen has been exited.
-
Configure Maxio Core
After retrieving your account ID, consumer key, consumer secret, token ID, and token secret from NetSuite, log in to your Maxio Core account.
Important: The following information must be entered by a Maxio Core user with an Administrator profile.
Step 7 - Update NetSuite integration settings
-
Go to Admin > Integrations > Oracle NetSuite.
-
From the NetSuite Integration page, click the Update Settings icon.

-
Set fields as follows:
- Account ID = From your text editor, copy and paste in the NetSuite Account ID. Then click Get Domains for Account. This populates the System and Webservices domains.
- System Domain = Accept the preset value.
- Webservices Domain = Accept the preset value.
- Automatically Generate Maxio Profiles for Items = Uncheck the box.
- Prepend Parent Item Name = Check the box.
- Append Item Internal ID = Check the box.
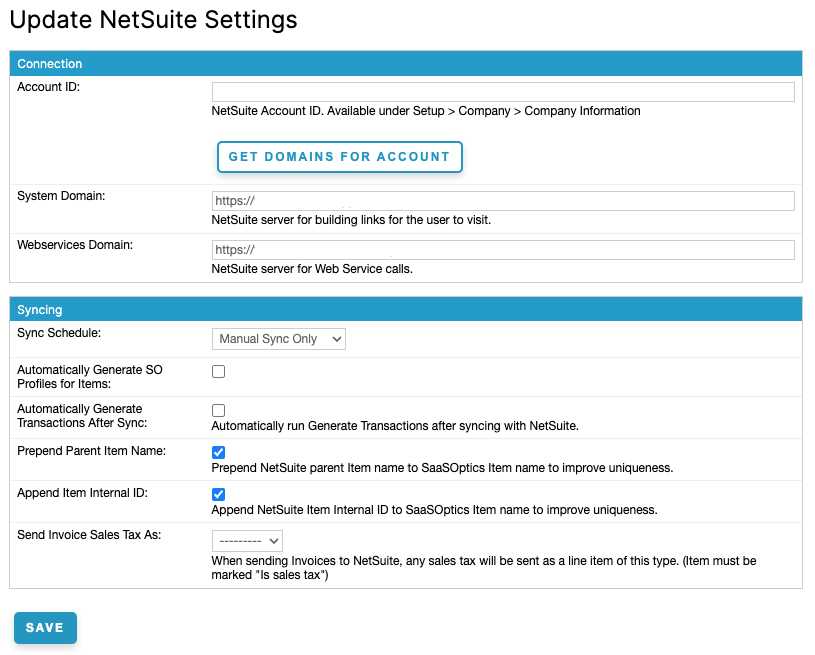
- Click Save.
Step 8 - Enter the NetSuite integration record credentials
- From the NetSuite Integration page, click the Integration Record Setup icon.
- From your text editor, copy and then paste into Maxio Core the NetSuite Consumer Key and Consumer Secret you recorded in Step 5 above.
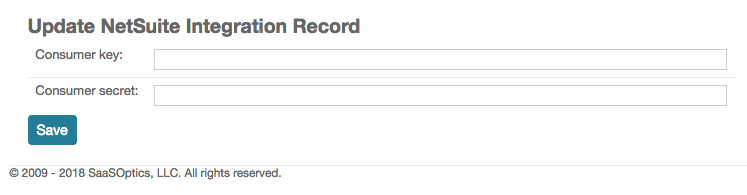
- Click Save.
Step 9 - Enter the NetSuite access token credentials
- Next, click the Access Token Setup icon.
- From your text editor, copy and then paste into Maxio Core the NetSuite Token ID and Token Secret.
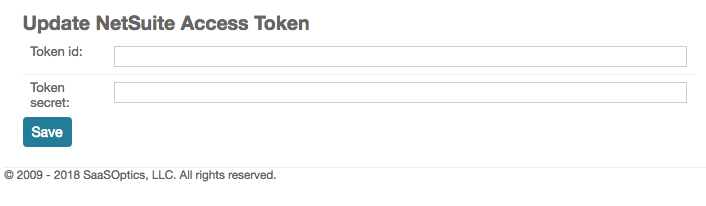
- (Optional) Enter a Token Role Name as your own reference note for which NetSuite role this token was created under. This is not sent to NetSuite and has no effect on the integration. NetSuite always derives the role from the token itself.
- Click Save.
Validate the connection
After saving the integration record and access token credentials, confirm that the NetSuite integration is connected successfully:
- Verify the NetSuite integration page shows the expected connection values.
- Confirm the System Domain and Webservices Domain populated after entering the Account ID.
- Confirm the integration record and access token credentials were saved without error.
- If available, run a connection or sync test before enabling scheduled syncs.
Required NetSuite role permissions
When connecting Maxio Core to NetSuite, we recommend creating a dedicated NetSuite integration role rather than using a standard Administrator role. A dedicated integration role helps limit access to only the permissions required for the Maxio Core integration while making it easier to audit, troubleshoot, and maintain access over time.
The permissions required depend on the Maxio Core features you enable. Organizations syncing customers and invoices may require fewer permissions than organizations also syncing journal entries, projects, custom records, multi-currency, or multi-subsidiary data.
Your implementation may need permissions beyond what's listed here, depending on your NetSuite customizations, workflows, scripts, enabled features, and custom field mappings.
Recommended role name
We recommend creating a dedicated role such as:
Maxio Core SuiteTalk AccessAssign this role only to the NetSuite user that Maxio Core uses for authentication.
Permission levels
Before assigning permissions, it is helpful to understand NetSuite permission levels.
| Level | Description |
|---|---|
| View | Allows Maxio Core to read records. |
| Create | Allows Maxio Core to create new records. |
| Edit | Allows Maxio Core to update existing records. |
| Full | Allows Maxio Core to create, edit, delete, and view records. |
As a general rule, analytics-only integrations typically require mostly View permissions. Synchronizing invoices, customers, payments, journal entries, or other records generally requires Full access to those record types.
Required permission categories
The Maxio Core integration role typically requires permissions from the following NetSuite categories:
- Transactions
- Lists
- Reports
- Setup
The exact permissions within each category depend on the Maxio Core features you enable.
Transaction permissions
The Transactions tab controls which transactional records Maxio Core can access or synchronize.
| Record type | Typical level | Required for |
|---|---|---|
| Invoices | Full | Invoice synchronization |
| Credit Memos | Full | Credit memo synchronization |
| Customer Payments | Full | Payment synchronization |
| Sales Orders | Full | Sales order synchronization, if enabled |
| Cash Sales | View or Full | Only if a sync step's NetSuite Type is manually set to Cash Sale instead of the default record type |
List permissions
The Lists tab provides access to reference records used throughout NetSuite.
| Record type | Typical level |
|---|---|
| Customers | Full |
| Items | Full |
| Currency | View |
| Departments | View |
| Classes | View |
| Locations | View |
| Subsidiaries | View |
| Employees | View |
Report permissions
Depending on your implementation, Maxio Core may require access to reporting objects in NetSuite.
| Permission | Typical level |
|---|---|
| Financial Statements | View |
| Saved Searches | View |
| Report Customization | View |
Setup permissions
The Setup tab allows the integration to access NetSuite configuration data and authentication-related records.
| Permission | Typical level | Required for |
|---|---|---|
| SOAP Web Services | Full | Connecting Maxio Core to NetSuite |
| User Access Tokens | Full | Creating and managing access tokens |
| Integration Records | Full | Creating and managing the NetSuite integration record |
| Custom Fields | View or Full | Accessing mapped custom fields |
| Custom Records | View or Full | Accessing mapped custom records, if applicable |
| Company Information | View | Viewing account and company configuration |
Feature-specific permissions
Additional permissions may be required depending on which Maxio Core features are enabled.
| Feature | Additional permissions may be required |
|---|---|
| Multi-Currency | Currency records and exchange rates |
| General Ledger | Journal Entries and Accounts |
| Revenue Recognition | Revenue accounts and accounting periods |
| Multi-Subsidiary | Subsidiaries |
| Custom Fields | Custom field permissions |
| Custom Records | Custom record permissions |
| Projects | Jobs or Projects |
NetSuite customizations
Many NetSuite environments include customizations that can affect integration access, including:
- Custom forms
- SuiteFlow workflows
- SuiteScript customizations
- Custom records
- Approval workflows
These customizations may require additional permissions beyond those documented here. If Maxio Core encounters authorization or permission errors during synchronization, review any customizations that may restrict access to the affected records.
Best practices
Keep these practices in mind when managing the integration role:
- Create a dedicated integration role instead of using the Administrator role.
- Create a dedicated integration user instead of using an individual employee account.
- Grant only the permissions required for the Maxio Core features you use.
- Document any custom permissions added during implementation.
- Periodically review the role as your NetSuite implementation evolves.
Related information
If synchronization fails with permission or authorization errors, see Troubleshooting and FAQs.
Next steps
You are now connected. Next, configure the sync between Maxio Core and NetSuite.
Continue to Configure the NetSuite Integration.
Still need help?
Reach out and our support team will take it from here.