
Set Up Anrok in Maxio Invoicing Suite
Applies to: Advanced Billing
Last updated on Sep 19, 2026
Connect Anrok to a Maxio site, test the connection, update Anrok credentials, or disable the integration.
Before you start
Review the prerequisites and limitations in Anrok Integration Overview before enabling Anrok.
- EA access enabled by Maxio Support/CSM
- Advanced Billing is enabled on your Maxio site
- An Advanced Billing API key
Implementation order
Follow these steps in order so your tax origin address and Plan tax categories are in place before tax begins calculating on live invoices.
- Get an Anrok API key.
- Enable the Anrok integration in Maxio.
- Connect Maxio as a data source in Anrok, and assign Plan tax categories.
- Configure the tax origin address and other tax calculation data.
- Test in Sandbox before going live.
Step 1: Get an Anrok API key
In your Anrok account, generate an API key (format typically sellerId/apiKeyId/secret.secret).
Step 2: Enable Anrok in Maxio
- In Maxio Advanced Billing, go to Taxes.
- Click Enable Anrok.
- Enter your Anrok API key.
- (Optional) Enter a Start syncing transactions from date. Invoices dated before this date are still taxed as usual, but aren't sent to Anrok. Changing this date later doesn't resend already-skipped invoices or remove already-synced ones. Leave it blank to sync every invoice.
- Click Connect Anrok.
- Once connected, confirm your site's tax type changes to Anrok.
Important: payment-confirmation-based (cash-basis) invoice syncing exists as an optional capability for Anrok, but it's enabled per-site by Maxio Support, not something you can turn on yourself from this form. If your business needs invoices to sync to Anrok only once they're paid, contact Maxio Support to have it enabled first — once it's on, it can't be reverted.
Test the connection
Use Test Connection to verify your API key before saving. This sends a live authentication request to Anrok without creating or updating your connection — if it fails, correct the key before clicking Connect Anrok.
Step 3: Connect Maxio as a data source in Anrok
-
In Anrok, go to Data sources.
-
Click Integrate System.
-
Under Data Source, select Maxio Advanced Billing.
-
Input the following:
-
Click Connect.
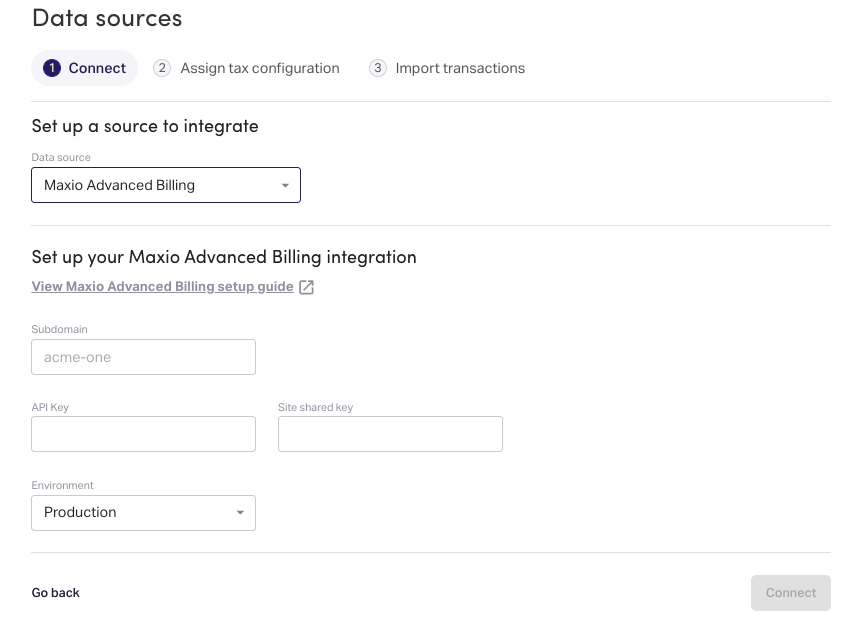
Step 4: Assign plan tax categories in Anrok
After your first sync from Maxio:
-
In Anrok, the connection is in phase 2, Assign Tax Configuration.
-
Review the imported Plan/Product list.
-
Assign each to a Plan Type and Tax Category.
-
Click Continue.
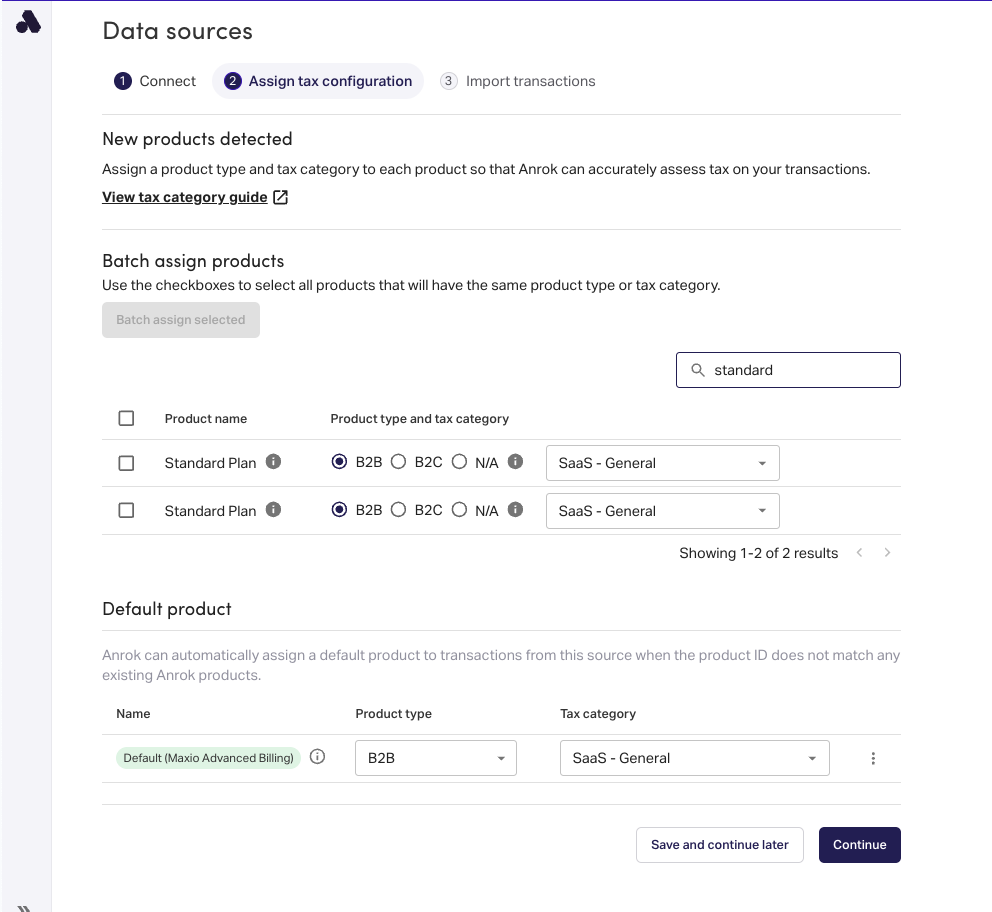
Step 5: Import transactions into Anrok
- In Anrok, the connection is in phase 3, Import Transactions.
- Use the recommended option from Anrok.
- Select Mark as finished.
Edit or rotate your Anrok API key
- Go to Taxes.
- In the Anrok Tax Automation card, click Edit.
- Enter the new API key, and update the Start syncing transactions from date if needed.
- Click Save Configuration.
Disable Anrok
- Go to Taxes.
- In the Anrok Tax Automation card, click Disable.
- Confirm disabling. This removes your Anrok credentials, resets your site's tax type to Custom, and stops automatic tax calculations through Anrok. You can reconnect Anrok later.
Still need help?
Reach out and our support team will take it from here.