Connecting Maxio to Stripe lets your customers pay an e-Bill by credit card or ACH, with Stripe acting as the payment processor. Maxio Support activates the integration, and you complete the connection and settings yourself.
To connect Maxio to your Stripe account
-
Contact support@maxio.com and ask them to activate the Stripe for Payments integration in your account.
-
Click e-Invoicing Payment Provider Settings in the Invoicing section of the Admin screen.
-
On the Payment Providers screen, click Connect to Stripe.

-
Log in to your Stripe account, selecting the account you want to use for this integration if you have more than one. Maxio is now connected to Stripe, and Connect to Stripe is replaced by Disconnect.
-
Click Configure and address the following settings:
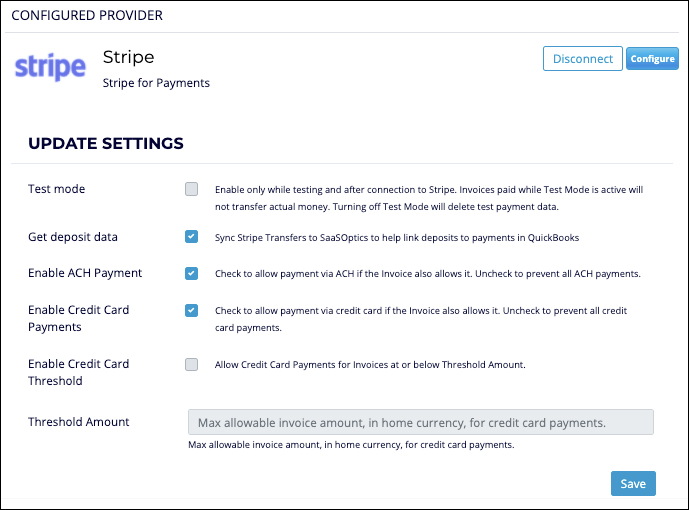
- Get deposit data - Syncs Stripe transfers to Maxio, which is what links deposits to payments in QuickBooks. Enabled by default.
- Enable ACH Payment - Allows payment by ACH, provided the Invoice also allows it. Clearing it prevents all ACH payments. Enabled by default.
- Enable Credit Card Payments - Allows payment by credit card, provided the Invoice also allows it. Clearing it prevents all credit card payments. Enabled by default.
- Require Address for Card Payments - Requires customers to provide a billing address when paying by card.
- Enable Credit Card Threshold - Allows credit card payment only for Invoices at or below the Threshold Amount. It applies to remittance customers only and has no effect on customers using Autopay. See Payment Providers for how the threshold behaves.
- Threshold Amount - The highest Invoice amount, in your home currency, that can be paid by credit card.
- Enable Credit Card Payment Window - Offers credit card payment only within a set number of days of the Invoice date, to encourage faster payment.
- Payment Window Theme - The e-Bill theme the payment window applies to. Leave it set to Apply to All Themes to use it everywhere.
- Days Available - How many days past the Invoice date the credit card option stays available.
-
Click Save.
If you have not already done so, match the following settings on the e-Bill Settings screen to your Stripe setup:
- Show Credit Card Payment Fields
- Show ACH Payment Fields
- Enable Credit Card Payments
- Enable ACH Payments
Test Stripe
Test mode is a Support-controlled setting, so ask Maxio Support to enable it when you are ready to test and to turn it off afterwards. Invoices paid while test mode is active move no real money, and turning test mode off deletes the test payment data.
WARNING: Request a sandbox account from Support for this. Do not connect a production account, one you actively use for invoicing and financial management, to Stripe in test mode. Test payments and deposits recorded against real data in your account cannot be removed.
To test the Stripe connection
- Ask Support to turn on test mode for your account.
- In Maxio, create a Customer, selecting Do Not Sync so the Customer does not reach your general ledger if you are in production.
- Add one or more Transactions to the Customer and generate an Invoice.
- Edit the Invoice and select Do Not Sync so the Invoice does not reach your general ledger either.
- Send the e-Bill to your own email address.
- Pay the e-Bill with a Stripe test credit card or bank account number, confirming there is a Test indicator in the top right of the Invoice.
- Wait about 15 minutes for the data to reach your account. The Invoice in Maxio then shows the payment information.
- Delete the test Customer, and ask Support to turn test mode back off.
Still need help?
Reach out and our support team will take it from here.
Contact support