
Sync QuickBooks Invoices
Applies to: Maxio Core
Last updated on Sep 19, 2026
An Invoice has to meet specific conditions before it syncs between Maxio and QuickBooks, like using Items that originated in QuickBooks, falling within the right date range, and having the right sync settings on the record and the account. Miss most of these conditions and the Invoice simply doesn't sync, with no error or alert. The QuickBooks Closing Date condition works differently: an Invoice that violates it is still sent to QuickBooks, rejected there, and shows up as a visible sync issue in Maxio. For how Credit Memos differ from the Invoice behavior on this page, see Sync QuickBooks Credit Memos.
Invoice sync conditions
An Invoice syncs from Maxio to QuickBooks once all of the following are true:
- The Invoice hasn't already synced.
- The Invoice Date is on or before the date you run the sync, and after the "Send Invoices Filter Date" setting in Configure QuickBooks Integration Settings.
- The Invoice contains only Invoice Line Items that use Items originally created in QuickBooks. If an Invoice contains even one Invoice Line Item using an Item created in Maxio, the whole Invoice doesn't sync.
- The Invoice contains only Invoice Line Items that use Items with Sync Invoices set to Yes.
- The Customer doesn't have Do Not Sync selected.
- The Invoice doesn't have Invoice Do Not Sync selected.
- Syncing the Invoice wouldn't violate the QuickBooks Closing Date.
An Invoice syncs from QuickBooks to Maxio once both of the following are true:
- The Invoice Date is after the "Send Invoices Filter Date" setting. Invoices dated before this are discarded.
- The Invoice's last-modified timestamp in QuickBooks is after the last-synced timestamp stored in Maxio. You can view the QuickBooks timestamp on an Invoice's View screen in Maxio.
Effect of the item sync setting on Invoice Line Items
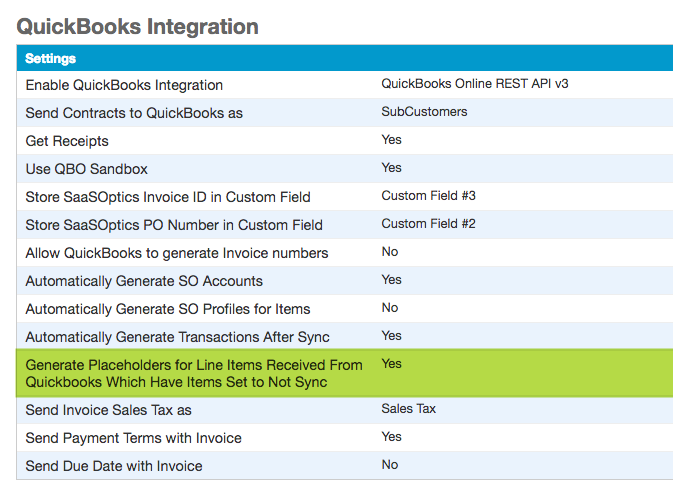
An Invoice created in Maxio with a mix of Items set to sync and not sync doesn't sync at all. An Invoice created in QuickBooks with that same mix does sync to Maxio, but any Invoice Line Item using an Item set to not sync gets an Amount of zero. Since Finance Reports use Invoice Line Item totals rather than QuickBooks Invoice totals, that Line Item shows as zero-value in your Finance Reports too. Depending on your QuickBooks Integration Settings, these non-syncing Line Items either don't appear at all or appear as zero-value Line Items.
Items without a Maxio Profile
A new Item synced in from QuickBooks needs a Maxio Profile before Invoice or Credit Memo data can sync. Until every Item has one, Maxio's Get Invoices and Get Credit Memos sync steps don't run, and the sync button itself is disabled. Customer sync isn't affected and continues normally either way.
Maxio's home page lists Items needing a Profile under Action Required. Once every Item has a Profile, sync again and Invoice and Credit Memo data flows normally. See Configure QuickBooks Integration Settings Fields to have Maxio create these Profiles automatically instead of manually.
You can also create an Item directly in Maxio, but an Invoice Line Item using a Maxio-created Item never syncs to QuickBooks. Reserve Maxio-created Items for cases where you don't want that data in QuickBooks at all, such as forecasts, historical data entry, or other one-off scenarios.
Closing dates
See Closing dates and locks for what the Maxio Closing Date and QuickBooks Closing Date do generally. For Invoices specifically: the QuickBooks Closing Date affects both syncing Invoices to QuickBooks and how Invoices can be created in Maxio. The Maxio Closing Date affects how Invoices synced from QuickBooks are treated, and also how Invoices can be created in Maxio.
QuickBooks Online only: the QuickBooks Online Closing Date field doesn't sync to Maxio, since the QuickBooks Online API doesn't expose it. Enter your QuickBooks Online Closing Date manually in Configure QuickBooks Integration Settings to keep the two in sync.
Two account-level settings prevent all Invoices before a specified date from syncing, in either direction: Sync Invoices to QuickBooks Only After Date and Sync Invoice from QuickBooks Only After Date. Both are typically set during initial implementation to prevent historical data from syncing, and can also support a close process.
Two per-Invoice settings give you finer control before an Invoice has synced: Invoice Do Not Sync prevents that Invoice from syncing to QuickBooks. Invoice Sync Immediately forces the Invoice to sync on the next sync, even if its date is in the future, though it doesn't override other sync conditions like Customer Do Not Sync or Item Do Not Sync.
Invoice numbering
Each Invoice in Maxio has both a Maxio Invoice Number and a QuickBooks Invoice Number, since Maxio requires Invoice Numbers to be unique but QuickBooks doesn't. By default, Maxio generates a unique Invoice Number and assigns it to both fields. You can also key in or edit an Invoice Number in Maxio, and the QuickBooks Invoice Number defaults to match it.
Sequential numbering across customers
Maxio generates Invoice Numbers when the Invoice is created, not when it syncs, which can change how your Invoice Numbers appear to progress. For example, a one-year Transaction with monthly invoicing for one customer might generate Invoice Numbers 1 through 12. A second customer's one-year Transaction, entered next, continues sequentially at 13 through 24, rather than starting a new sequence. For some organizations, this shift from numbers loosely correlating to a point in time, to no correlation at all, can be disruptive.
To address this, enable Allow QuickBooks to Generate Invoice Numbers in Configure QuickBooks Integration Settings. This changes Maxio's default behavior from assigning a matching QuickBooks Invoice Number, to leaving the QuickBooks Invoice Number blank when the Invoice is created in Maxio. QuickBooks then assigns the Invoice Number when the Invoice actually syncs, and sends that number back to Maxio. With this setting on, your Maxio Invoice Number and QuickBooks Invoice Number will differ.
QuickBooks only generates the Invoice Number if the QuickBooks Invoice Number field in Maxio is blank. Allow QuickBooks to Generate Invoice Numbers doesn't force that field blank. It only stops Maxio from populating it when an Invoice is created. If you key in a value and sync, QuickBooks creates the Invoice using the number you entered. If you've already scheduled future Invoices under the default behavior, you need to manually clear the QuickBooks Invoice Number field on any unsynced future Invoice for QuickBooks to generate its number instead.
QuickBooks' own Invoice Number generation isn't well documented by Intuit. In practice, QuickBooks remembers the last number entered on an Invoice created directly in QuickBooks and increments from there; enabling this setting picks up from that same counter. QuickBooks Invoice Numbers are alphanumeric.
Editing an Invoice after it syncs
Once an Invoice syncs from Maxio to QuickBooks, or from QuickBooks to Maxio, you can no longer modify its line items in Maxio. Edit it in QuickBooks instead:
- If you remove a line item from a synced Invoice in QuickBooks, the Line Item remains in Maxio with a value of zero.
- If you void a synced Invoice in QuickBooks, its Line Items remain in Maxio, each with a value of zero.
Deleted Invoices
QuickBooks Desktop distinguishes deleting from voiding: deleting removes the Invoice entirely, while voiding preserves it but zeros out its values. Voiding is preferred over deleting; issuing a credit memo is the best-practice approach. When you delete a previously-synced Invoice in QuickBooks Desktop:
- If it's dated after the Maxio Closing Date or the QuickBooks Closing Date, Maxio automatically deletes it too. Any Transaction linked to the deleted Line Item isn't deleted, so it will likely become out-of-balance.
- If it's dated on or before either Closing Date, Maxio doesn't delete it. It appears in the Invoices Deleted from QuickBooks list instead, where you can manually delete the Line Item.
QuickBooks Online deletes Invoices outright, with no void-first convention. A deleted Invoice doesn't sync to Maxio at all. If an Invoice previously synced to Maxio is later deleted in QuickBooks Online, Maxio deletes the Invoice and its Line Items, but any associated Transactions aren't deleted.
Currency and sales tax
If multi-currency is on in Maxio, the currency and FX rate sync with the Invoice. If multi-currency is off in Maxio but on in QuickBooks, only the currency syncs, and QuickBooks itself adds the FX rate and home value.
If sales tax is enabled in QuickBooks, QuickBooks calculates and generates sales tax at both the line item and Invoice total level during the sync, using the Customer's Sales Tax Code and Sales Tax Item settings stored in QuickBooks. You don't create separate Transactions or add other Invoice data in Maxio to handle sales tax.
Discounts
Sending invoices to QuickBooks
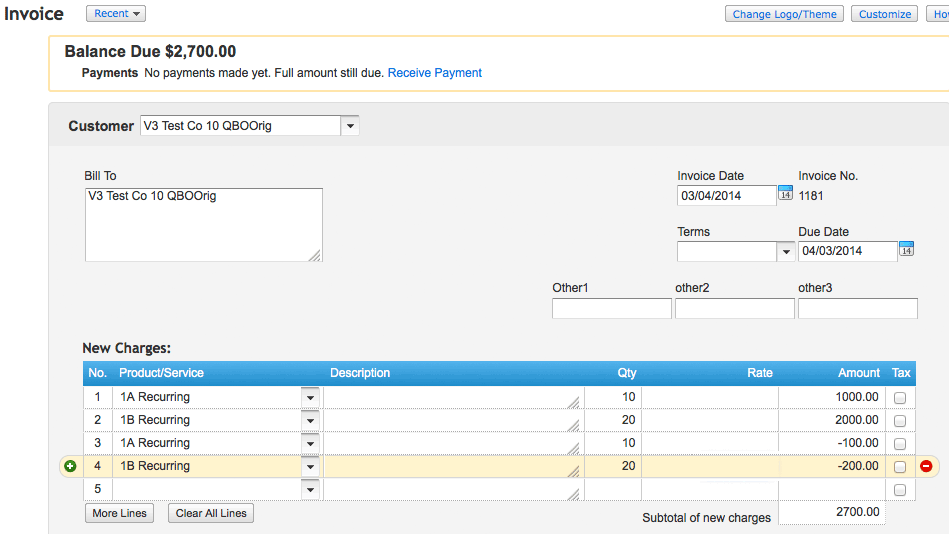
QuickBooks Online's own Discount function applies a discount to the total Invoice rather than to an individual Product, which creates revenue-reporting issues, so Maxio doesn't send Invoices that way. Set up Discount Products in QuickBooks Online instead, and enter the discount in Maxio as a negative Invoice Line Item:
QuickBooks Desktop Discount Items are supported on Invoices, but only sync when combined with other Invoice Line Items so the Invoice total is positive. A Discount Line Item without other Line Items for the same Customer Contract on the same day results in an error and stops the sync.
Important: Enter a Discount in Maxio as a negative Transaction Amount to generate the correct offsetting revenue. QuickBooks applies a Discount Line Item as a discount regardless of whether it's presented as a positive or negative value, so entering it as a positive value will leave your Transaction, Contract, and Customer out-of-balance after syncing.
Getting invoices and credit memos from QuickBooks Online
If an Invoice or Credit Memo pulled from QuickBooks Online includes a Discount line, Maxio reflects it as a negative Line Item using the Item selected in the Get Invoice/Credit Memo Discount As setting. This applies only to QuickBooks Online's US edition. See Sync QuickBooks Credit Memos for the Credit Memo side of this same setting.
If a synced Invoice or Credit Memo includes a discount and the Get Invoice/Credit Memo Discount As setting isn't configured, the sync stops until you set it.
QuickBooks Online custom fields
QuickBooks Online has three custom fields available for Invoices. Maxio can map your Invoice's PO Number to one of them, and can also store the synced Invoice's unique QuickBooks ID in one of the three. Enabling the Store Unique Invoice ID feature is recommended, since it works around a QuickBooks Online sync architecture limitation.
If you store the unique Invoice ID in a custom field and then copy an Invoice inside QuickBooks Online, the copy keeps the same Invoice ID. Maxio treats the copy as a duplicate and won't pull it in from QuickBooks Online. Avoid using QuickBooks Online's copy function, or clear the Invoice ID from the copy's custom field before your next sync.
QuickBooks Desktop templates
QuickBooks Desktop Invoices can specify a Template, which controls which fields appear on the Invoice and how it prints. Maxio assigns a Template using this order: the Template selected on the specific Invoice, then the default Template set for the Customer, then the default Invoice Template set for your Maxio account. If none of these are set, Maxio sends no Template reference at all, and QuickBooks Desktop applies whatever Template it would normally default to, which in QuickBooks 2013 and later is the last Template used by the last Invoice created directly in QuickBooks itself.
QuickBooks calculates the Rate if your Template includes a Rate column, and ignores Quantity if your Template doesn't include a Quantity column.
Invoice fields and functions that don't sync
The Enable Online Payment checkbox, Custom Fields, Job Numbers, Item Groups, Subtotals, and Add Online Payment Link to Invoices aren't supported in Maxio for QuickBooks Desktop Invoices.
Print and email queues
The Customer and Invoice To Be Printed and To Be Emailed settings in Maxio queue Invoices for printing or emailing once they reach QuickBooks:
- Inherit - Sets the Invoice's To Be Emailed property to the Customer's To Be Emailed setting.
- Yes - Sets the To Be Emailed Invoice property to Yes in QuickBooks.
- No - Doesn't set the To Be Emailed Invoice property in QuickBooks, even if the Customer's To Be Emailed setting is Yes.
These come from two Customer-record fields in Maxio, Invoice email preference and Invoice print preference, along with the email address used to send Invoices from QuickBooks. Neither field has an equivalent editable setting in QuickBooks itself, though removing a Customer's email address in QuickBooks turns off their Invoice email preference in Maxio.
QuickBooks Online: to print or email queued Invoices, select Sales > All Sales, select Filter, then filter by Delivery Method = Print Later or Send Later.
QuickBooks Desktop: to print queued Invoices, go to the QuickBooks File menu, select Print Forms, then Invoices. To email them, select Send Forms, then Email Invoices. Confirm your email setup works in QuickBooks before you sync Invoices you plan to email this way.
Related information
For the full set of sync conditions across all record types, see Sync QuickBooks Data.
For how Credit Memos differ from the Invoice sync rules above, see Sync QuickBooks Credit Memos.
For how the Customer an Invoice belongs to syncs, see Sync QuickBooks Customers.
Still need help?
Reach out and our support team will take it from here.