
Understanding Product Settings
Applies to: Advanced Billing
Last updated on Aug 27, 2026
Check what each Product setting does and how it affects billing. These settings appear when you create or edit a Product.
Product details
When entering Product Details, be as specific as possible. This data flows through to subscriber statements.
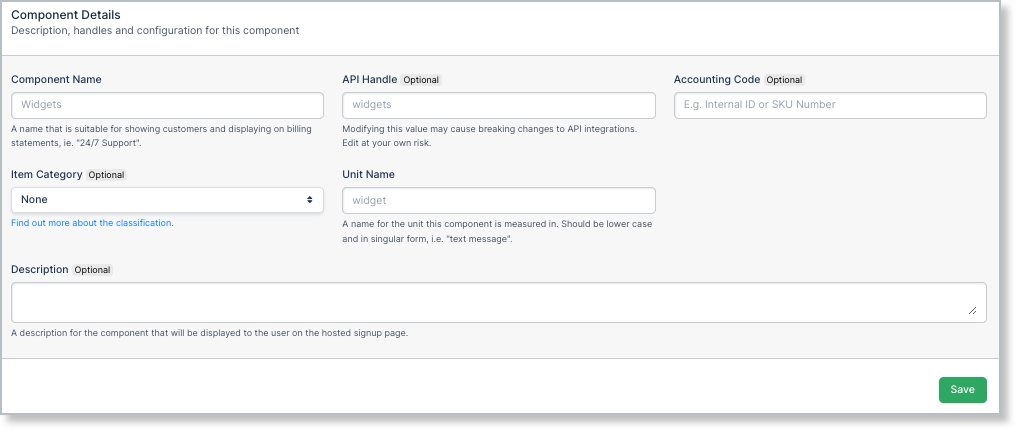
Give a Product Name that's compact and suitable for use on statements. The length of this field is purposefully restricted. The API Handle is automatically created and based on the Product Name.
You may select from the following Item Categories:
Item Category options
| Category | Description |
|---|---|
| Business Software | Software that is sold to businesses and used by employees to perform various business-related functions. |
| Consumer Software | Software sold to end-users for non-business purposes. |
| Digital Services | Any service where an exchange of information or content takes place digitally and typically over the internet. |
| Physical Goods | Goods that can be physically touched. |
| Other | Use this category when none of the previous categories satisfy the description of what you are selling. |
Next, for Unit Name, specify what the Product is measured in. This entry must be in lowercase and singular form. Advanced Billing may elect to properly pluralize this unit name when constructing reports. The On/Off Product type doesn't require units, so this option isn't available for it.
Finally, for Description, give your subscribers an exact idea of what Product they're purchasing. Provide as much detail as you can, since this information is displayed on the Public Signup Page, not the statement.
Price points
Product Price Points allow you to charge customers different amounts for the same Product. You can define multiple prices and pricing schemes, then choose which Price Point to use for each Subscription. You can specify up to 11 decimals for Product Price Points. Alternately, keep it simple and have just one Price Point for each Product.
Example: You sell a widget for $1.00 per unit, but for a segment of your customers you want to sell it for $2.00 or $3.00 per unit. In this case you'd have three Price Points:
- A default Price Point for $1.00 per unit.
- A second Price Point for $2.00 per unit.
- A third Price Point for $3.00 per unit.
New Subscriptions use the $1.00 per unit default pricing, unless you specify a different Price Point. You can change the Price Point associated with a Subscription at any time.
Using a single price point
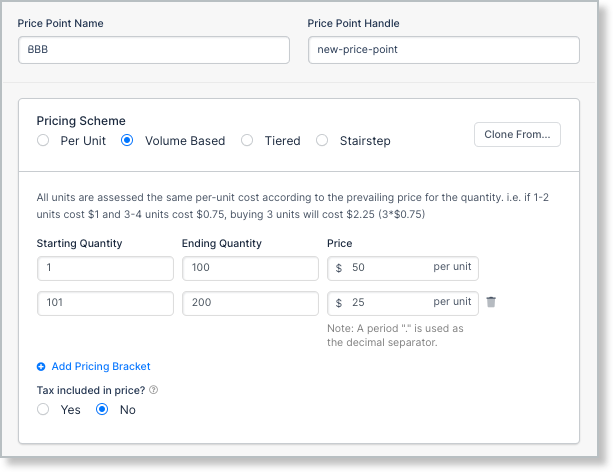
By default, the Product pricing editor creates one, static, Price Point for your Product. If you only have one price for a Product, enter the details required and save your Product.
Creating multiple price points
Create individual pricing schemes for each Price Point by adding another Price Point to your pricing setup.
As an example, you may have:
- Price Point AAA:
- Pricing Scheme: Per Unit
- Unit Price: $10.00
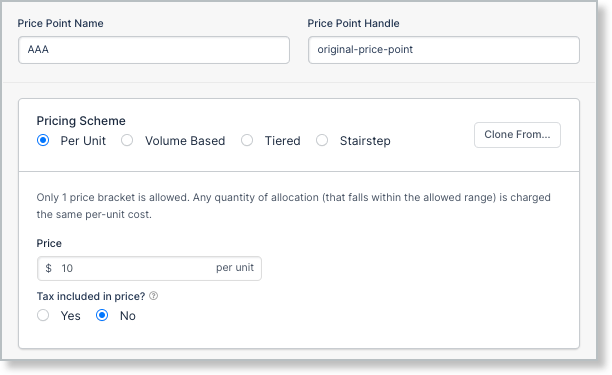
- Price Point BBB:
- Pricing Scheme: Volume
- Quantities 1 - 100: $50
- Quantities 101 - 200: $25
The above setup is expressed in the sample images below:
Setting the default price point
After you've set up multiple Price Points and saved your work, you can adjust which Price Point is the default for the Product. Take a look at the example below:
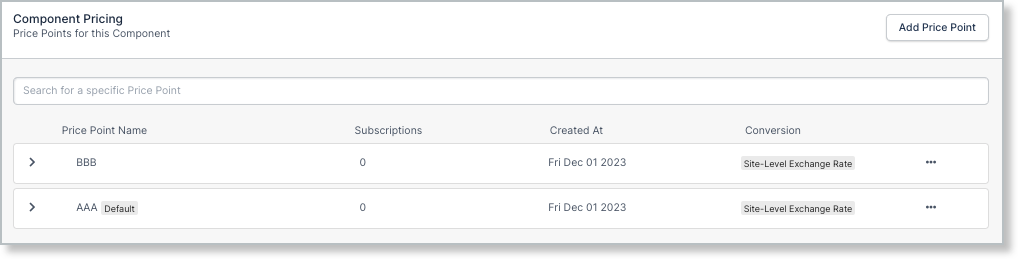
Here, "AAA" is the default Price Point. New subscribers are charged this Price Point by default.
To change the default Price Point, click the Actions menu (...) next to the Price Point you'd like to change, then select Make Price Point Default. This transitions the selected Price Point to the default.
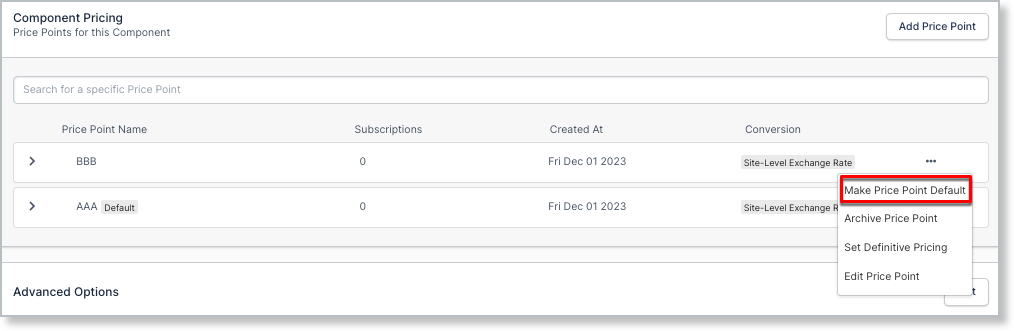
You can change the default Price Point for your Products at any time. This is a global change and affects only new subscribers to the Product.
Moving subscriptions between price points
When editing a Product, you can also move Subscriptions between Price Points.
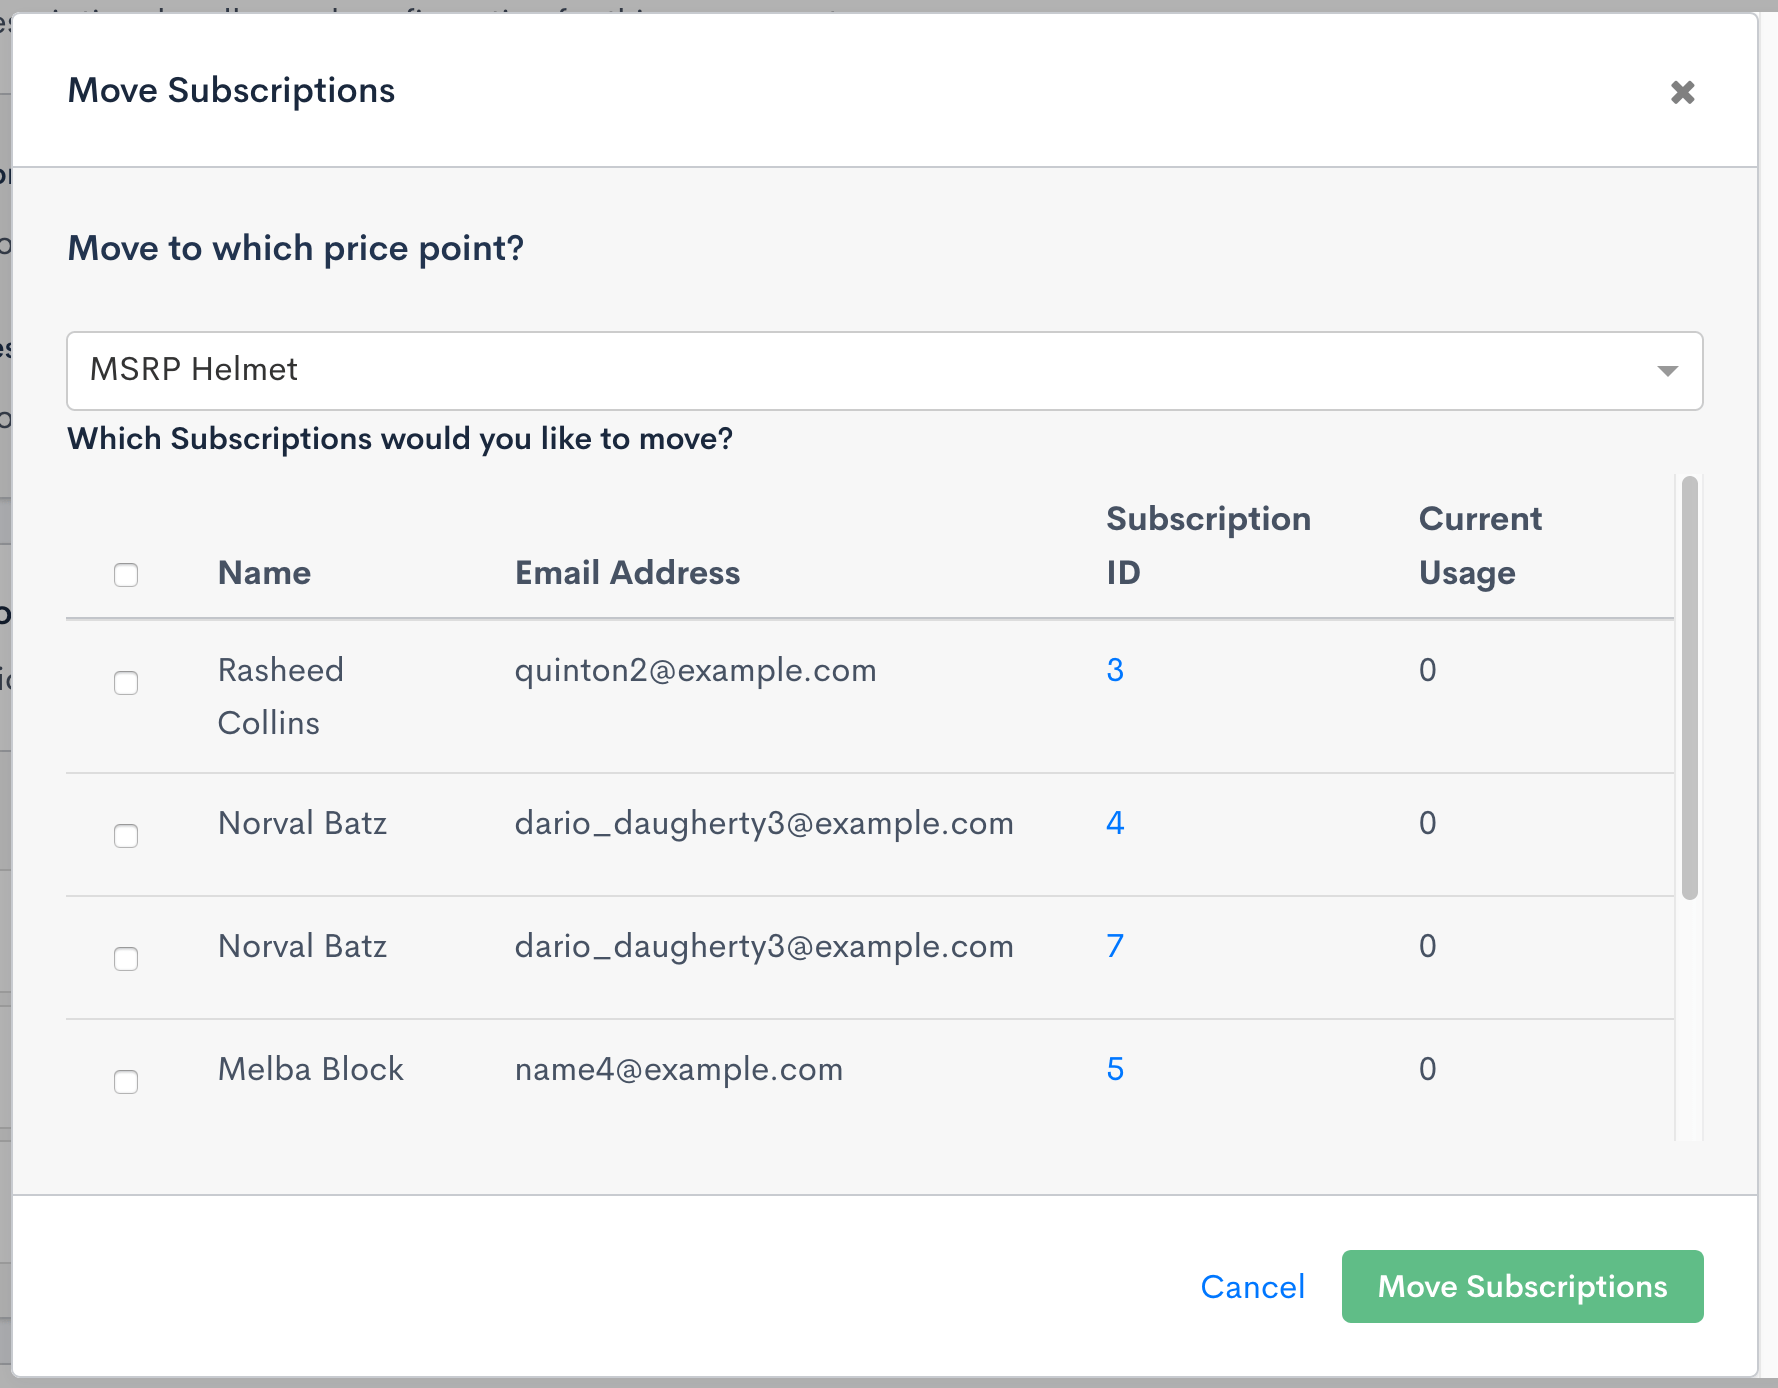
Move Subscriptions
Locking subscriptions into product price points
If you're using multiple Price Points, you may want to lock all existing Subscriptions that aren't currently using a Product into a Price Point, to ensure any possible future Product usage gets charged at a specific price. An example scenario is a Product price increase: you want to increase the price for any new Subscriptions, but ensure existing Subscriptions keep the original price if they ever use the Product.
- Subscriptions can be locked into a Price Point from the Product edit page.
- If any Subscriptions exist that aren't currently using the Product, a Lock Subscriptions option is available for each Price Point.
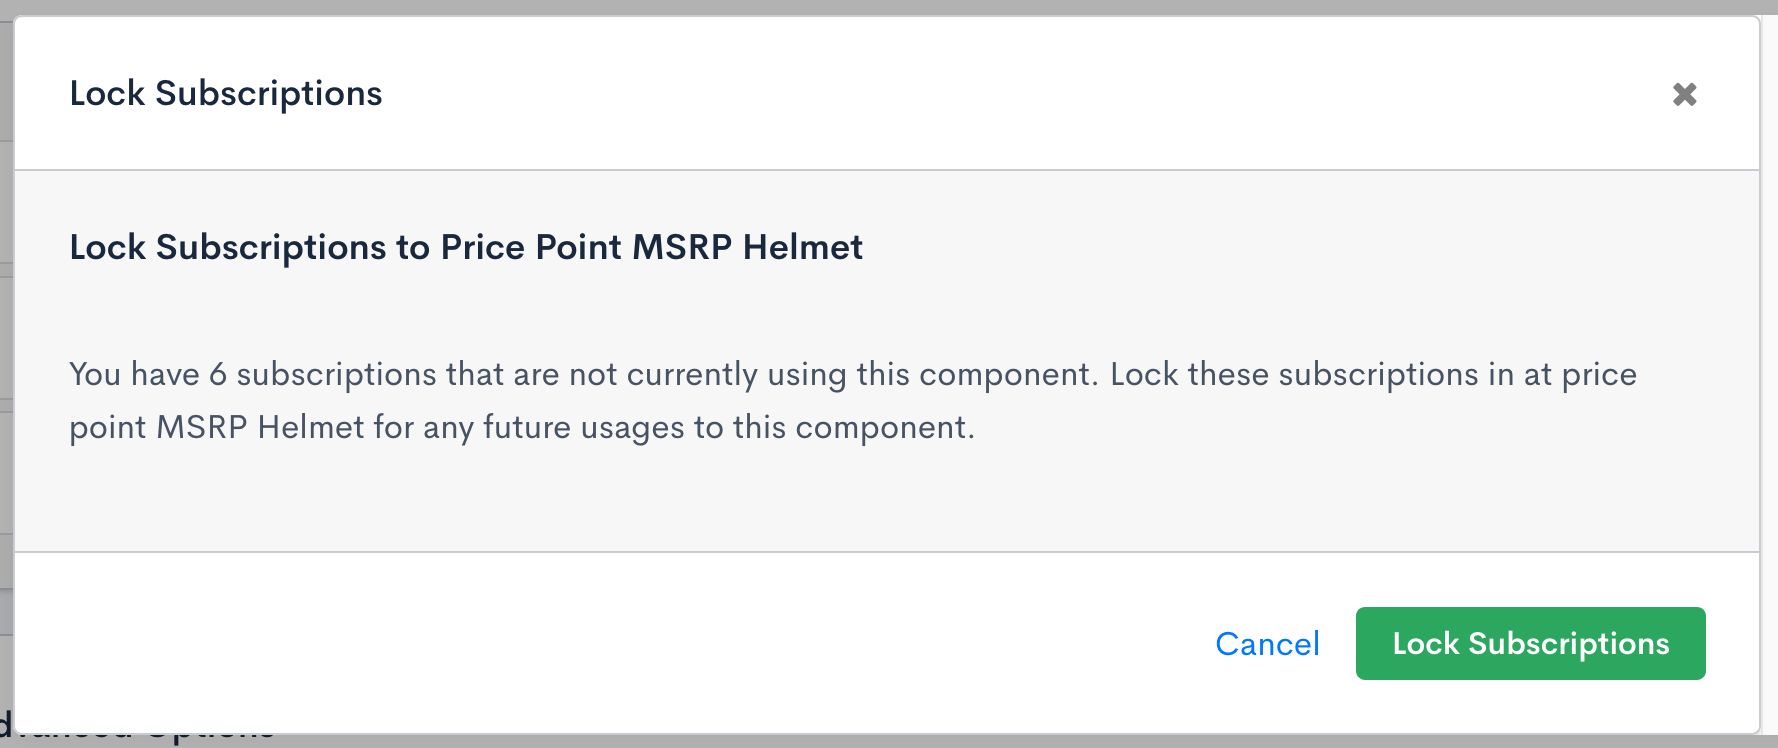
Lock in Subscriptions
Archiving or unarchiving a price point
At any time, you can archive a Price Point, as long as it isn't the default.
Archived Price Points can be viewed by toggling them in the application, and can be unarchived from the Actions menu (...).
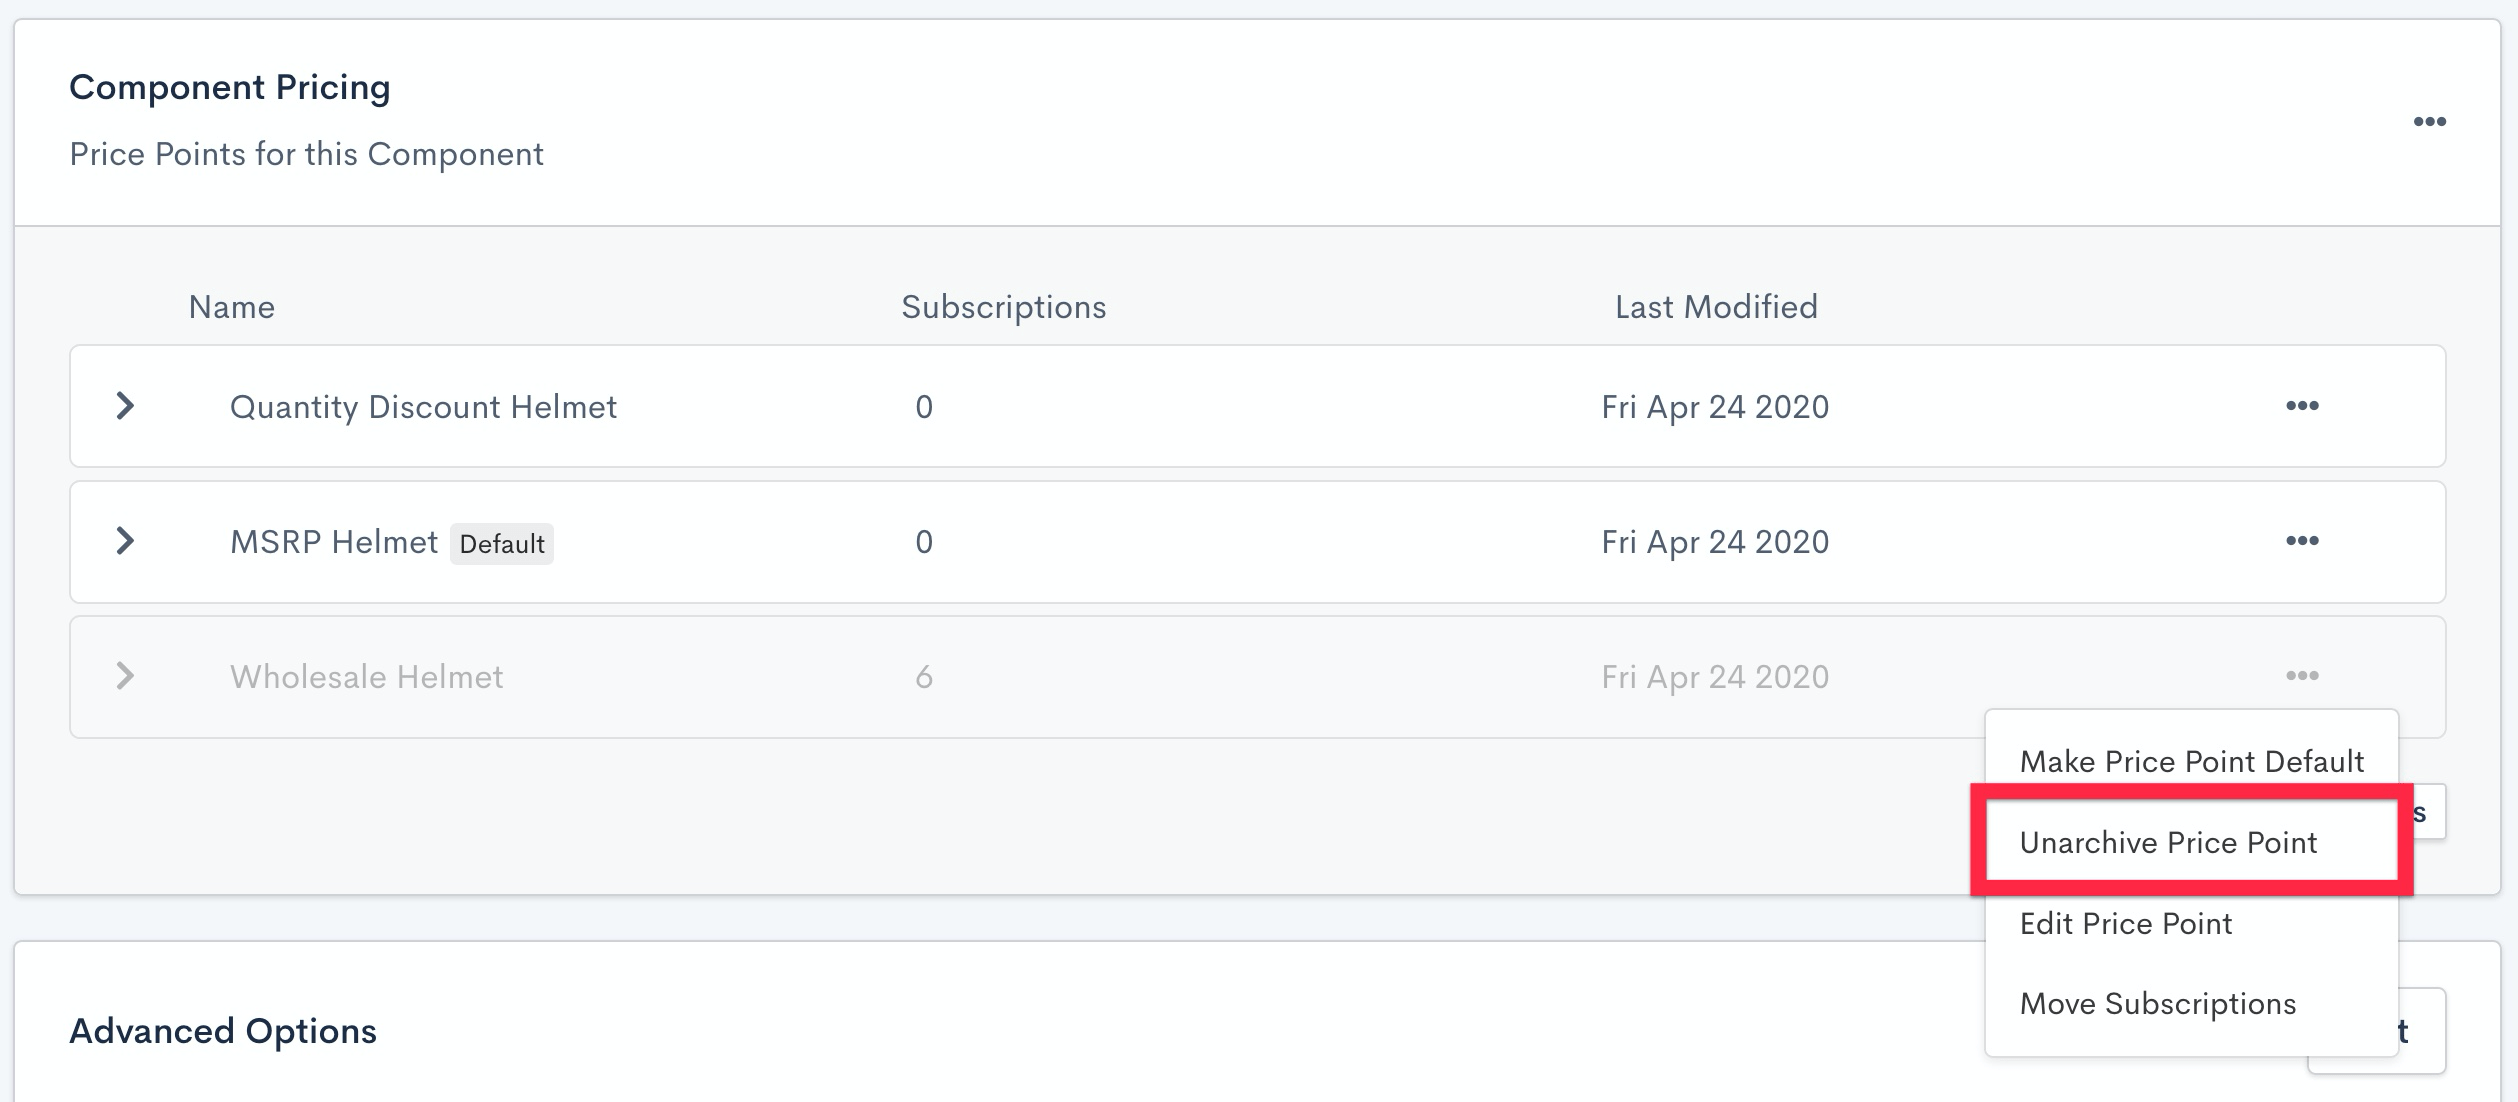
Select Unarchive Price Point to make it available again
User access
Define whether to allow a subscriber to update the Product amount in the Billing Portal.
Tax settings
Define whether the Product is subject to taxes.
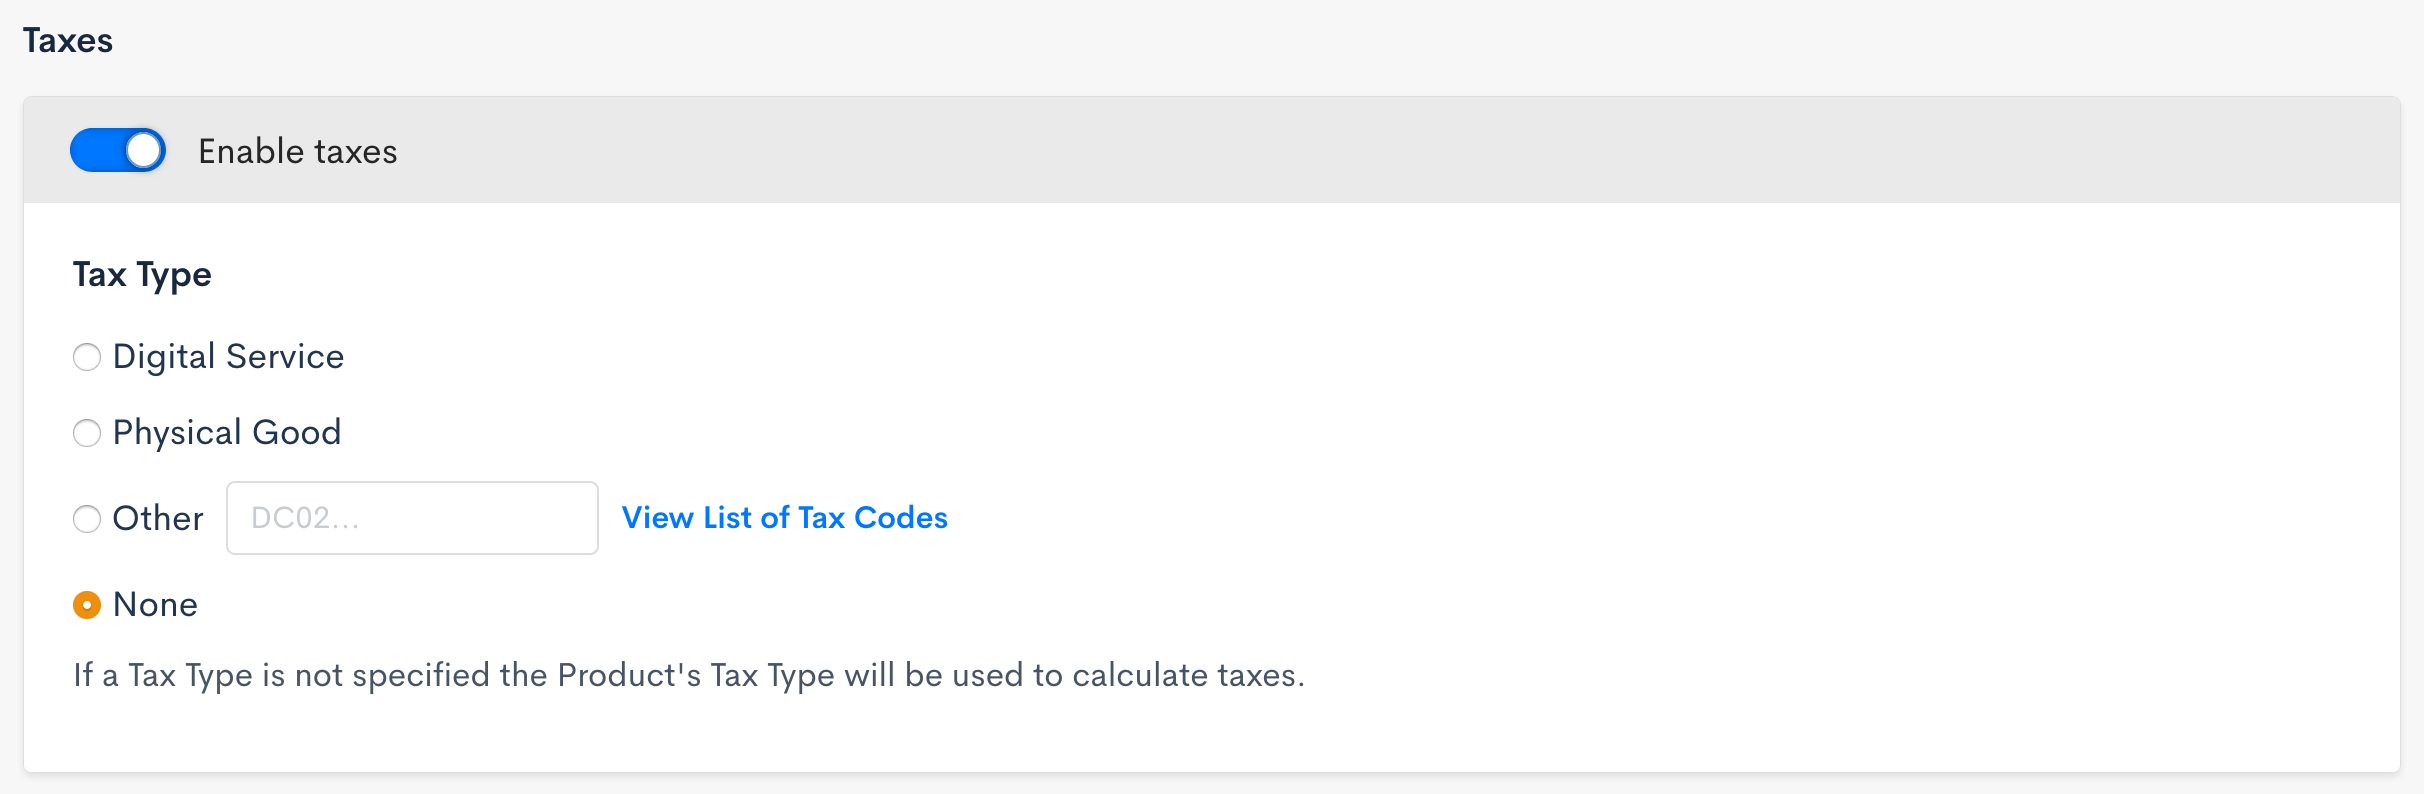
Select the tax setup for your Product, if applicable
Tax type
Select or fill in the appropriate tax for the type of Product offered. This is especially important when using the Avalara service to tax based on locale. If a tax type isn't specified, Advanced Billing uses the Plan's tax code to determine the tax rate for Product charges.
If you're not sure which Avalara tax code relates to your Product, click View List of Tax Codes to view Avalara's tax code search page.
Product proration
Choose to use the Configure Proration Schemes for Products site defaults, or make custom proration choices for your Product. When customizing Product proration, you have the option to select what happens when the Product price increases and when it decreases. Select a custom value, or individually rely on the site-level default settings.
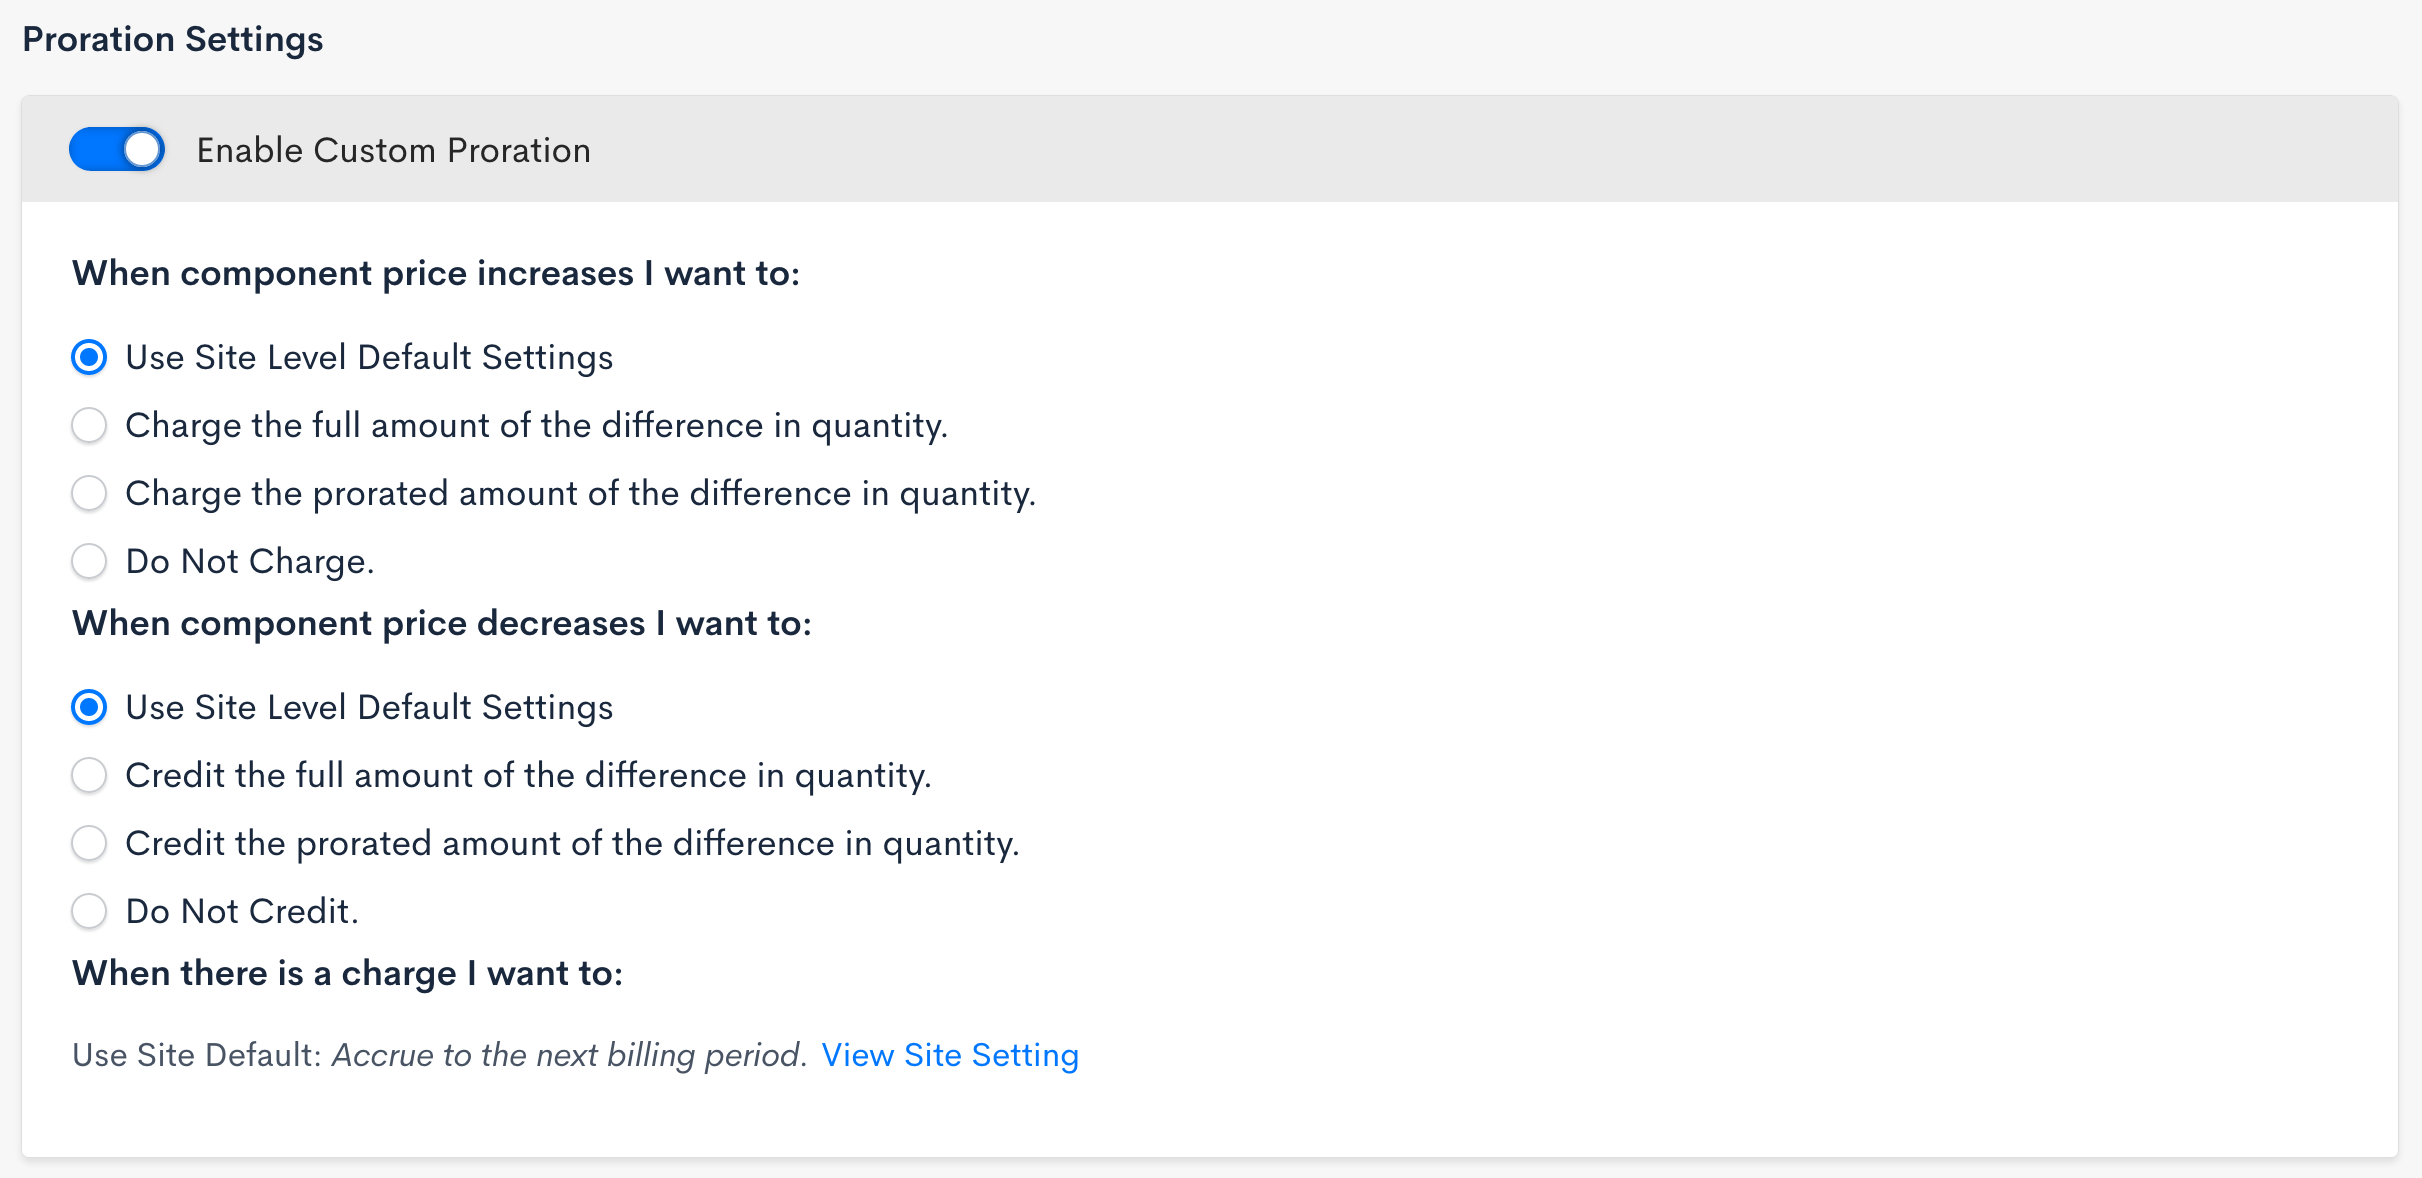
Select the desired behavior for the Product's proration settings
These settings override the site defaults. The setting for what to do when there's a charge can only be set from Configure Proration Schemes for Products.
Related information
See Understand Products for how Products fit into the Catalog overall.
Still need help?
Reach out and our support team will take it from here.