
Configure Salesforce CPQ for Advanced Billing
Last updated on Aug 24, 2026
Enable CPQ (Configure, Price, Quote) functionality in Salesforce so your quote configuration screen can add, edit, or upgrade Advanced Billing Subscriptions directly. This is optional, and only needed if your organization uses Salesforce CPQ.
Important: Follow these steps exactly as written. They configure Salesforce CPQ (SBQQ) directly, so none of it can be verified against Maxio's own codebase.
Add custom fields
Add two fields to the Quote Line object so CPQ can link a quote line to an Advanced Billing Subscription Preview.
To add the custom fields
-
Navigate to Setup > Object Manager > Quote Line (
SBQQ__QuoteLine__c). -
Create a new Lookup field to the Maxio Subscription Preview object, with these values:
- Field Label: Maxio Subscription Preview
- Field Name: Maxio_subscription_preview
-
Create a new formula field, with these values:
- Field Label: Maxio Subscription
- Field Name: Maxio_subscription
- Formula Type: Checkbox
- Formula:
NOT(ISBLANK(Maxio_subscription_preview__c))
Create custom actions for CPQ
Add three custom actions so users can create, edit, and upgrade an Advanced Billing Subscription from the Quote Line Editor.
To create the custom actions
-
Navigate to Setup > Object Manager > Custom Action (
SBQQ__CustomAction__c). -
Find and edit the Label field (
SBQQ__Label__c). -
Add these three values to the picklist:
- New Maxio Subscription
- Edit Maxio Subscription
- Upgrade Maxio Subscription
-
Click the Custom Actions tab.
-
Click New Custom Action and set these values:
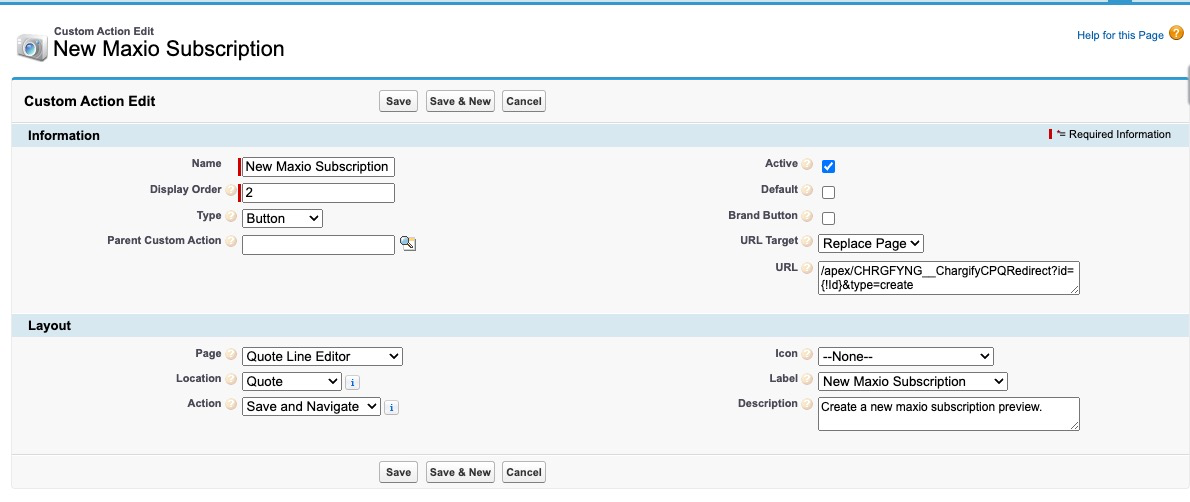
- Name: New Maxio Subscription
- Display Order: 2
- Type: Button
- Active: true
- URL Target: Replace Page
- URL:
/apex/CHRGFYNG__ChargifyCPQRedirect?id={!Id}&type=create - Page: Quote Line Editor
- Location: Quote
- Action: Save and Navigate
- Label: New Maxio Subscription
-
Click Save.
-
Click New Custom Action again and set these values:
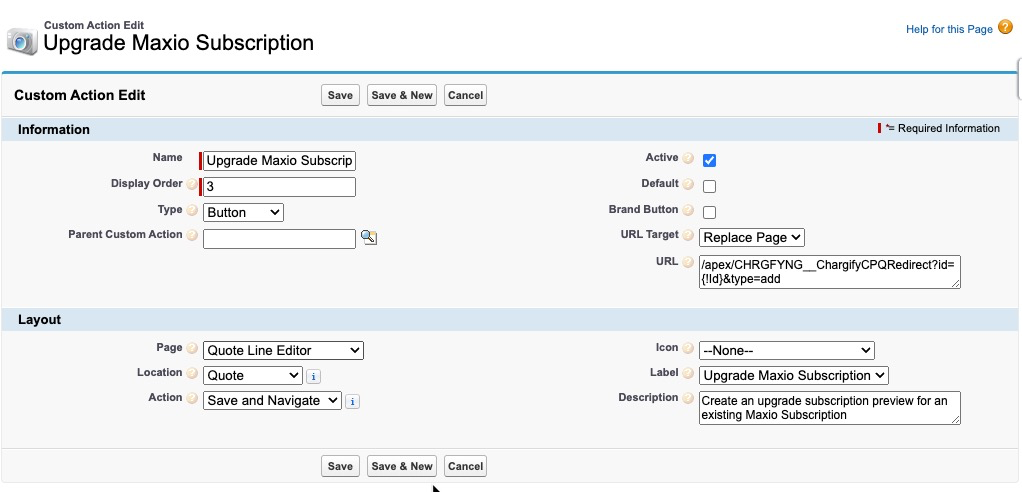
- Name: Upgrade Maxio Subscription
- Display Order: 3
- Type: Button
- Active: true
- URL Target: Replace Page
- URL:
/apex/CHRGFYNG__ChargifyCPQRedirect?id={!Id}&type=add - Page: Quote Line Editor
- Location: Quote
- Action: Save and Navigate
- Label: Upgrade Maxio Subscription
-
Click Save.
-
Click New Custom Action one more time and set these values:
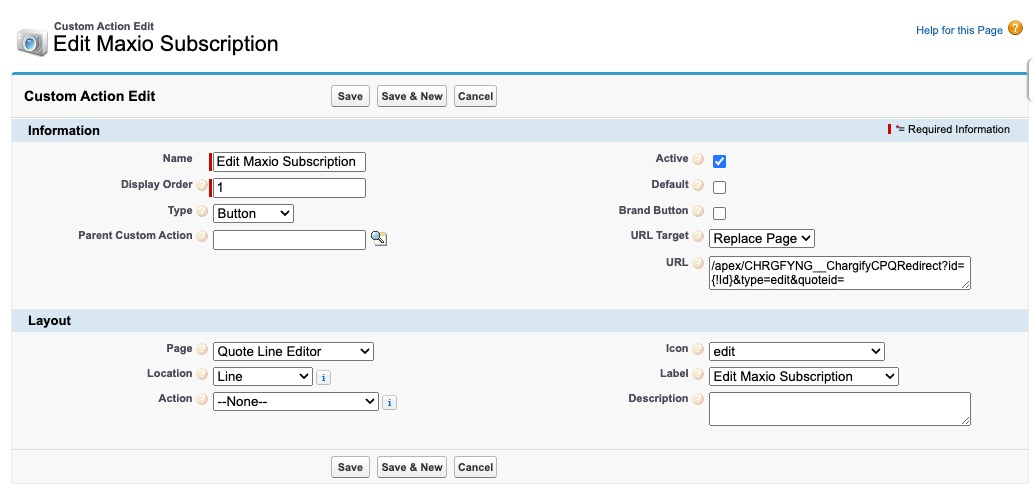
- Name: Edit Maxio Subscription
- Display Order: 1
- Type: Button
- Active: true
- Icon: edit
- URL Target: Replace Page
- URL:
/apex/CHRGFYNG__ChargifyCPQRedirect?id={!Id}&type=edit"eid={!SBQQ__Quote__c.Id} - Page: Quote Line Editor
- Location: Line
- Label: Edit Maxio Subscription
Create triggers
Add two Apex triggers so quote and quote line changes sync with Advanced Billing.
To create the triggers
-
Navigate to Setup > Create > Objects > Quote (
SBQQ__Quote__c). -
Create a new trigger, then copy and paste this code:
trigger ChargifyQuoteTrigger on SBQQ__Quote__c (before insert, before update, before delete, after insert, after update, after delete, after undelete) { CHRGFYNG.ChargifyCPQAPI.QuoteTrigger(Trigger.operationType, Trigger.old, Trigger.new, Trigger.oldMap, Trigger.newMap); } -
Navigate to Setup > Create > Objects > Quote Line (
SBQQ__QuoteLine__c). -
Create a new trigger, then copy and paste this code:
trigger ChargifyQuoteLineTrigger on SBQQ__QuoteLine__c (before insert, before update, before delete, after insert, after update, after delete, after 		undelete) {
CHRGFYNG.ChargifyCPQAPI.QuoteLineTrigger(Trigger.operationType,Trigger.old,Trigger.new,Trigger.oldMap,Trigger.newMap);
}
Configure the Quote Line Item Editor
(Optional) Improve the Quote Line Editor's display of Products and Subscriptions.
To configure the Quote Line Item Editor
-
Navigate to Setup > Installed Packages > Salesforce CPQ > Configure > Line Editor.
-
Enable Visualize Product Hierarchy.
-
Move the product name to the top of the list.
-
Navigate to Setup > Create > Objects > Quote Line (
SBQQ__QuoteLine__c) > Field Set. -
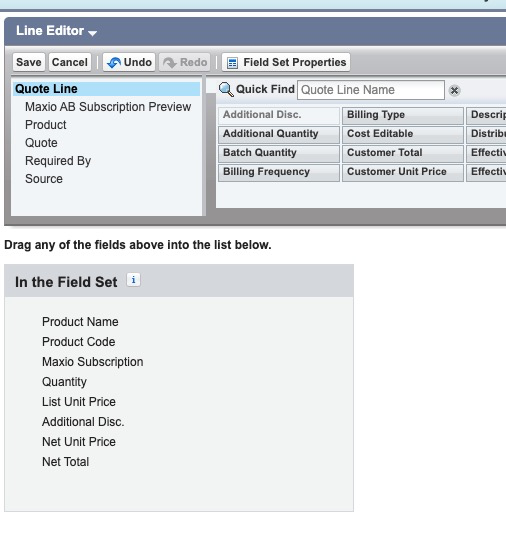
Click Edit for the Line Editor.
-
Move the product Code to after the Product Name.
-
Add the Maxio Subscription field.
-
Click Save.
Related information
To install and connect the integration before configuring CPQ, see Setup the Salesforce Integration.
Still need help?
Reach out and our support team will take it from here.