
Configuring Billing Portal Options
Applies to: Advanced Billing
Last updated on Oct 1, 2026
The Maxio Billing Portal lets Customers manage their Subscriptions, payment methods, Invoices, and account details through a secure, self-service experience. Enable and configure the Billing Portal in Advanced Billing to customize available features, control subscriber access, and manage invitation settings, so you can support flexible billing workflows and reduce manual support effort.
Enable or disable the Billing Portal
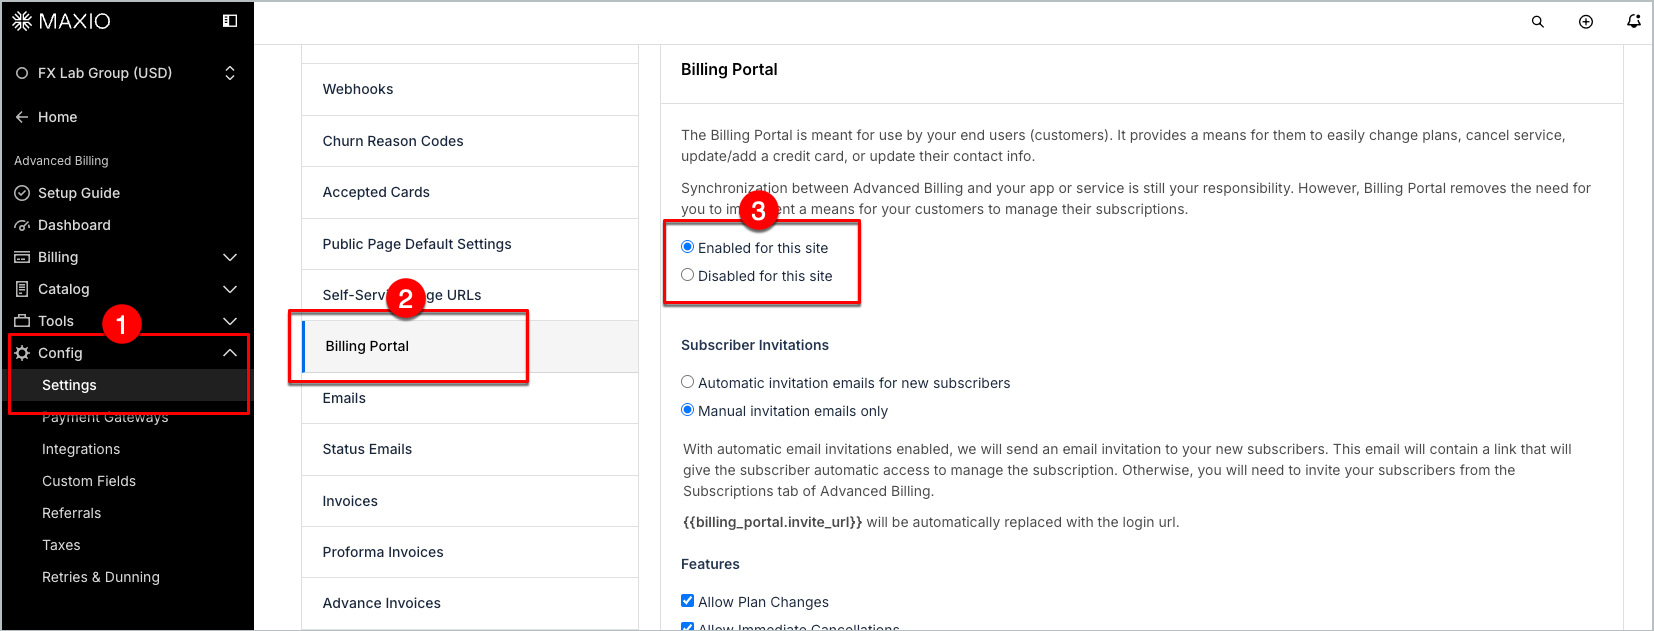
The Billing Portal must be enabled before your subscribers can begin to interact with it. Go to Config > Settings > Billing Portal tab, then click Enabled for this site.
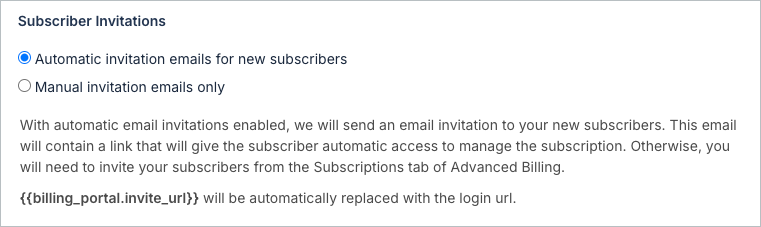
Choose automatic or manual subscriber invitations
With automatic email invitations enabled, Maxio sends an email invitation to your new subscribers. This email contains a link that gives the subscriber automatic access to manage the Subscription. Otherwise, invite your subscribers from the Subscriptions tab in Advanced Billing.
Set how long a Billing Portal link stays valid
The Billing Portal Link Expiration Time setting controls how long a Billing Portal management link remains valid before it expires. This gives you more flexibility and security when configuring Customer access to their Billing Portal.
This value represents the number of seconds a generated portal management link stays active before expiring.
- Default expiration: 65 days (5,616,000 seconds)
- Maximum expiration: 6 months (15,552,000 seconds)
If no value is provided, Maxio uses the default of 65 days.
Example:
You set the Portal Link Expiration Time to 2,592,000 seconds. All new portal management links expire 30 days after being created.
Choose how returning subscribers are verified
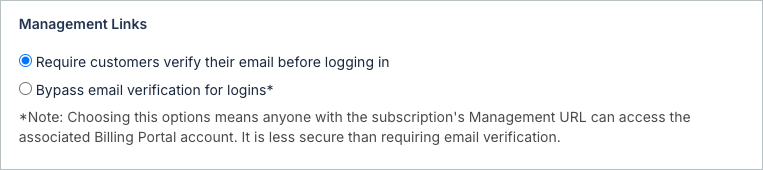
When a Customer visits their unique Billing Portal link, they see a screen to enter their email. They then receive an email with a unique URL that lets them access their Billing Portal.
Choose how a returning subscriber is verified when they visit their management URL:
- Require customers to verify their email before logging in (default): the Customer confirms their email before accessing the Billing Portal.
- Anyone with the URL can access the associated Billing Portal: less secure, since no further verification happens once someone has the link.
Choose which Billing Portal features to offer
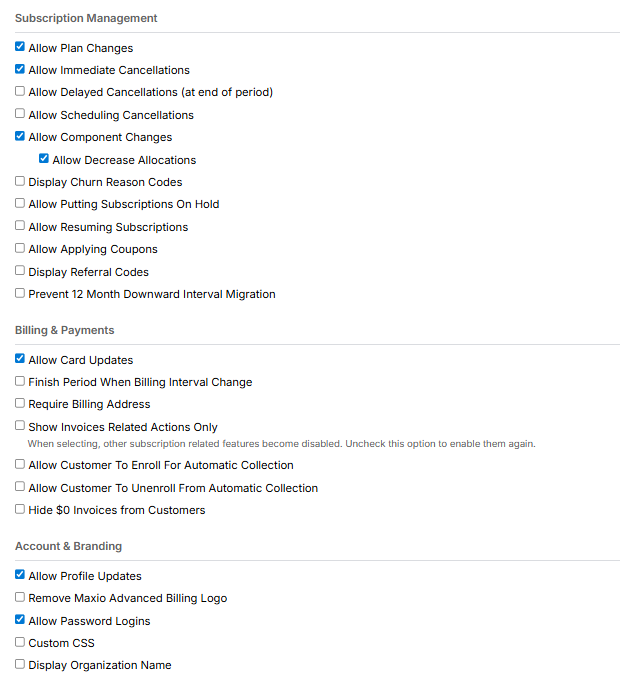
The Billing Portal features are grouped to help you control how subscribers manage subscriptions, how billing and payments behave, and how your portal reflects your brand.
- Subscription management Controls what Subscribers can do with their Subscriptions from the Billing Portal: plan changes, cancellations (immediate/delayed/scheduled), product changes (including decreases), holds/resumptions, coupons, referral codes, and migration limits.
- Billing and payments Focuses on payment updates, invoice behaviors, and automatic collection options.
- Account and branding Lets you customize profile access, merchant details, logos, and styling so the portal matches your organization.
Subscription management
Configure what subscribers can manage directly in the Billing Portal, including plan changes, cancellations, product adjustments (including decreases), Subscription holds and resumptions, and the use of Coupons or referral codes. You can also control migration rules and limits to ensure changes follow your business policies.
Options appear in the order shown below, the same order they appear on the Billing Portal settings page:
| Option | Description |
|---|---|
| Allow Plan Changes | Allow or disallow a subscriber to change their plans. You can choose how the plans available to the customer are sorted in the view. |
| Allow Immediate Cancellations | Allow or disallow a subscriber to cancel their Subscriptions immediately. |
| Allow Delayed Cancellations (at end of period) | Allow or disallow a subscriber to cancel their Subscriptions at the end of the current billing period. |
| Allow Scheduling Cancellations | Allow or disallow subscribers to pick a future date to cancel. |
| Allow Product Changes | Allow or disallow a subscriber to change their Products, including quantity and on/off toggles. |
| Allow Decrease Allocations | Permit subscribers to decrease Product allocations when Product changes are enabled. This is the default setting, and only appears once Allow Product Changes is checked. |
| Display Churn Reason Codes | Enabling this displays churn reason codes to the subscriber upon cancellation, if any have been defined. |
| Allow Putting Subscriptions On Hold | If enabled, Customers can put their Subscriptions on hold indefinitely, or, if Allow Resuming Subscriptions is also enabled, specify a date and time to automatically resume. |
| Allow Resuming Subscriptions | If enabled, Customers can manually resume their Subscriptions, or select a date to automatically resume when putting their Subscription on hold. |
| Allow Offer Migrations | Allow or disallow a subscriber to migrate to a different Offer from the Billing Portal. |
| Allow Applying Coupons | If enabled, Customers can add Coupons to their Subscriptions. |
| Display Referral Codes | If enabled, Customers can see their Subscription's referral codes. |
| Prevent 12-month Downward Interval Migration | Restricts Customers from downgrading their billing plan or switching to a less frequent subscription (like going from annual to monthly) within 12 months. This helps keep Customers on longer-term plans and makes revenue more predictable. |
| Hide Subscription Signup Date | Check this box to hide the Subscription's signup date from the Billing Portal view. |
| Hide Product Family Name | Check this box to hide the Product Family name from the Billing Portal view. |
| Hide Canceled Subscriptions | Check this box to hide Subscriptions in the canceled state from the Billing Portal subscription list. A Subscription that's only scheduled to cancel at the end of its billing period stays visible until it actually reaches the canceled state. |
| Hide Expired Subscriptions | Check this box to hide Subscriptions in the expired state from the Billing Portal subscription list. |
| Hide Failed to Create Subscriptions | Check this box to hide Subscriptions in the failed to create state from the Billing Portal subscription list. |
These three settings only change what appears in the Billing Portal subscription list. A subscriber can still reach a hidden Subscription directly if you send them a link to it, and hiding a Subscription never removes any dunning notice or card-update prompt tied to it.
Billing and payments
Manage how billing and payment activity works in the portal, including invoice behavior, payment method updates, and automatic collection settings. These options help ensure subscribers have the right tools to stay current while supporting your payment workflows.
| Option | Description |
|---|---|
| Allow Card Updates | Allow or disallow a subscriber to update their credit cards. |
| Manage Payment Methods | Allows subscribers to access the Payment section in the Billing Portal, where they can view existing payment profiles and add a new payment method outside of an Invoice payment flow. |
| Finish Period when Billing Interval Change | Makes sure that when a Customer switches their billing interval (like from monthly to quarterly), the current billing period finishes first before the new interval starts. This helps avoid mid-period changes and keeps the billing process on track. |
| Require Billing Address | Requires a subscriber to provide a billing address before completing a payment-related action in the Billing Portal. |
| Show Invoices-Related Actions Only | Lets users only do things related to Invoices, like viewing or downloading them. Enabling this disables other Subscription-management features in the portal, keeping the interface simple and focused on billing tasks. |
| Allow Customer to Enroll for Automatic Collection | Allows subscribers to sign up for automatic payments, so future Invoices are charged automatically to their saved payment method. |
| Allow Customer to Unenroll from Automatic Collection | Gives subscribers the option to opt out of automatic payments whenever they want, giving them more control over when and how they pay. |
| Hide $0 Invoices from Customers | Check this box to hide zero-dollar Invoices from the subscriber view. |
Account and branding
Customize the portal experience to reflect your organization by controlling profile access, merchant information, logos, and visual styling. These settings help ensure the Billing Portal aligns with your brand and provides a consistent customer-facing experience.
| Option | Description |
|---|---|
| Allow Profile Updates | Allow or disallow a subscriber to update their Customer profile information, such as name and email address. |
| Remove Maxio Advanced Billing Logo | Enabling this checkbox removes the Maxio logo from the Billing Portal for white-labeling purposes. |
| Allow Password Logins | If password logins are turned off, a Customer can use the login screen to easily request a Login Link using their email address on file. |
| Custom CSS | Allows users to apply custom Cascading Style Sheets (CSS) to the Billing Portal interface. This option enables businesses to align the look and feel of the Billing Portal with their brand's identity by customizing fonts, colors, and layout styles. |
| Display Organization Name | Shows the organization's name clearly on the Billing Portal, making it easy to recognize and reinforcing the company's brand in all billing-related communication. |
Two more settings, described below, control how plan changes themselves are sorted and applied. They aren't part of any single category above, but they render right after them on the same settings page.
Sort plans for plan changes
Choose how plans appear in the Billing Portal when a subscriber changes plans, so Customers can find what they need faster, and you can prioritize newer or pricier plans over older, cheaper ones.
Choose one of the following:
- By creation date, oldest first (default)
- By creation date, newest first
- By Plan name, A–Z
- By Plan name, Z–A
- By Plan price, highest–lowest
- By Plan price, lowest–highest
Plan change strategy
This determines how plan changes for your Customers are handled. From the Default drop-down, choose one of the following options:
- Prorated upgrades and downgrades (default)
- Prorate upgrades and no proration downgrades (Delayed Plan/Product Change)
- Instant plan/product change, no proration
- Delayed plan/product change
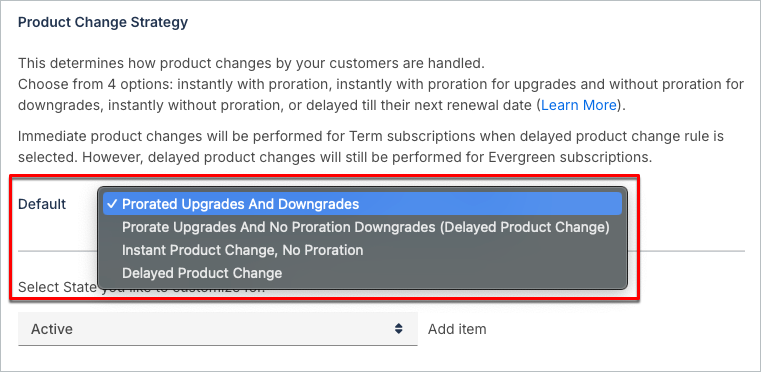
Different strategies can also be set for different Subscription states. Below the Default option, which applies to any Subscription not otherwise specified, choose Active or Trialing from the drop-down, then select Add Item to assign a separate strategy to that state.
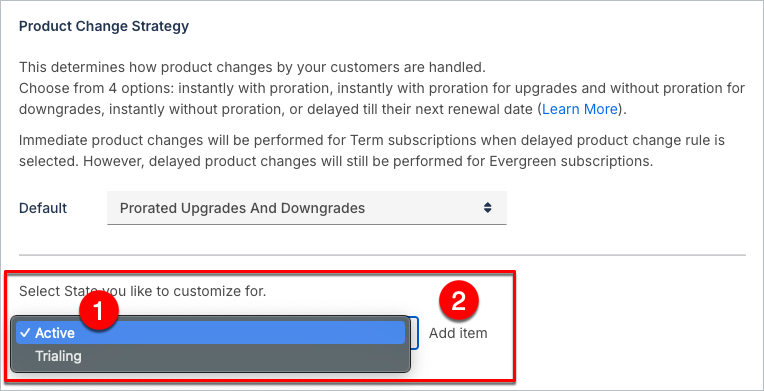
Repeat these steps to add a strategy for the other Subscription state.
Keep in mind how these Product types work within plan change strategies.
Usage-based Products: Metered or Event-Based Billing Products are charged according to your selected plan change strategy. Once the Subscription is on the new plan, usage counts reset to zero.
Quantity-based Products: Quantity-based, Prepaid Usage, and On/Off Products can be prorated down to the second, or charged in full immediately, depending on your selected strategy.
For more information, see Understand Upgrade and Downgrade Scenarios.
Add your merchant name and contact information
Enter the name you wish to display on the Billing Portal. This is useful if you don't have a logo.
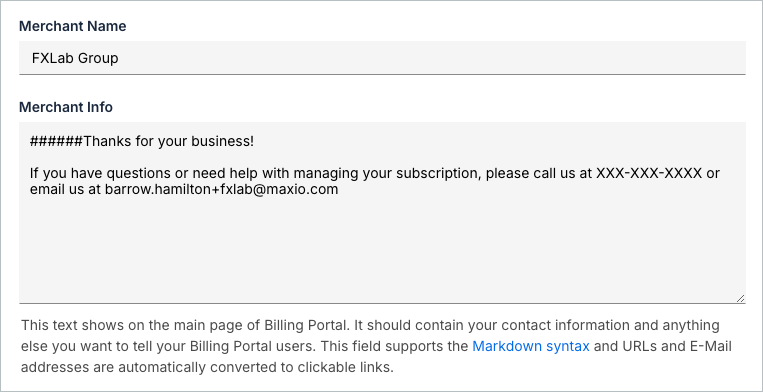
The text you enter in the Merchant Info box shows on the main page of the Billing Portal, and also on the login and invitation pages. It should contain your contact information and anything else you want to tell your Billing Portal users. This field supports Markdown syntax, and a Markdown syntax guide link below the field opens a reference. URLs and email addresses are automatically converted to clickable links.
If no Merchant Info has been saved yet, the box starts with a default "Thanks for your business" message that includes the phone number and email address on your account. It becomes your Merchant Info when you save.
As you type, a live character count appears below the field. You can resize the field vertically by dragging its corner handle.
Customize the invitation email
This invitation email is also sent to all subscribers you invite manually.
If the Subscriber invitations option is enabled, Maxio sends this invitation email to your new subscribers. Like other emails, the invitation email is fully customizable. Click Edit Template. See Customize Email Templates for the full list of available Liquid variables.
Some merchants include the Billing Portal invitation in the subscription signup email from Advanced Billing, reducing the number of emails sent to the Customer at signup. Use the variable
subscription.billing_portal_management_url.
Upload a logo
This logo appears at the top of your Billing Portal instance. If you don't upload a logo, your business name appears instead.
Select Choose file to upload a logo. Once a logo is uploaded, it is shown here, with a Remove link beneath it to delete it.
Style the Billing Portal with custom CSS
Once you enable Custom CSS in Account and branding, paste your CSS directly into the Custom CSS field to style the Billing Portal interface. The field uses a monospace font, and you can resize it vertically by dragging its corner handle.
A live counter below the field shows how much of the 64 KB size limit your CSS uses. When you click out of the field, Advanced Billing checks the CSS for common mistakes: an unclosed block, a stray closing brace, an unclosed comment or quote, or CSS over the 64 KB limit. If it finds one, an error appears below the field and updates as you edit. Errors for an unclosed block, brace, comment or quote name the line number. The size error does not.
If the CSS differs from what you last saved and has one of these mistakes, Maxio blocks the Save button for the whole Billing Portal settings page until you fix it. CSS you haven't changed can still be saved even if it fails the check, so you can still save your other settings.
When you save, Maxio removes the following from your CSS, and the removed lines no longer appear in the field:
- Any declaration that contains a
url(), including links to relative,httpandhttpsaddresses. The whole declaration is removed, not only theurl()part, sobackground: url(logo.png) no-repeat;is removed completely. @importrules.- Any declaration that uses a CSS property outside Maxio's list of allowed properties, such as
gap,inset,aspect-ratioor a custom property like--brand-color.
Related information
See Understand the Billing Portal for an overview of what the Billing Portal does and who it's for.
See Explore Billing Portal Topics for the full set of Billing Portal setup, access, and support articles.
Still need help?
Reach out and our support team will take it from here.