
Setting Up the Avalara ELR Integration
Applies to: Advanced Billing
Last updated on Oct 8, 2026
Before invoices can be submitted to Avalara ELR for eInvoicing and live reporting, you must complete a one-time setup in Maxio. This process connects your Maxio account with Avalara, ensures your seller information is configured correctly, and activates mandate rules for each supported jurisdiction.
For what the integration covers before you set it up, see Avalara ELR Integration Overview, and General Categories of E-Invoicing Models for the clearance and reporting models different countries require.
Before you start
- Avalara ELR must be enabled for your site by Maxio Support. It's not a self-service toggle. If you don't see an eInvoicing tab under Config > Invoicing, contact our support team for access.
- Invoice-centric billing must be active on your site; Avalara ELR requires it.
Configure your tax origin address
Avalara needs your business's full seller address on file, separately from the eInvoicing connection itself.
- Go to Config > Taxes.
- Next to Tax Origin Address, click Edit (or Set Your Tax Address if none is set yet).
- In the Tax Origin Address dialog, enter your complete address: Address, Address Line 2, City, Country, State, and Zip Code.
- Under Identifiers, add any legal entity identifiers your jurisdictions require, such as a VAT ID, using + Add Identifier.
- Click Save Changes.
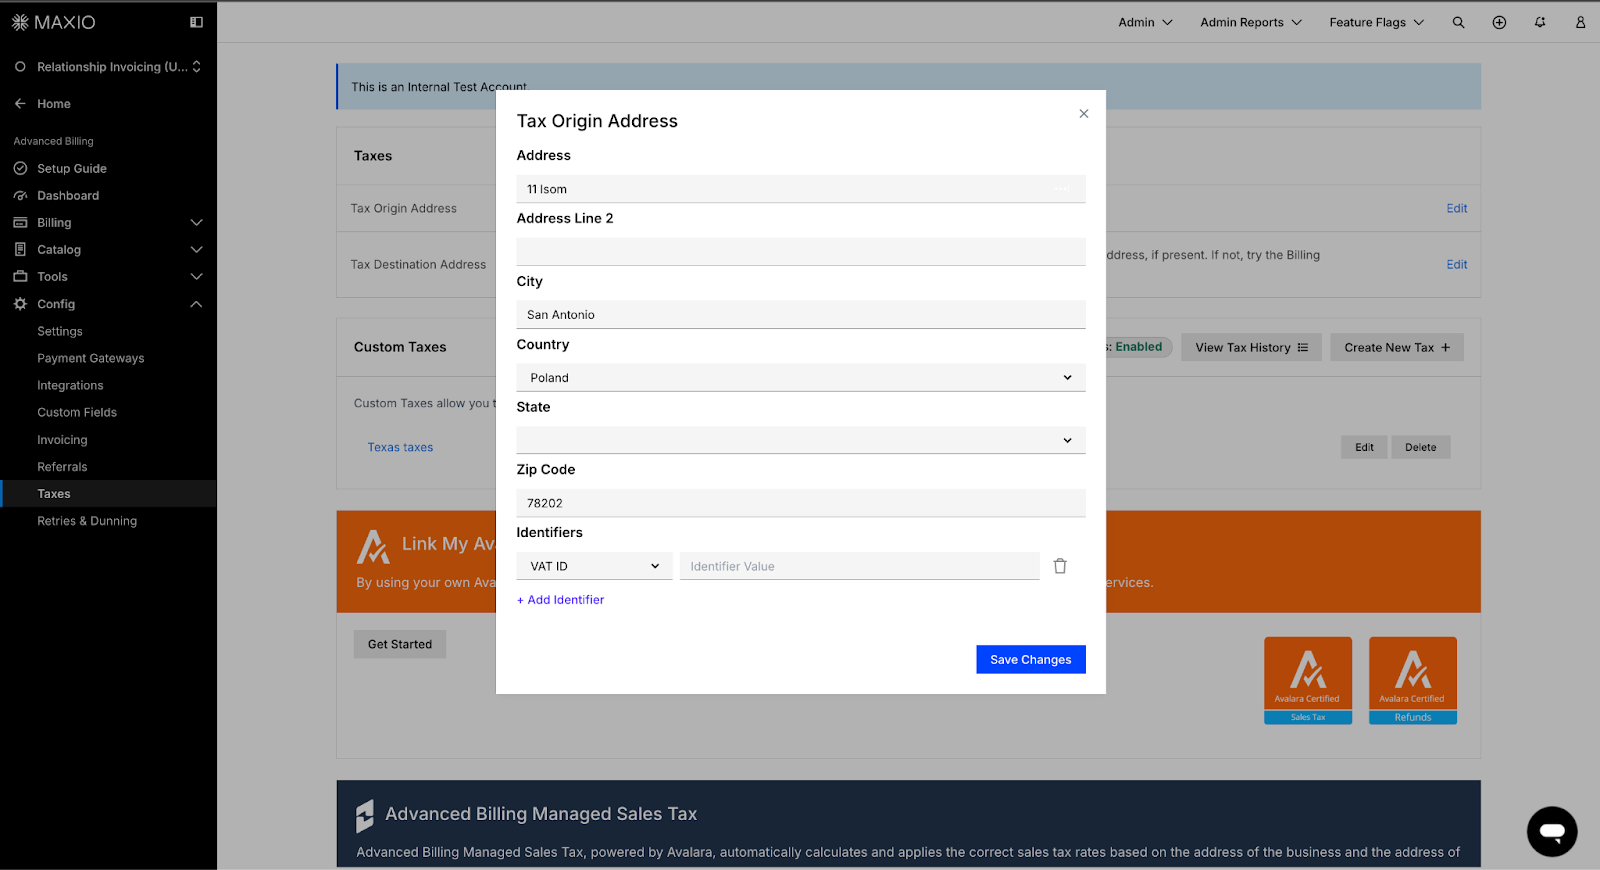
If you correct the Country after adding identifiers, the Kind options update for the new country:
- An identifier is kept if the new country also uses its Kind.
- An identifier is removed if the new country doesn't use its Kind.
- A removed identifier is restored if you switch back before saving.
See Configure Tax Entity Identifiers for how identifiers and the tax origin country interact. This matters here because some mandates require the identifier to be present, such as the seller's VAT number that a FR-B2B-EINVOICE document requires.
Connect Avalara ELR
Go to Config > Invoicing > eInvoicing. Connecting walks you through 3 steps: providing your Client ID and Secret, setting up your company, and configuring mandates.
Step 1: Provide Client ID and Secret
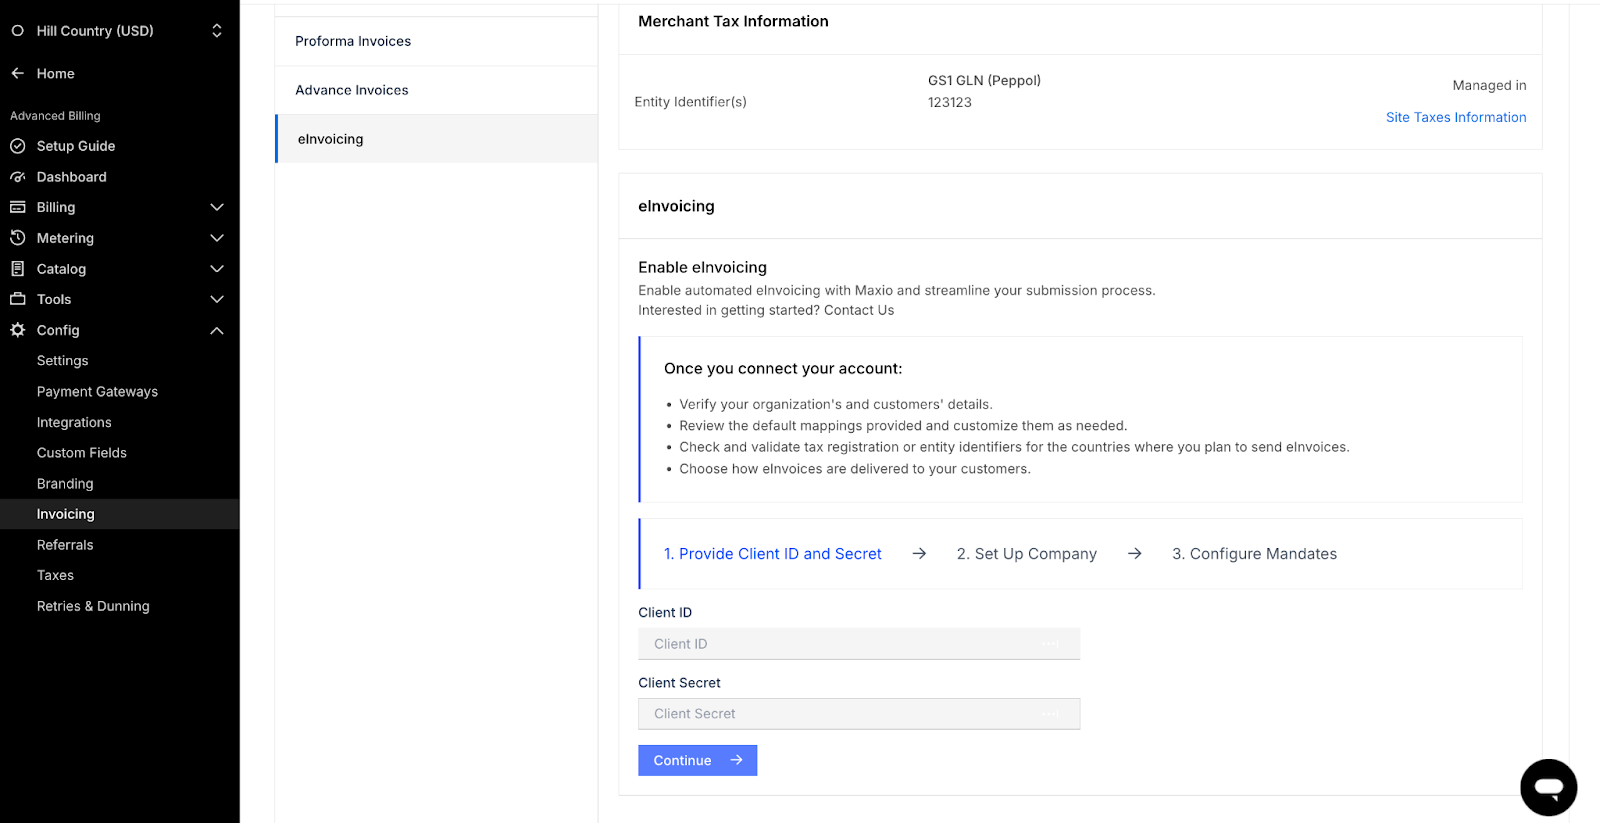
Enter the Client ID and Client Secret issued by Avalara ELR, then click Continue. Use your Avalara sandbox ELR credentials if you're testing in a non-production environment, or your production ELR credentials otherwise.
Once you connect your account, you'll need to verify your organization's and customers' details, review the default mappings and customize them as needed, check and validate tax registration or entity identifiers for the countries where you plan to send eInvoices, and choose how eInvoices are delivered to your customers.
Step 2: Set up company
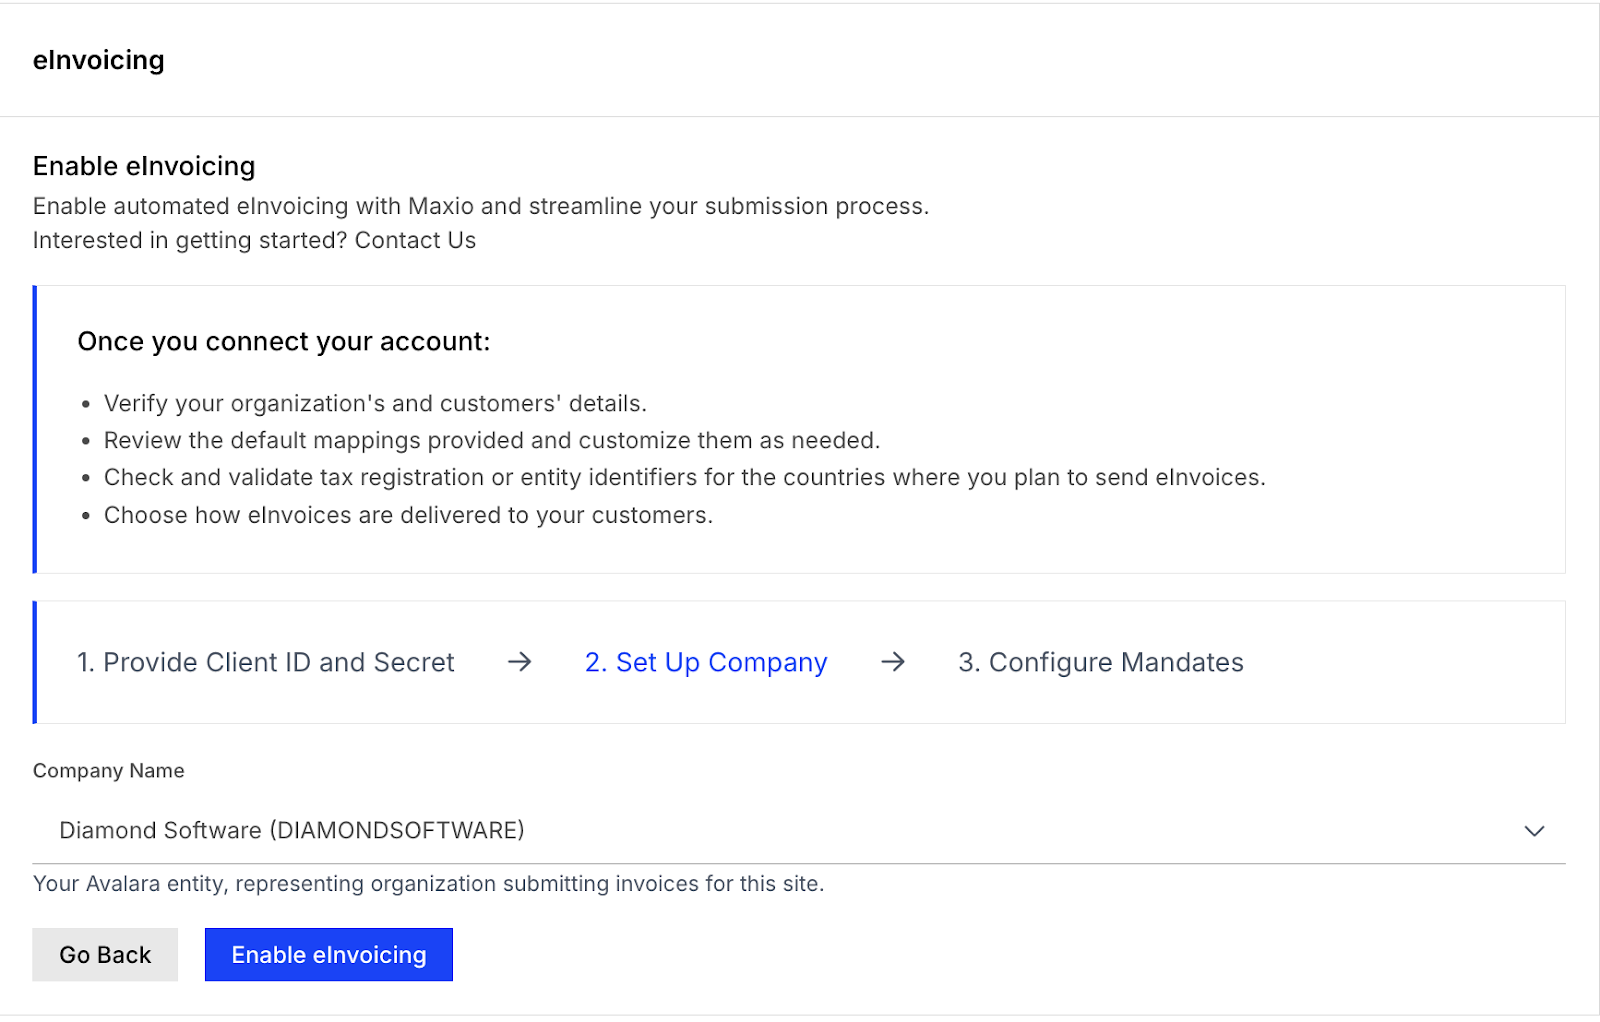
If you're new to Avalara ELR, register your company in the Avalara web portal and complete the compliance contact details first. If you're already registered, confirm your company is active and its identifiers, such as a VAT number, are populated.
Select your Company Name from the dropdown, then click Enable eInvoicing.
WARNING: if you're reconnecting and select a different company than the one you originally connected, all previous mapping configurations are removed. Only change the selected company if you intend to start over with the new company's mappings.
Step 3: Configure mandates
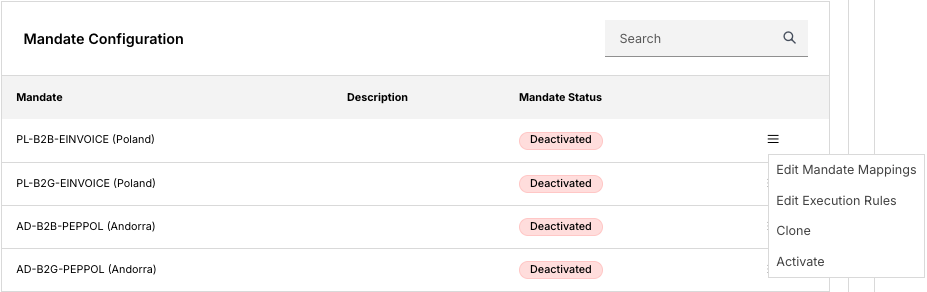
Avalara ELR returns the full list of eInvoicing mandates available to your account under Mandate Configuration (over 50 country- and network-specific mandates, such as HU-B2B-REPORTING for Hungary or AD-B2B-PEPPOL for Andorra). Every mandate starts Deactivated. The table's Avalara Activation column shows whether Avalara has finished activating each mandate; see Avalara activation status for what each status means. A mandate can't submit documents until that status reads Completed, with one exception: Not synced yet means Maxio hasn't checked with Avalara yet and doesn't block submission. From the row menu next to a mandate, you can:
- Activate or Deactivate the mandate, individually or in bulk across multiple selected mandates. A one-click Reverse Change link is available immediately after a bulk action, to undo it.
- Clone an existing mandate's mapping configuration to a new one, instead of starting from scratch.
- Edit Mandate Mappings to review and adjust how Maxio Properties map to Avalara Properties for that mandate, which Avalara then delivers in the mandate's required format.
- Edit Execution Rules to define the conditions, based on invoice or credit note fields, that determine whether a document matches that mandate.
Edit Mandate Mappings
A mandate can advertise more than one document format for the same document kind — for example, both UBL Invoice and UBL Extended Invoice apply to invoices — and each format keeps its own independent set of mappings. Use the Format selector above the mappings list to switch between the mandate's advertised formats; the list refreshes to show only that format's Avalara Properties, alongside the search field for finding a specific property within it.
For each Avalara Property, its Maxio Property is a default value out of the box, labeled (Default). You can:
- Add a custom value by typing directly into the Maxio Property field instead of choosing one of the listed options.
- Restore a single property to its default by clicking the reset icon inside its Maxio Property field.
- Restore multiple properties to their defaults at once by selecting their checkboxes and choosing Restore to Default from the bulk actions menu. Confirm the action in the dialog that follows.
A format that the mandate advertises but that Maxio can't yet submit documents in shows in the Format selector labeled (view only). When you select it:
- Its properties are shown for reference.
- An alert explains that documents are still submitted using the formats you can edit.
- Its Maxio Property fields are read-only.
- No new repeatable-element rows can be added.
UBL Extended Invoice and UBL Extended Credit Note are a special case of this. They're submittable only on a mandate that supplies its own extended defaults.
- Today, that's just France's B2B e-invoicing mandate (
FR-B2B-EINVOICE). - On every other mandate that advertises one of them, it shows as (view only), even on an otherwise fully submittable mandate, because Maxio has no safe default mapping to send under that profile.
Choose which format is submitted
Above the mappings list, next to the mandate description, two dropdowns decide which of the mandate's submittable formats Maxio actually sends when you submit a document of that kind:
- Default format for invoices
- Default format for credit notes
Avalara returns this in the submission metadata as the document's format and version. Pick a format from either dropdown and save to change it. Each dropdown only lists formats the mandate currently accepts for submission.
If a format you previously chose is no longer advertised by the mandate, a warning banner appears above the mappings list naming which submittable format Maxio is using instead. Maxio chooses the replacement in this order:
- The document kind's standard default format (UBL Invoice or UBL Credit Note).
- If the default isn't available, another format of that kind that the mandate still advertises and Maxio can submit.
Whichever replacement is used:
- Documents are submitted using that replacement format's own saved mapping, or its default values if none is saved.
- A mapping you configured for your original choice is never copied to the replacement.
- Your original choice is kept as saved and isn't overwritten until you pick a different format from the dropdown.
- Maxio only falls back to another format for the documents you submit in the meantime.
Edit Execution Rules
Execution rules specify the conditions that determine when a mandate applies to an invoice or credit note. Build one or more rules, each comparing a document or customer field against a value, then combine them with AND or OR to decide whether a document matches.
Rule fields cover the customer, the invoice or credit note, and the underlying subscription, including:
- Customer fields, such as
customer.business_type,customer.network_format,customer.country,customer.vat_country, andcustomer.tax_exempt. - Invoice or credit note fields, such as
invoice.currency,invoice.total_amount,invoice.billing_address.country, andinvoice.line_items.tax_code. - Subscription fields, such as
subscription.taxable_country. - Document type, to scope a rule to only invoices or only credit notes when a mandate's rules otherwise apply to both.
Each rule supports operators appropriate to its field type: equals, not equals, greater than, greater than or equal, less than, less than or equal, in list, not in list, contains, begins with, and ends with. Click Save Rules to apply your changes to the mandate.
Manage your connection
- Sync Schedule: on the same eInvoicing settings page, choose how often Maxio checks Avalara for updated registrations and mandates: Manual, Fifteen minutes, Hourly, or Nightly.
- Test Connection: verify your Avalara credentials are still valid without submitting a document.
- Registrations: review the Networks and Registration Status for your company, separately from Mandate Configuration. A failed registration links out to your Avalara account for resolution.
- Disable eInvoicing: disconnect the integration entirely from the same settings page. No future documents are submitted after disabling, and you can re-enable at any time.
Still need help?
Reach out and our support team will take it from here.