
Push Financial Records to HubSpot
Applies to: Maxio Core
Last updated on Sep 19, 2026
Send Financial Records pushes a current summary of each Customer's subscription data from Maxio back to the matching Company record in HubSpot. The summary covers Customer MRR and ARR for the current and previous month, the Customer's status, the total Transaction amount, the oldest open Invoice due date, the total open balance, and an e-Bill link.
Important: HubSpot must already be connected before you can enable this, and every step below requires a Maxio user with an Administrator profile. See Set Up HubSpot Integration.
Why push the summary to HubSpot
Having those figures in HubSpot keeps Sales and Customer Success current on a Customer's standing, which helps avoid conflicting records and gives both teams the context they need for future dealings.
Enable Send Financial Records
The sync is one of the integration's four steps, so you turn it on and set its schedule in the integration settings alongside the others.
To enable the sync
-
Go to Admin > Integrations > HubSpot, then click the pencil icon to open Update HubSpot Integration Settings.
-
In the Send Financial Records section, check Enabled.
-
Set the Sync Schedule:
- Manual Sync Only - Nothing runs until you press the Sync button.
- Nightly Sync - Runs once a night.
- Hourly Sync - Runs once an hour.
- Every 15 Minutes - Offered for this step and for Get Sales Orders.
-
Click Save.
The Send Financial Records tab is now available in your HubSpot Integration Settings.
Configure the Send Customers setting
Enabling the step is not enough on its own. Send Customers decides whether Maxio actually sends anything and how far back it reaches, and it is configured per step rather than in the main settings.
To configure Send Customers
-
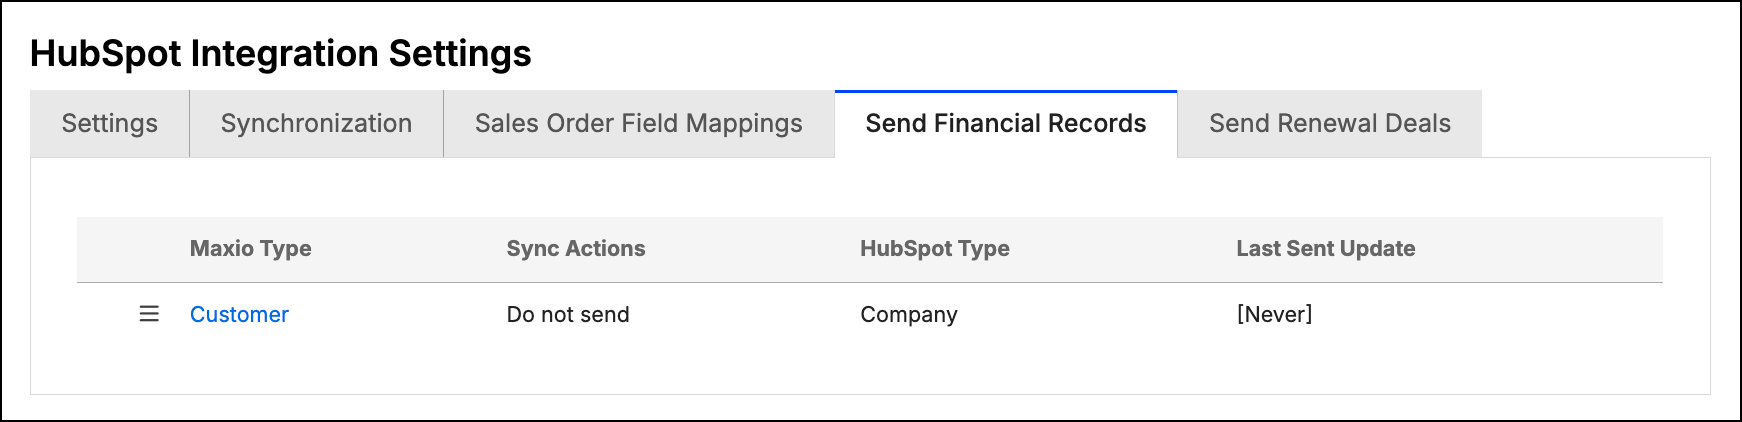
Click the Send Financial Records tab.
-
Click the menu icon beside Customer and select Configure. This opens Send Customers Settings. The same menu offers Details if you only want to review the step.
-
For Enable Send Customers, select Send updates only. The alternative, Do not send, leaves the step configured but inactive. HubSpot Object is fixed at Company and cannot be changed.
-
Set Last Sync Timestamp, which controls how much history is sent:
- To send only changes made since a given moment, enter the date and time in the format yyyy-mm-dd hh:mm:ss on a 24-hour clock. Example: 2022-09-12 13:45:00
- To send historical data, leave the field blank. A blank value displays as Never.
-
Click Save. Maxio returns you to HubSpot Integration Settings.
The screen also shows HubSpot Object: Company, the HubSpot record type this step writes to.
Important: A Clear Last Sync Timestamp Schedule setting on this same screen can clear the timestamp automatically, either Nightly or Weekly, as part of the scheduled sync. Leave it on Manual Clear Only if you set a timestamp specifically to keep historical data from being sent, because clearing it has the same effect as leaving it blank. The current value appears in the Clear Timestamp Schedule column on the Send Financial Records tab.
Create the custom properties in HubSpot
Maxio writes the financial summary into custom properties on the HubSpot Company object, and it can create them for you.
To create the properties
-
On the Send Financial Records tab, click the up-arrow icon in the top-right corner. This opens Create Custom Fields in HubSpot.
-
Review the list. The screen names every property it creates, with its HubSpot object, field name, and field label. All ten are created on the HubSpot Company object:
HubSpot field name HubSpot field label maxio__local_arr_at_end_of_month__cMaxio Customer: Total ARR at EOM maxio__local_arr_of_prior_month__cMaxio Customer: Total ARR at EOM Last Month maxio__local_mrr_at_end_of_month__cMaxio Customer: Total MRR at EOM maxio__local_mrr_of_prior_month__cMaxio Customer: Total MRR at EOM Last Month maxio__total_transaction_local_amount__cMaxio Customer: Total Transactions Amount maxio__customer_status__cMaxio Customer: Status maxio__next_invoice_hyperlink_e_invoice__cMaxio Customer: Open Invoice Hyperlink (e-invoice) maxio__total_open_invoice_balance__cMaxio Customer: Total Open Balance maxio__next_invoice_due_date__cMaxio Customer: Open Invoice Due Date maxio__base_url_customer_idHyperlink to Maxio Customer You only need to do this once. The fields are then available in your HubSpot account, but must be added to any views manually.
-
Click Create.
If your account has multi-currency enabled, the list is longer: the monetary properties are labeled as Local values, and a Home equivalent is created alongside each of them.
You only need to do this once, and the properties then stay available in your HubSpot account. Running it again is harmless, since Maxio skips any property that already exists and reports that it created the fields if they did not already exist. The properties do have to be added to your HubSpot views manually.
Finish the setup in HubSpot
The properties exist once Maxio creates them, but HubSpot does not show them until you add them to a record view.
-
In HubSpot, open a Company record and select View all properties at the bottom left.
-
Expand Maxio Financial Summary and select the fields you want shown on the Company's preview page.
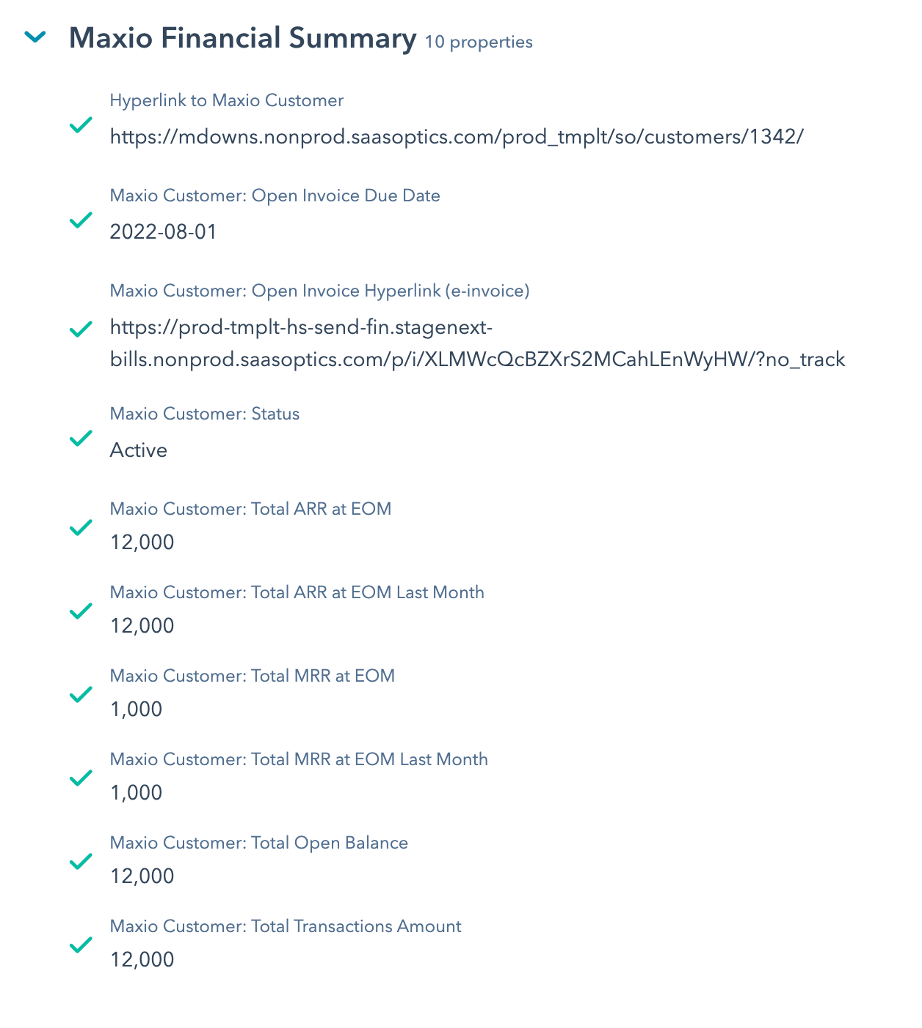
The two-way integration is now complete, and Maxio will sync Customer financial information into your HubSpot account on the schedule you set.
Clear CRM IDs
If you're migrating off another CRM onto HubSpot, or otherwise need to break and rebuild the links between Maxio and HubSpot, you can clear the stored HubSpot IDs for Customers and Transactions directly from the Send Financial Records tab. You don't need to contact Maxio Support to do this. Only a Maxio user with an Administrator profile can clear CRM IDs, and the action is only available while HubSpot is your currently connected CRM.
Clearing an ID doesn't resend or recreate anything in HubSpot. It only removes the stored link Maxio uses to keep that record in sync:
- Customer clears every Customer's HubSpot CRM ID and resets the Send Customers sync bookmark. Send Financial Records only updates records it already has a HubSpot ID for, so once a Customer's ID is cleared, that Customer is skipped by every future sync until it's linked in HubSpot again.
- Deal / Deal Line Items clears the stored HubSpot deal link on every Transaction created from a synced Sales Order. No scheduled sync depends on this link, but the Transaction needs to be manually re-linked to reflect any further changes from that deal.
WARNING: Before continuing, make sure you have a way to re-establish the HubSpot associations for the object types you select. Otherwise, they simply stop syncing until a new link is made. We recommend running a backup first.
To clear CRM IDs
- On the Send Financial Records tab, click the ban icon in the top-right corner, labeled Clear All CRM IDs. This opens Clear CRM IDs.
- Check Customer, Deal / Deal Line Items, or both.
- Type YES to confirm, then click Proceed.
Maxio clears the selected IDs and shows a confirmation message. If HubSpot isn't currently your connected CRM, or the confirmation phrase doesn't match, Maxio rejects the submission in place and nothing changes.
Related information
To connect HubSpot to Maxio before enabling any of these syncs, see Set Up HubSpot Integration.
To understand how a Transaction gets the HubSpot deal link that clearing removes, see Sync and Process Sales Orders.
Still need help?
Reach out and our support team will take it from here.