
Building Integrations and Workflows with iPaaS
Applies to: Advanced Billing
Last updated on Sep 19, 2026
Follow worked examples of integrations built with an iPaaS (Integration Platform as a Service), using Zapier and Cyclr. Each example connects Advanced Billing to another system, or back to Advanced Billing itself, without writing application code.
Important: Maxio does not build, debug, maintain, or support anything you or a developer builds with an iPaaS. Depending on your plan, Maxio can help you determine which Advanced Billing webhooks and API endpoints to use.
Before you start
- Feature
- Webhooks and API
- You Need
-
- Completed Design Your Integrations
- Person(s) with technical experience building (but not coding) integrations, handling data modification, and knowledge of APIs and webhooks.
- An iPaaS software
- Code
- No-code to low-code
- Difficulty
- ◉◎◎◎◎, increasing with your integration's complexity
Zapier
Zapier suits low-complexity integration needs.
The recording below implements a one-way integration from Advanced Billing to Slack. The trigger and action are: when a new subscription is created in Advanced Billing, post a message to a Slack channel. It covers Zapier Webhooks, Zapier Filters, triggers, and actions.
https://drive.google.com/file/d/1NZtzyCk40pZnI2PHEFjS4_Jpfg4QL8Vn/previewA one-way Advanced Billing to Slack integration built in Zapier
Example 1: connect to a third-party system
This example listens for a signup_success webhook event in Advanced Billing and performs an action in a third-party system. For the flow diagram, see the Example 1 diagram.
Set up the webhook
Configure Zapier to listen for an Advanced Billing webhook.
To set up the webhook
-
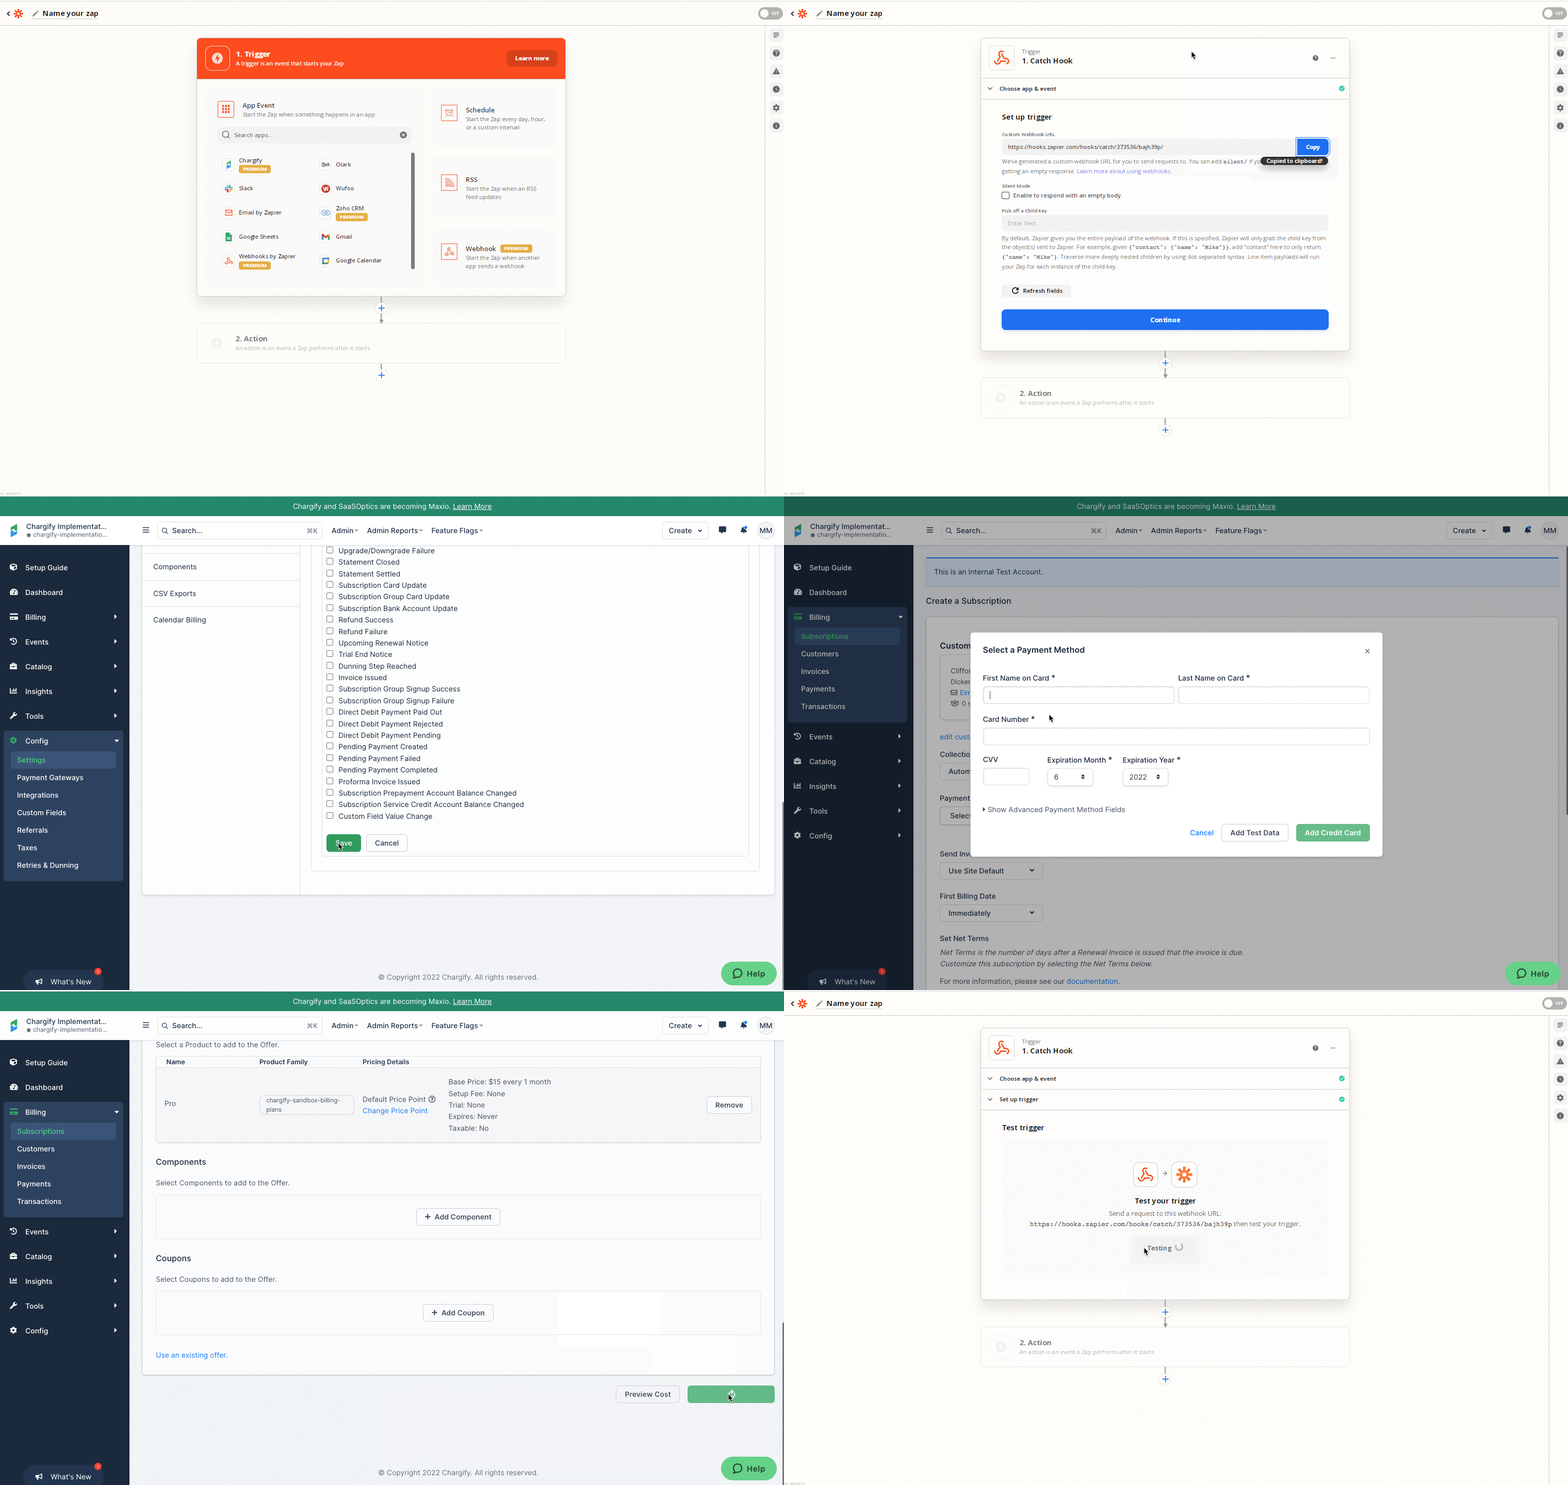
In Zapier, select Webhooks by Zapier, set the trigger event to Catch Hook, click Continue, and copy the webhook URL.
-
In Advanced Billing, go to Config > Settings > Webhooks. Add the webhook URL to your webhook settings, select Signup Success, select Send webhooks to your webhook endpoints, then click Save Changes.
-
In Advanced Billing, create a test subscription.
-
In Zapier, click Continue, then click Test Trigger. Test data appears if the test succeeded. Click Continue.
Add a filter
Add a filter when you want to act on specific scenarios only. This example filters for the signup_success webhook.
To add a filter
-
In Zapier, select Filter by Zapier.
-
Configure the filter to continue only if: Event | (Text) Exactly Matches |
signup_success.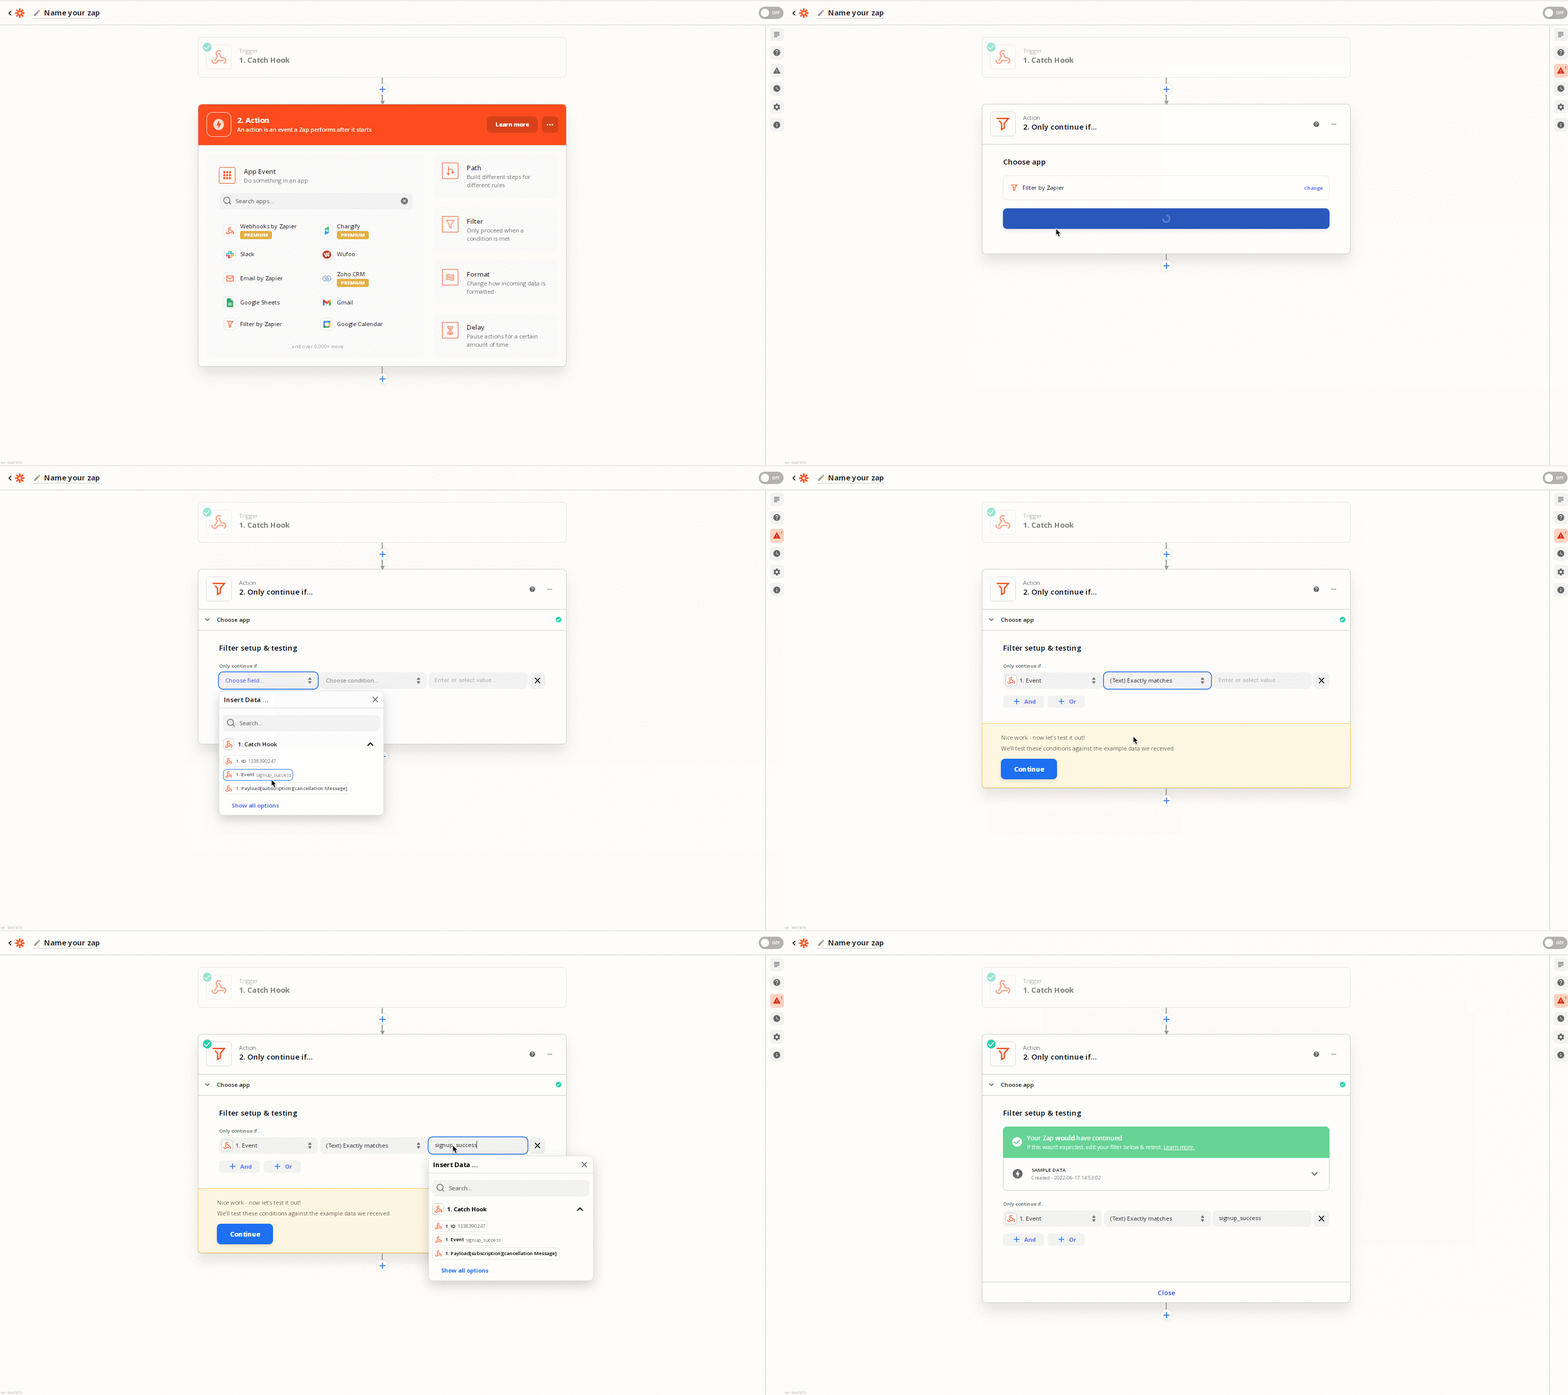
Connect to a system and map the data
Connect to any third-party system. The only requirement is that Zapier has a connector for that system and supports the actions you need.
To connect a system and map its data
- In Zapier, select the third-party system, choose any options Zapier asks for, and authenticate.
- Map your data from the webhook payload to the third-party system's fields. This step matters most, so take the time to map each field deliberately.
Test the workflow
Run the Zap end to end to confirm the trigger fires, the filter passes, and the third-party action lands.
To test the workflow
- Save your changes from the previous step, then click Test & Continue.
- If it didn't work, review the Zap. Zapier displays any errors it hit.
Note: Maxio does not help debug Zapier workflows.
Example 2: perform an action in Advanced Billing
This example updates a subscription in Advanced Billing after it is created. Use this pattern when the final step of your workflow is an API request back to Advanced Billing, which is the most common Zapier use case. For the flow diagram, see the Example 2 diagram.
Set up the webhook and filter
Steps 1 and 2 are identical to Example 1. Follow Set up the webhook and Add a filter above, then return here.
Configure the Advanced Billing action
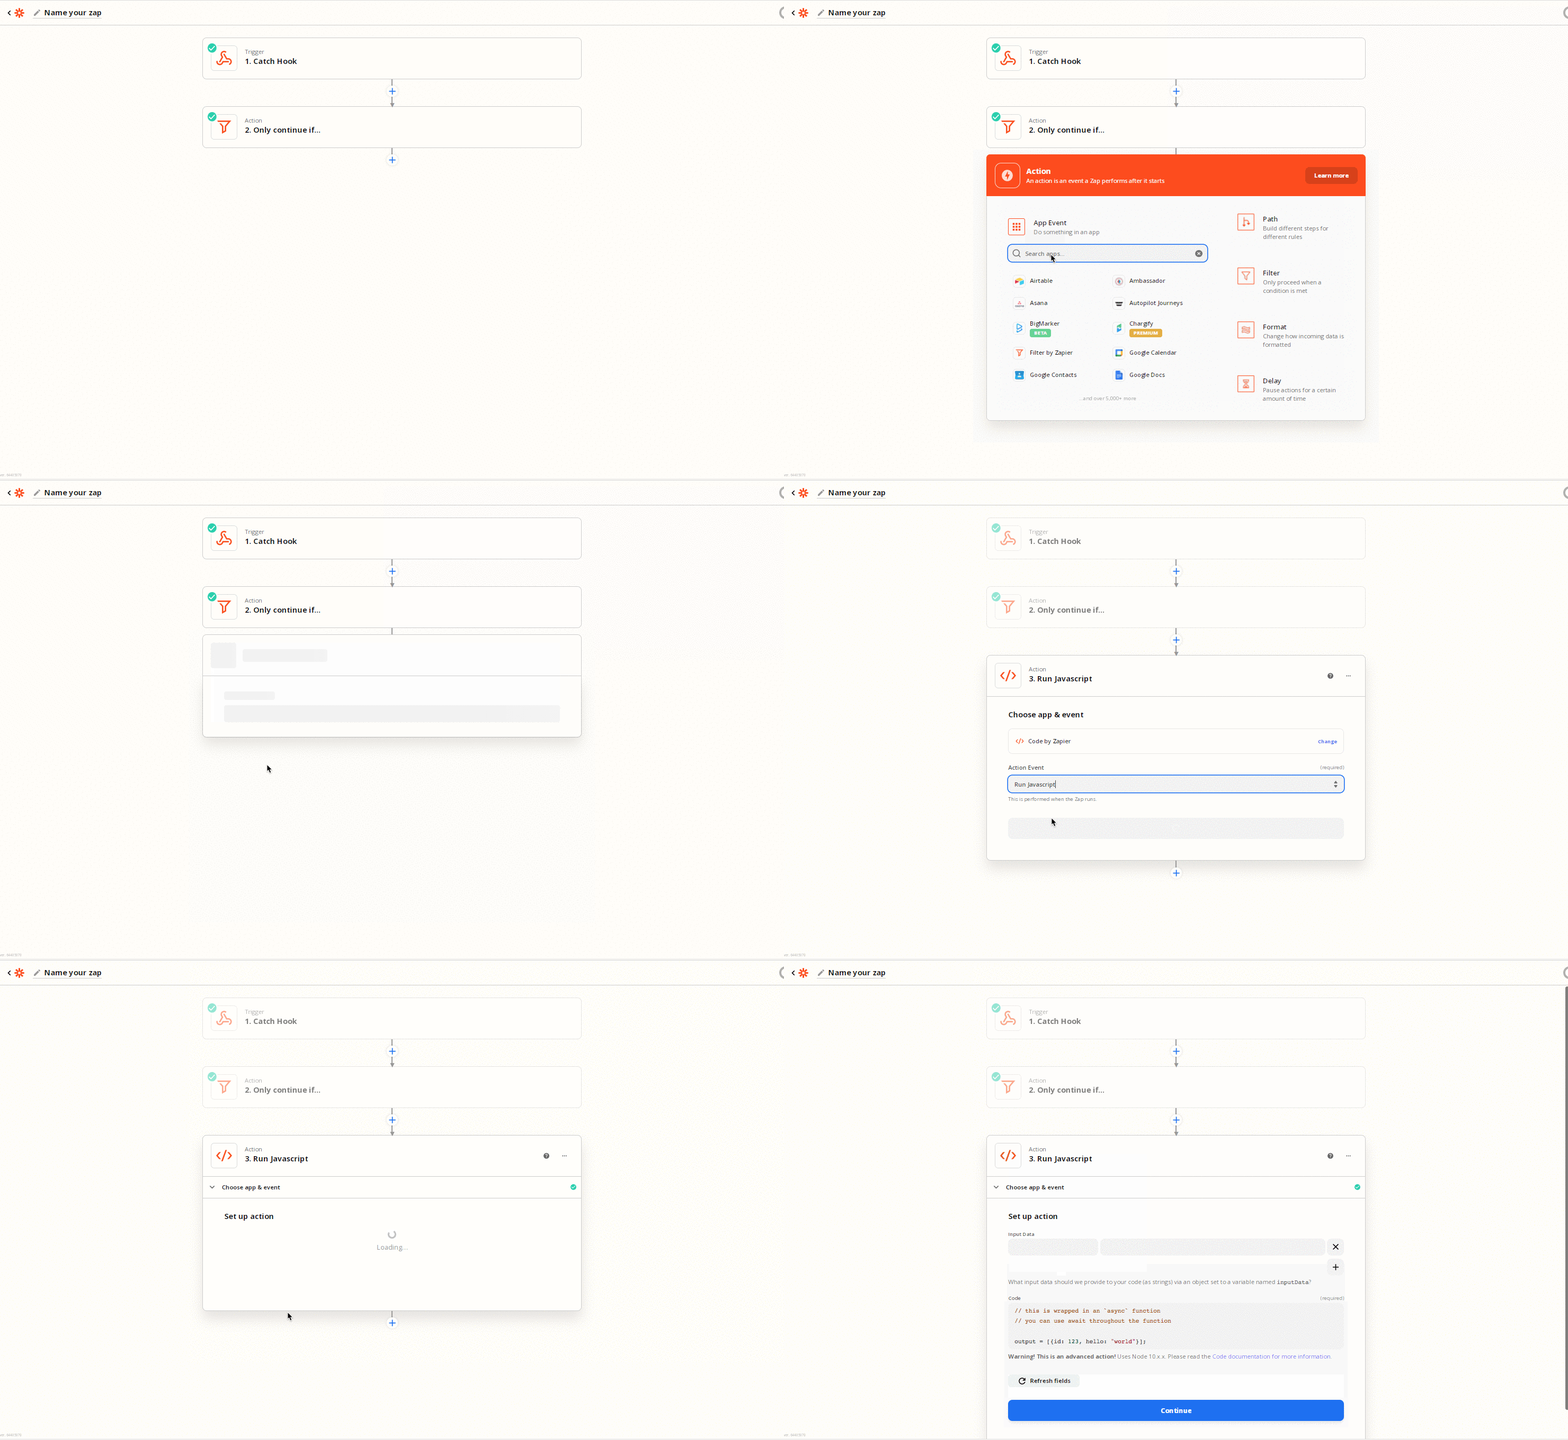
In Zapier, search for Code by Zapier and set the action event to Run Javascript.
Set a variable
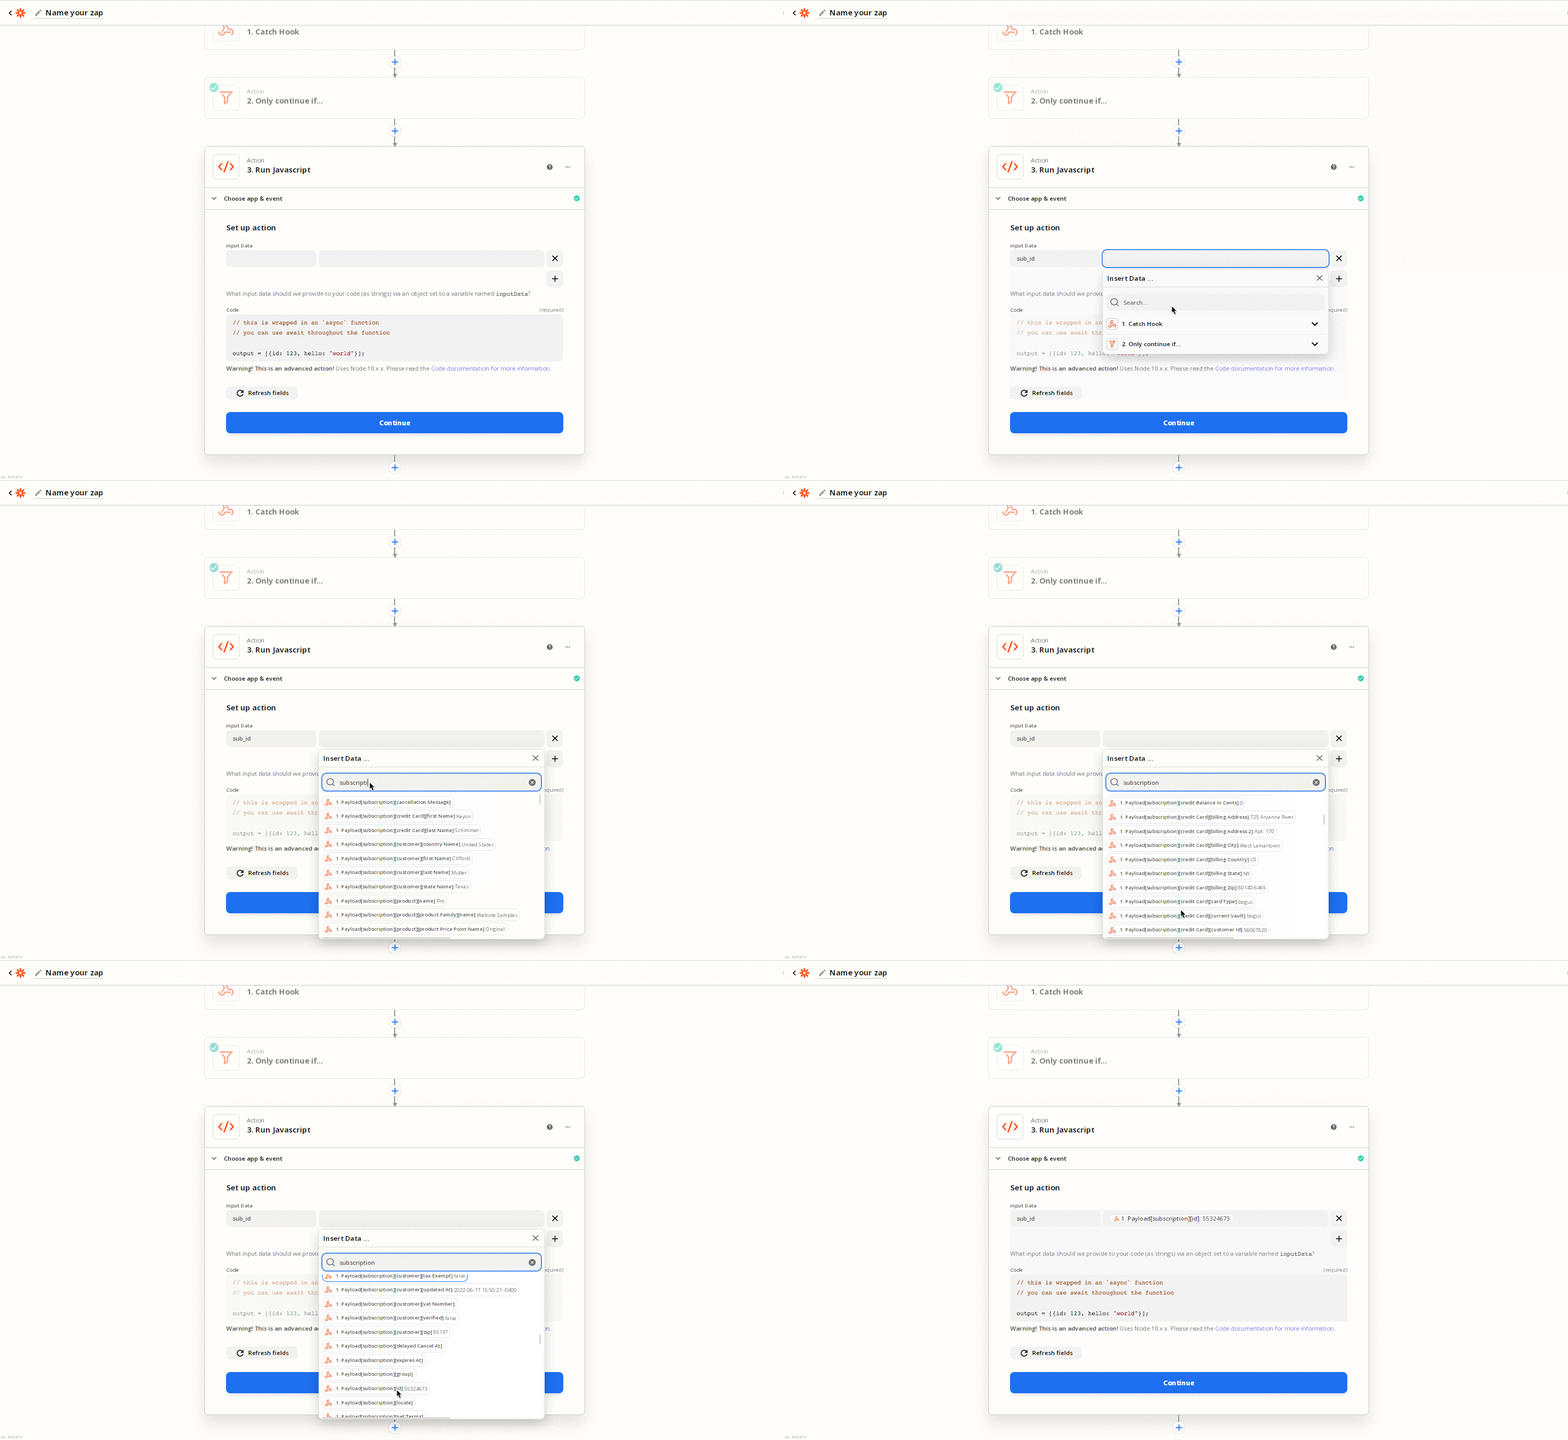
Define a variable and map it to data from the webhook. You usually want the subscription ID, so this example creates a variable called sub_id and maps it to the real subscription ID. Searching is awkward in this step, so take the time to confirm you pulled the correct field.
Write the custom API request
Make an API request back to Advanced Billing.
To write the API request
-
Copy this sample code into Zapier.
js//** //**CONFIG //** //Advanced Billing credentials var chargify_subdomain = 'subdomain'; var chargify_api_key = 'apikey'; //API request var http_method = 'POST'; //Use POST, PUT, or DELETE var endpoint = '/subscriptions/' + inputData.sub_id + '/price_points.json'; //Example of updating a subscription price point //JSON body. Example of components below: var json = {"components": [ { "component_id": 1506141, "price_point": "second-price-point" } ] }; //** //**ZAPIER API REQUEST //** fetch('https://' + chargify_subdomain + '.chargify.com' + endpoint, { method: http_method, headers: { 'Content-Type': 'application/json', "Accept": "application/json", 'authorization': 'Basic ' + Buffer.from(chargify_api_key + ":x").toString('base64') }, body: JSON.stringify(json) }) .then(function(res) { var text = res.json(); callback(null, text); }) .then(function(body) { var output = {"body": body}; callback(null, output); }) .catch(callback); -
Edit the CONFIG section of the code:
- Advanced Billing credentials - Replace the subdomain and API key. You are entering an API key into Zapier, so create a new API key dedicated to Zapier rather than reusing an existing one.
- API request - Set
http_methodto POST, PUT, or DELETE, and edit the endpoint as needed. Keep the structure as it is, and note that thesub_idvariable is already included. - JSON body - Replace the example body with your own.
As written, the sample sends a POST to
/subscriptions/{id}/price_points.json, which changes a subscription's component price point. See the price points endpoint for its full request body. To change something else, such as the next billing date, swap in the corresponding endpoint and method from Update Subscription.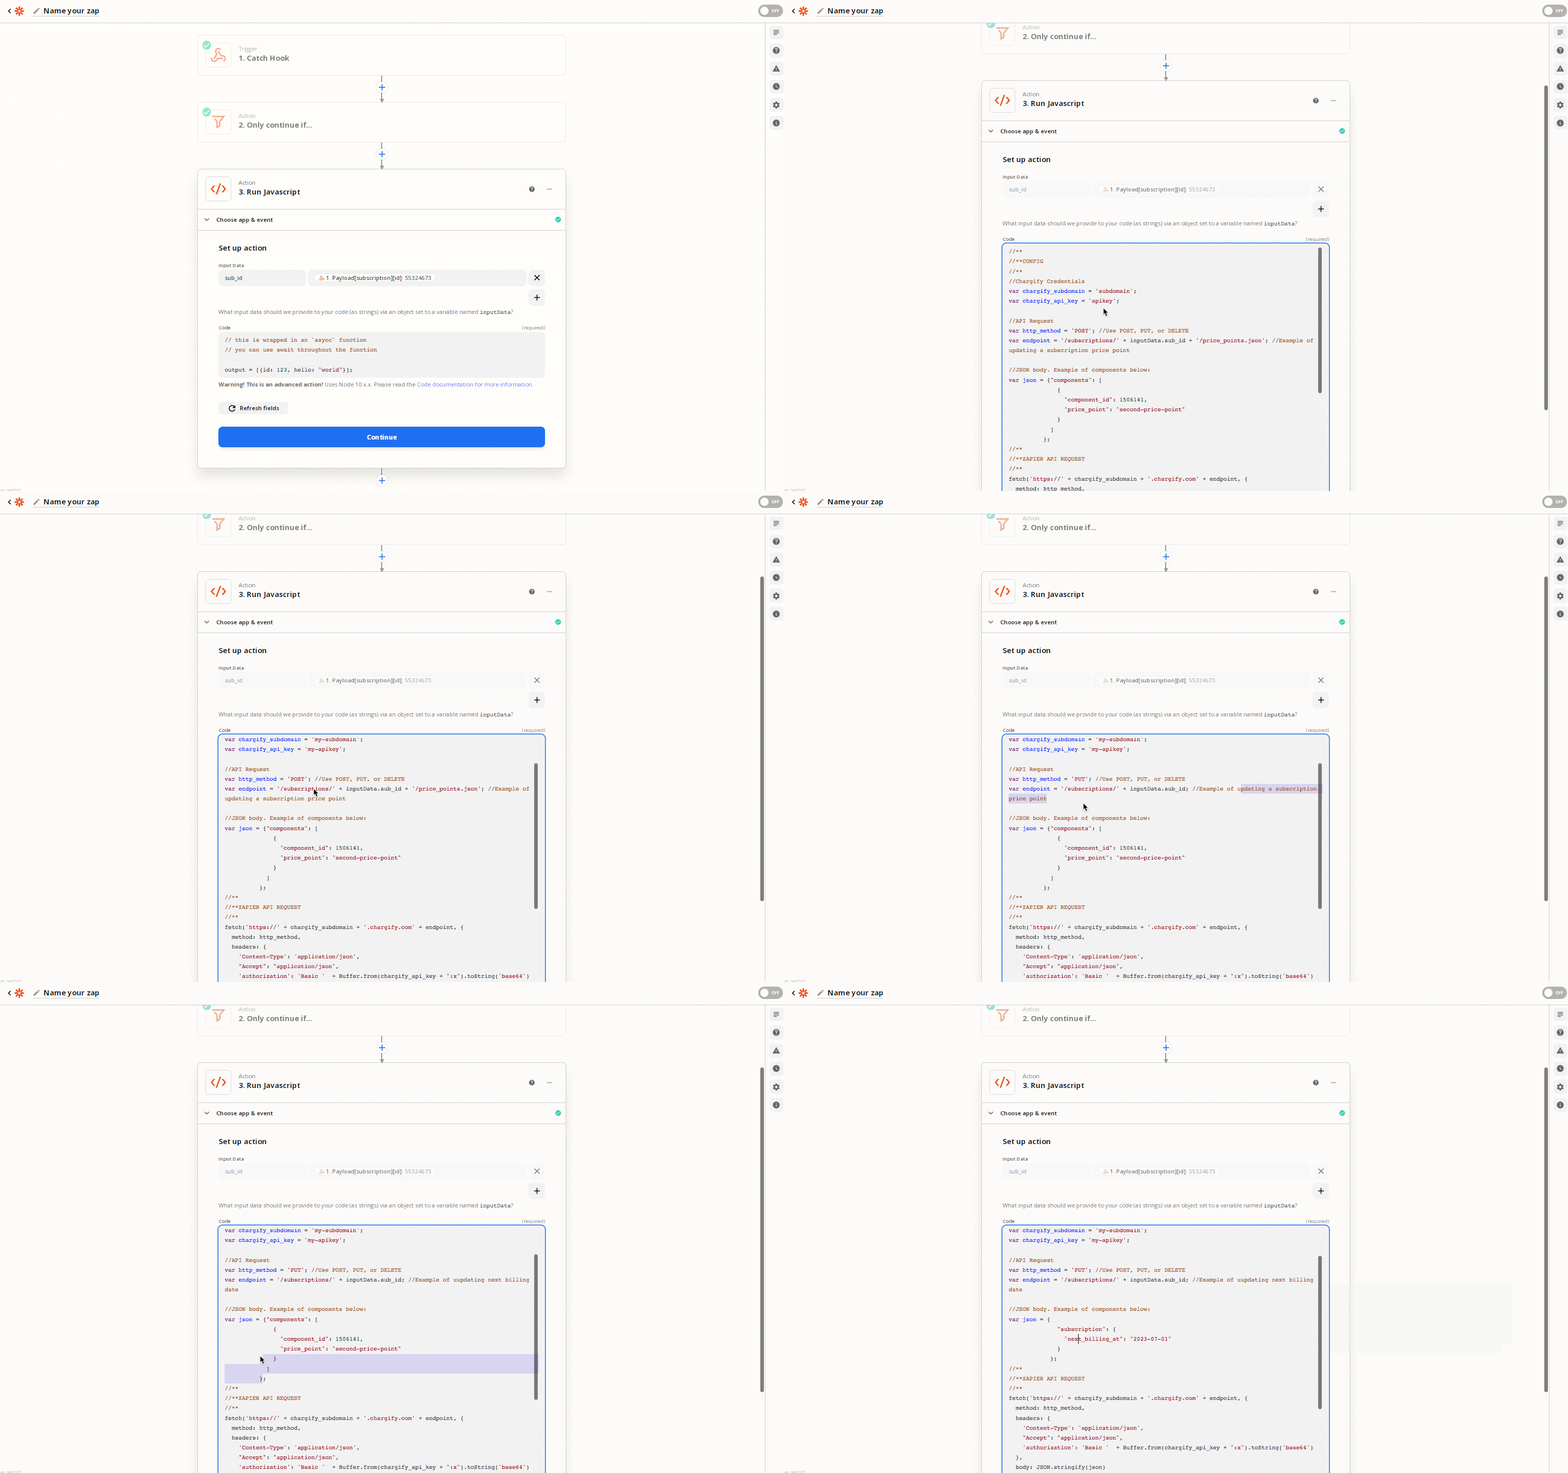
Test the workflow
Run the Zap end to end and confirm the API request reaches Advanced Billing and returns a success response.
To test the workflow
- Save your changes from the previous step, then click Test & Continue.
- If it didn't work, review the Zap. Zapier displays any errors it hit.
Note: Maxio does not help debug Zapier workflows.
Cyclr
Cyclr suits medium to large businesses integrating Advanced Billing with other systems, particularly where the integration is complex.
The recording below implements a workflow using webhooks and the Advanced Billing API with no code. The trigger and action are: when a new subscription is created in Advanced Billing, update that subscription's next billing date in Advanced Billing. It covers the Cyclr Webhook method and Cyclr's Advanced Billing API connector.
https://drive.google.com/file/d/1nULARfPSbDPQyvKSk3fd3UUdh61cUke1/previewA no-code Advanced Billing workflow built in Cyclr
Set up a cycle
All three Cyclr examples below start from the same two stages. Set them up once, then follow whichever example you need.
In Cyclr, a Cycle means an integration or workflow.
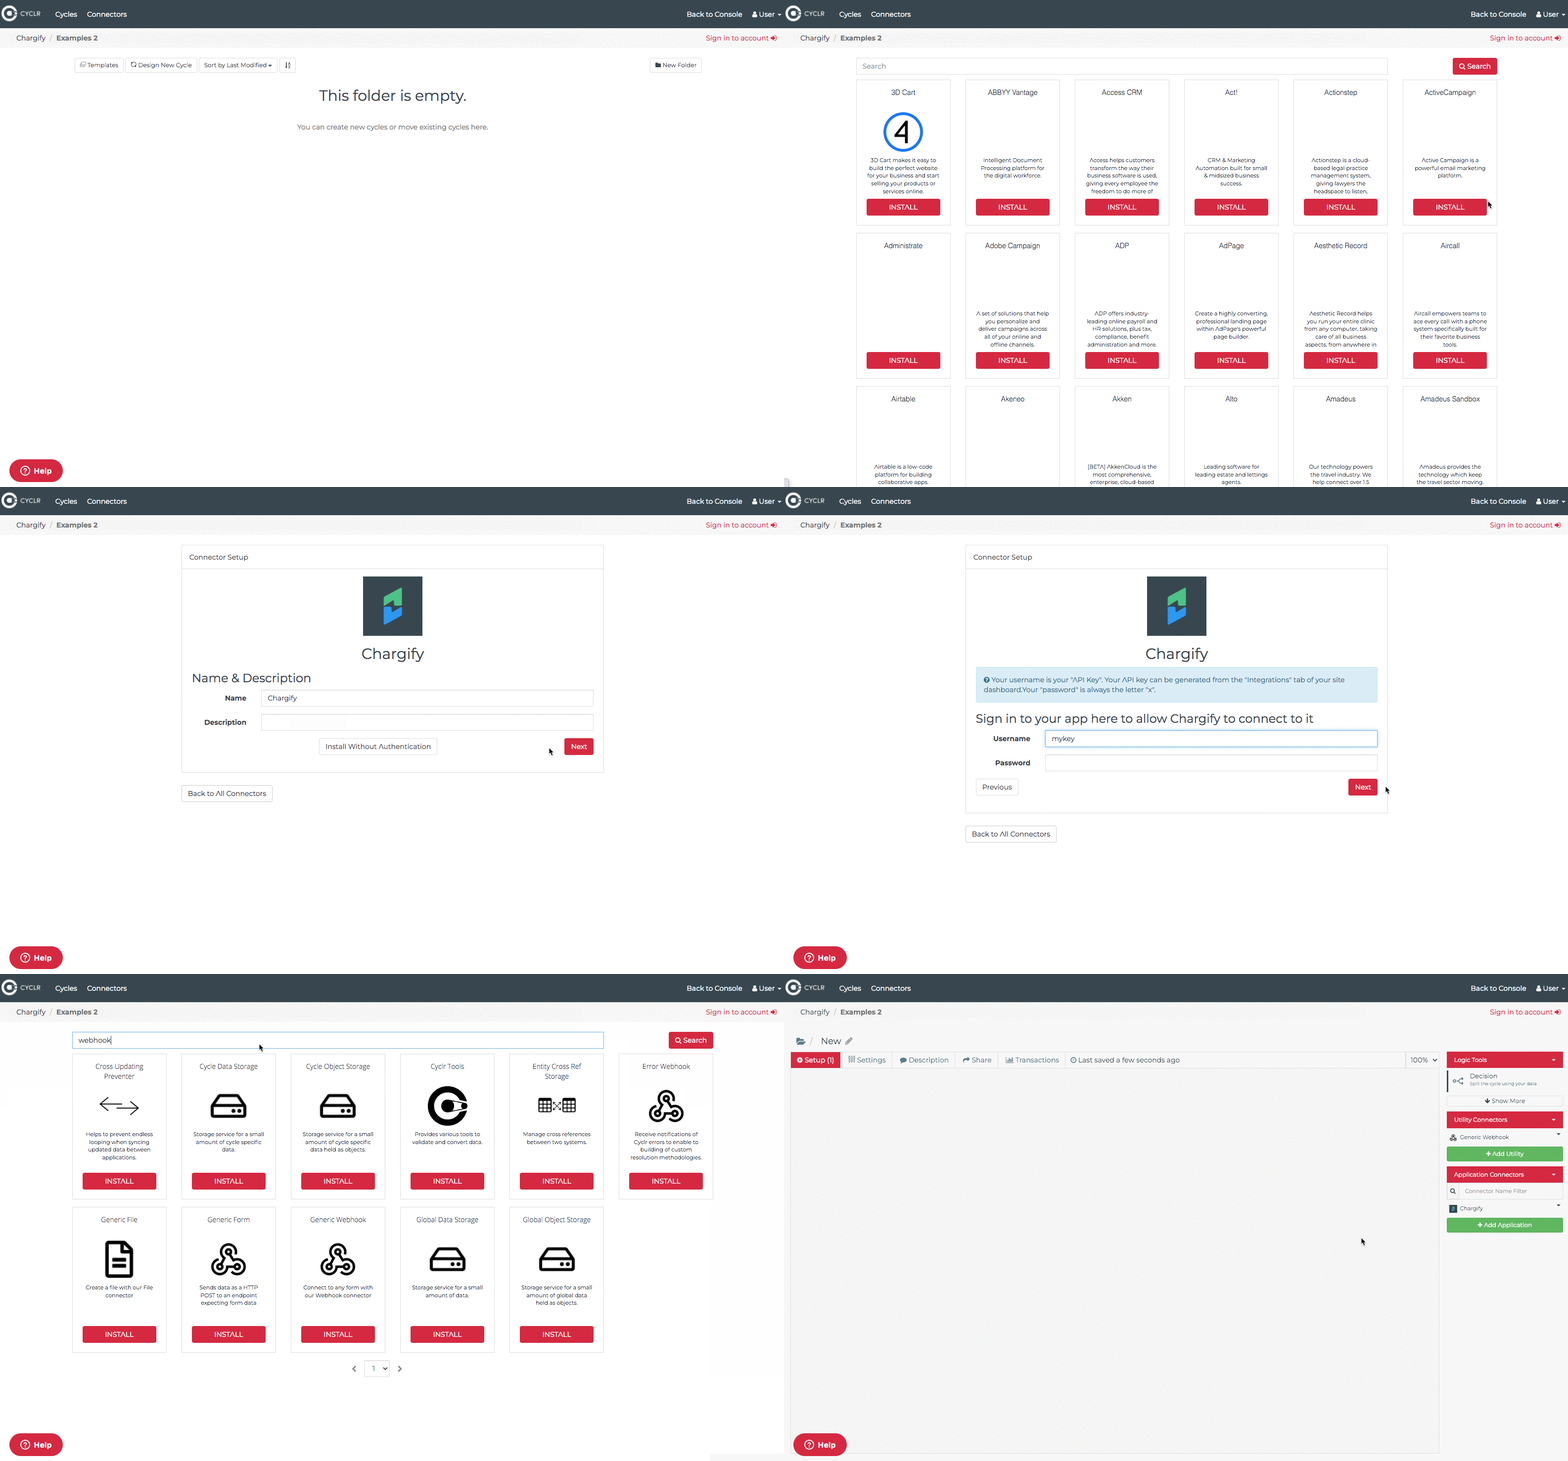
Create a new cycle
Start by creating the Cycle itself and installing the two connectors every example needs: the Advanced Billing connector, which authenticates against your Site, and the Generic Webhook connector, which receives the trigger.
To create a new Cycle
-
Click Design New Cycle and name the Cycle.
-
Add the Advanced Billing connector:
- Click + Add Application, search for Advanced Billing, and click Install.
- On the Name & Description screen, click Next.
- On the Connector Setup screen, add your Advanced Billing subdomain and click Next.
- On the next screen, add your Advanced Billing API key in the Username field, leave the Password field blank, and click Next. Create a new API key dedicated to Cyclr rather than reusing an existing one.
-
Add the Generic Webhook connector. You are now back on the main Cycle screen.
- On the right, click + Add Utility and search for webhook.
- Find Generic Webhook and click Install.
- On the Name & Description screen, click Next.
Set up the webhook
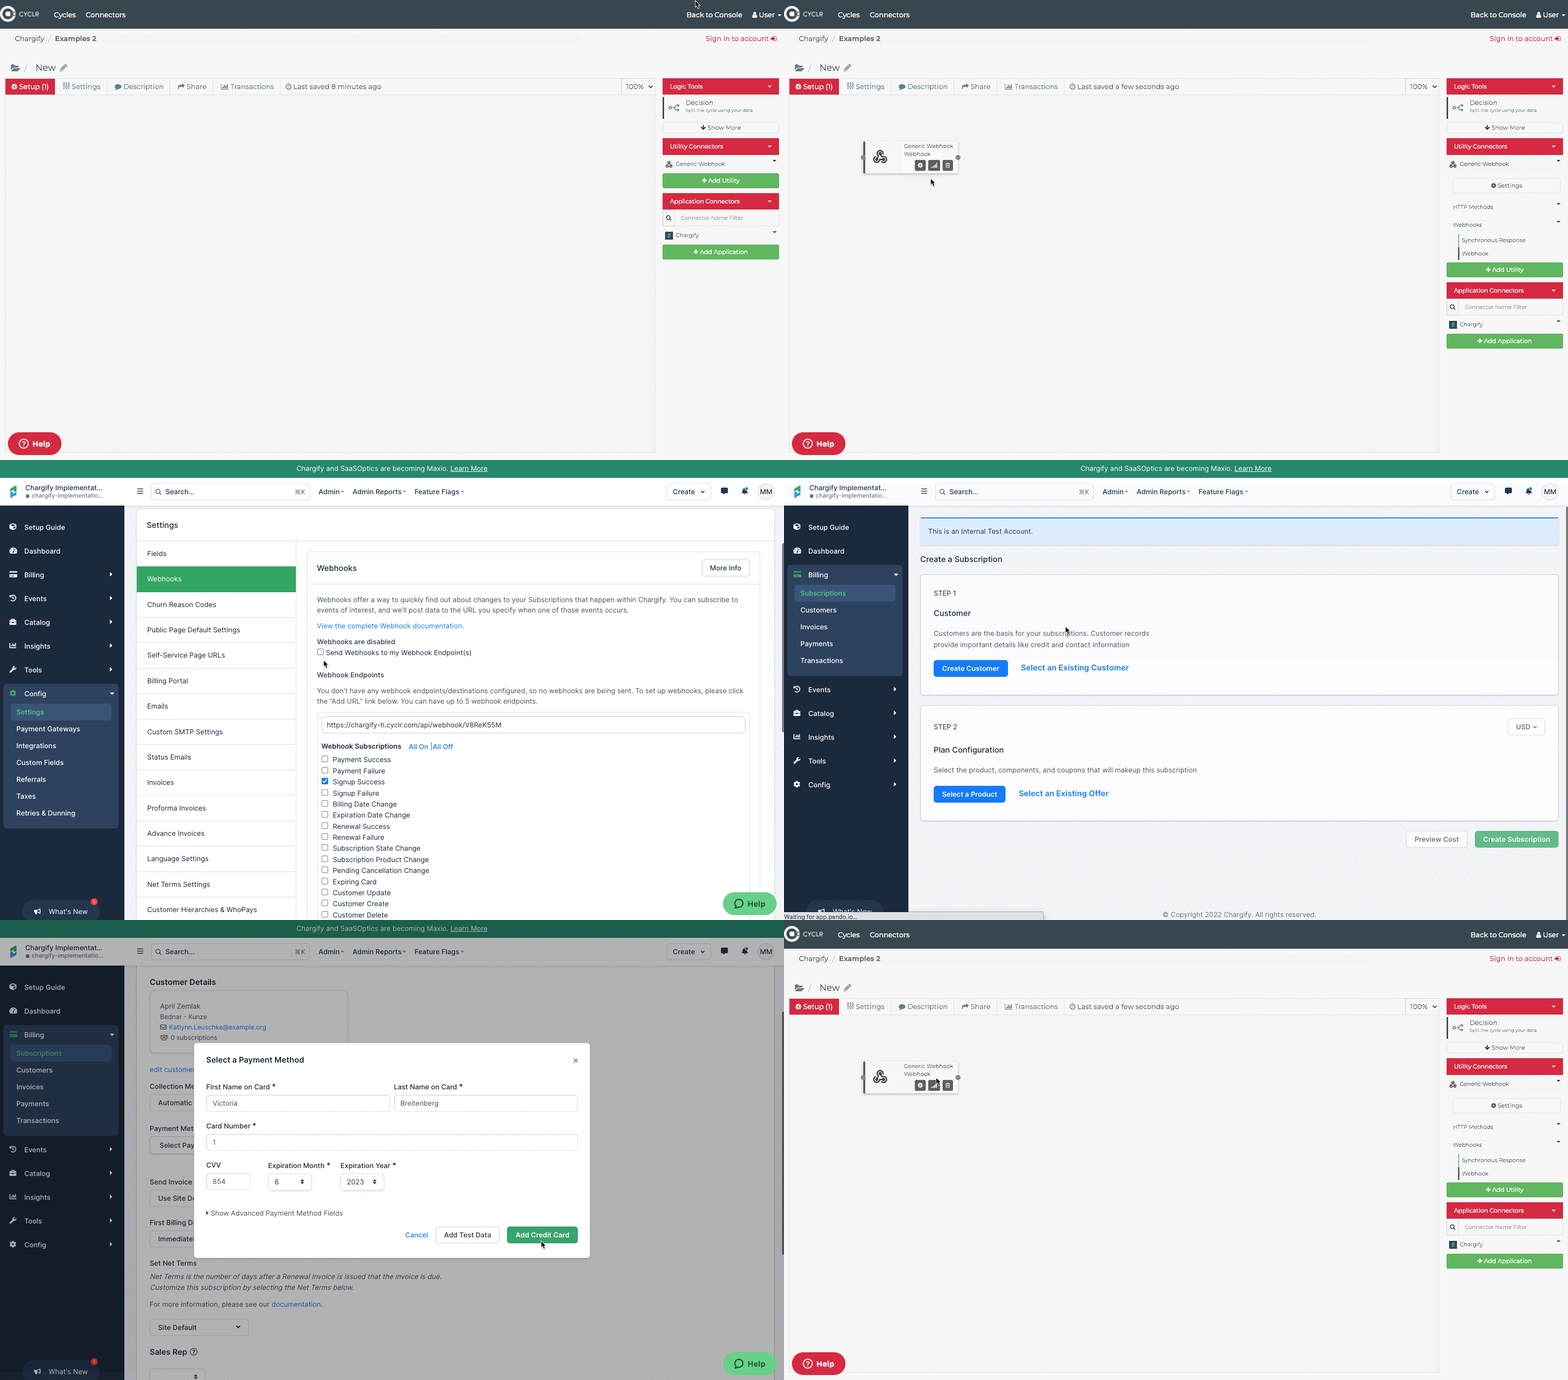
Connect the Cycle to an Advanced Billing webhook so it triggers on the event you care about. This example uses signup_success.
To set up the webhook
-
On the main Cycle screen, click Generic Webhook and drag the method called Webhook onto the Cycle template.
-
On the Webhook method, click the cog wheel and copy the webhook URL.
-
In Advanced Billing, go to Config > Settings > Webhooks. Add the webhook URL to your webhook settings, select Signup Success, select Send webhooks to your webhook endpoints, then click Save Changes.
-
Perform field discovery:
- In Cyclr, click Close on the webhook URL screen.
- Click the bar icon
 to open Field Discovery.
 - While Field Discovery is on, go to Advanced Billing and create a test subscription.
- Wait 10 to 30 seconds after the subscription is created for Cyclr to discover the fields.
-
Confirm field discovery succeeded. A green success message appears in the top right corner once the fields are discovered.
Example 1: perform an action in Advanced Billing
This example updates a subscription in Advanced Billing after it is created. It is deliberately simple, but the same shape extends to any action in any third-party system, with as many steps as you need. For the flow diagram, see the Cyclr Example 1 diagram.
Complete Set up a Cycle above first.
Configure the Advanced Billing action
This example uses a single Advanced Billing action, but you can add as many as you need across as many systems as you need, including filter steps and reads from Advanced Billing or elsewhere.
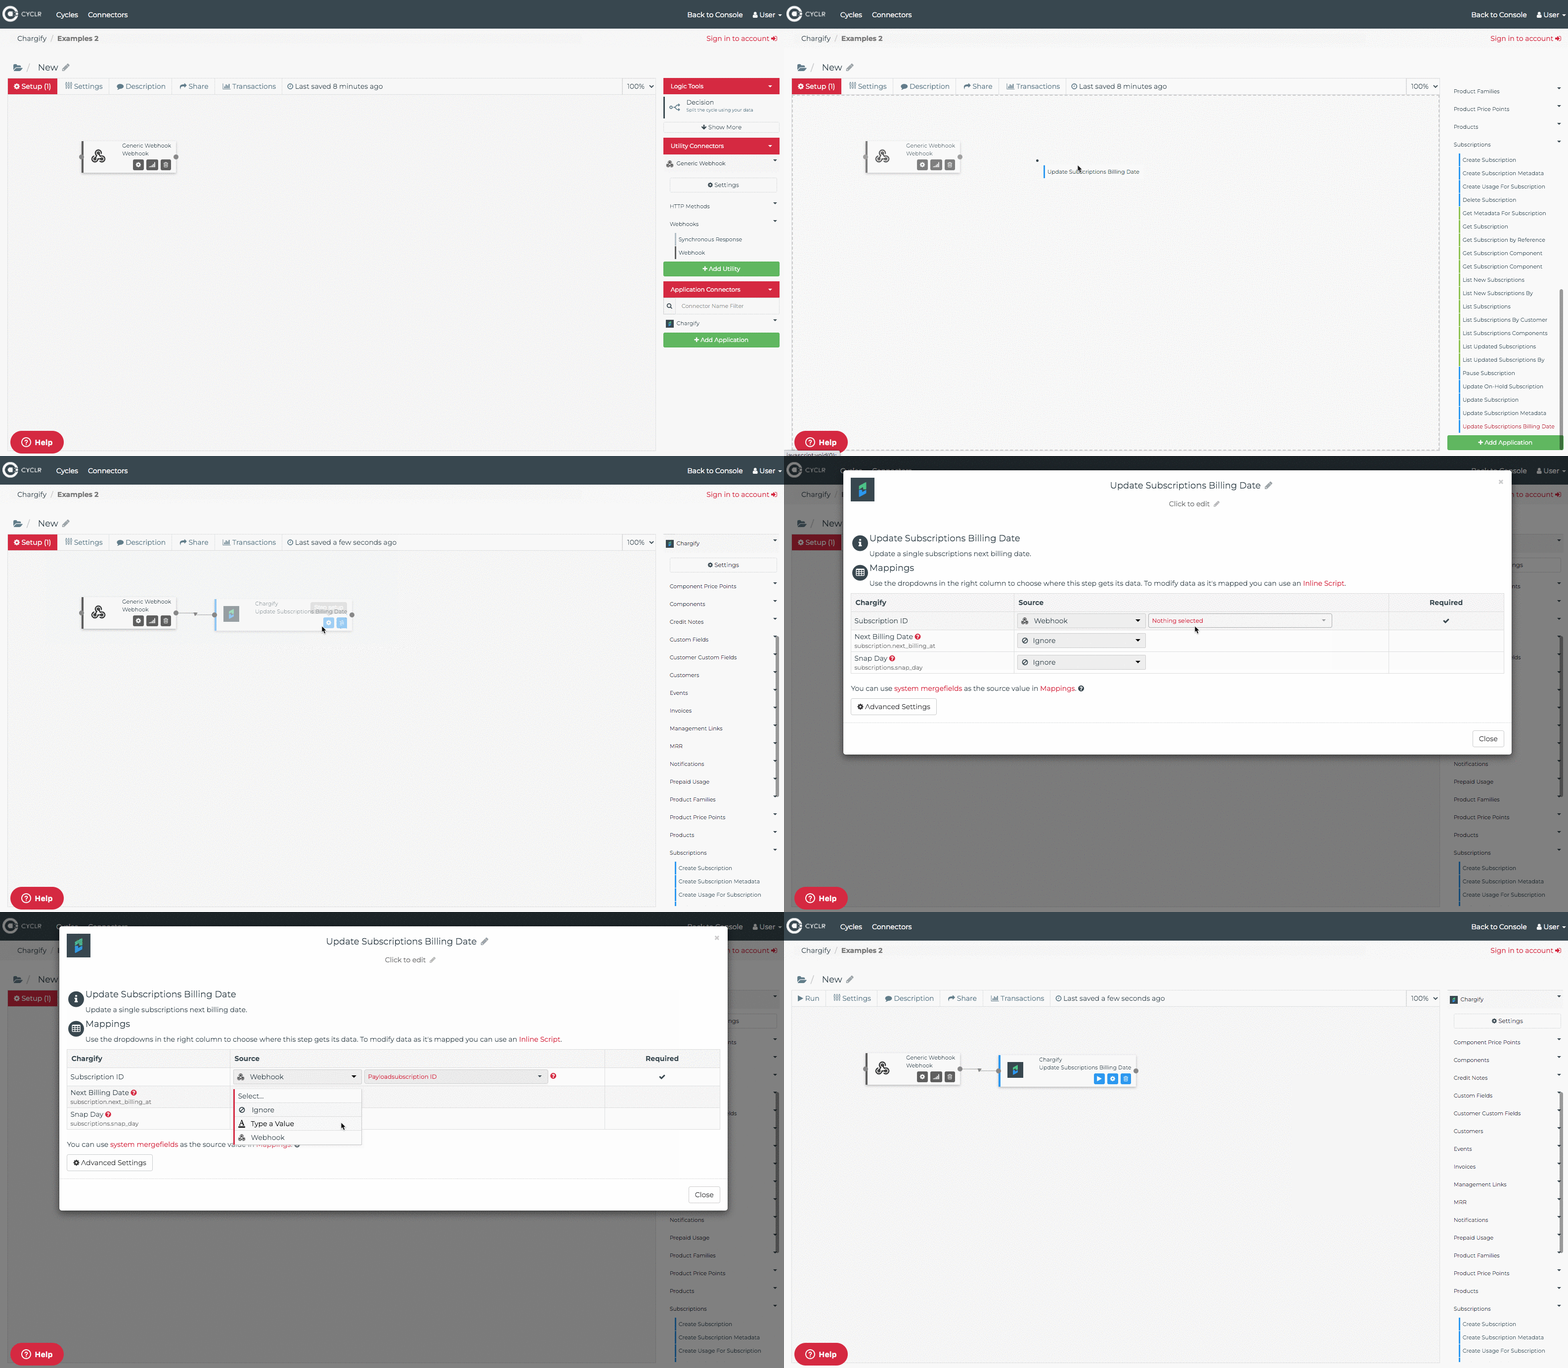
To configure the action
-
On the main Cycle screen, click Advanced Billing on the right side and find the action you want. Drag it onto the template, then connect the Webhook box to the Advanced Billing box.
-
Map the data:
- Click the cog icon
 to open the Advanced Billing action.
 - Map your data.
- Repeat for each additional step.
- Click the cog icon
Test the cycle
Run the Cycle live and confirm the webhook triggers it and the Advanced Billing action applies the change you expect.
To test the Cycle
-
Turn on the Cycle by clicking the Run icon
 .
. -
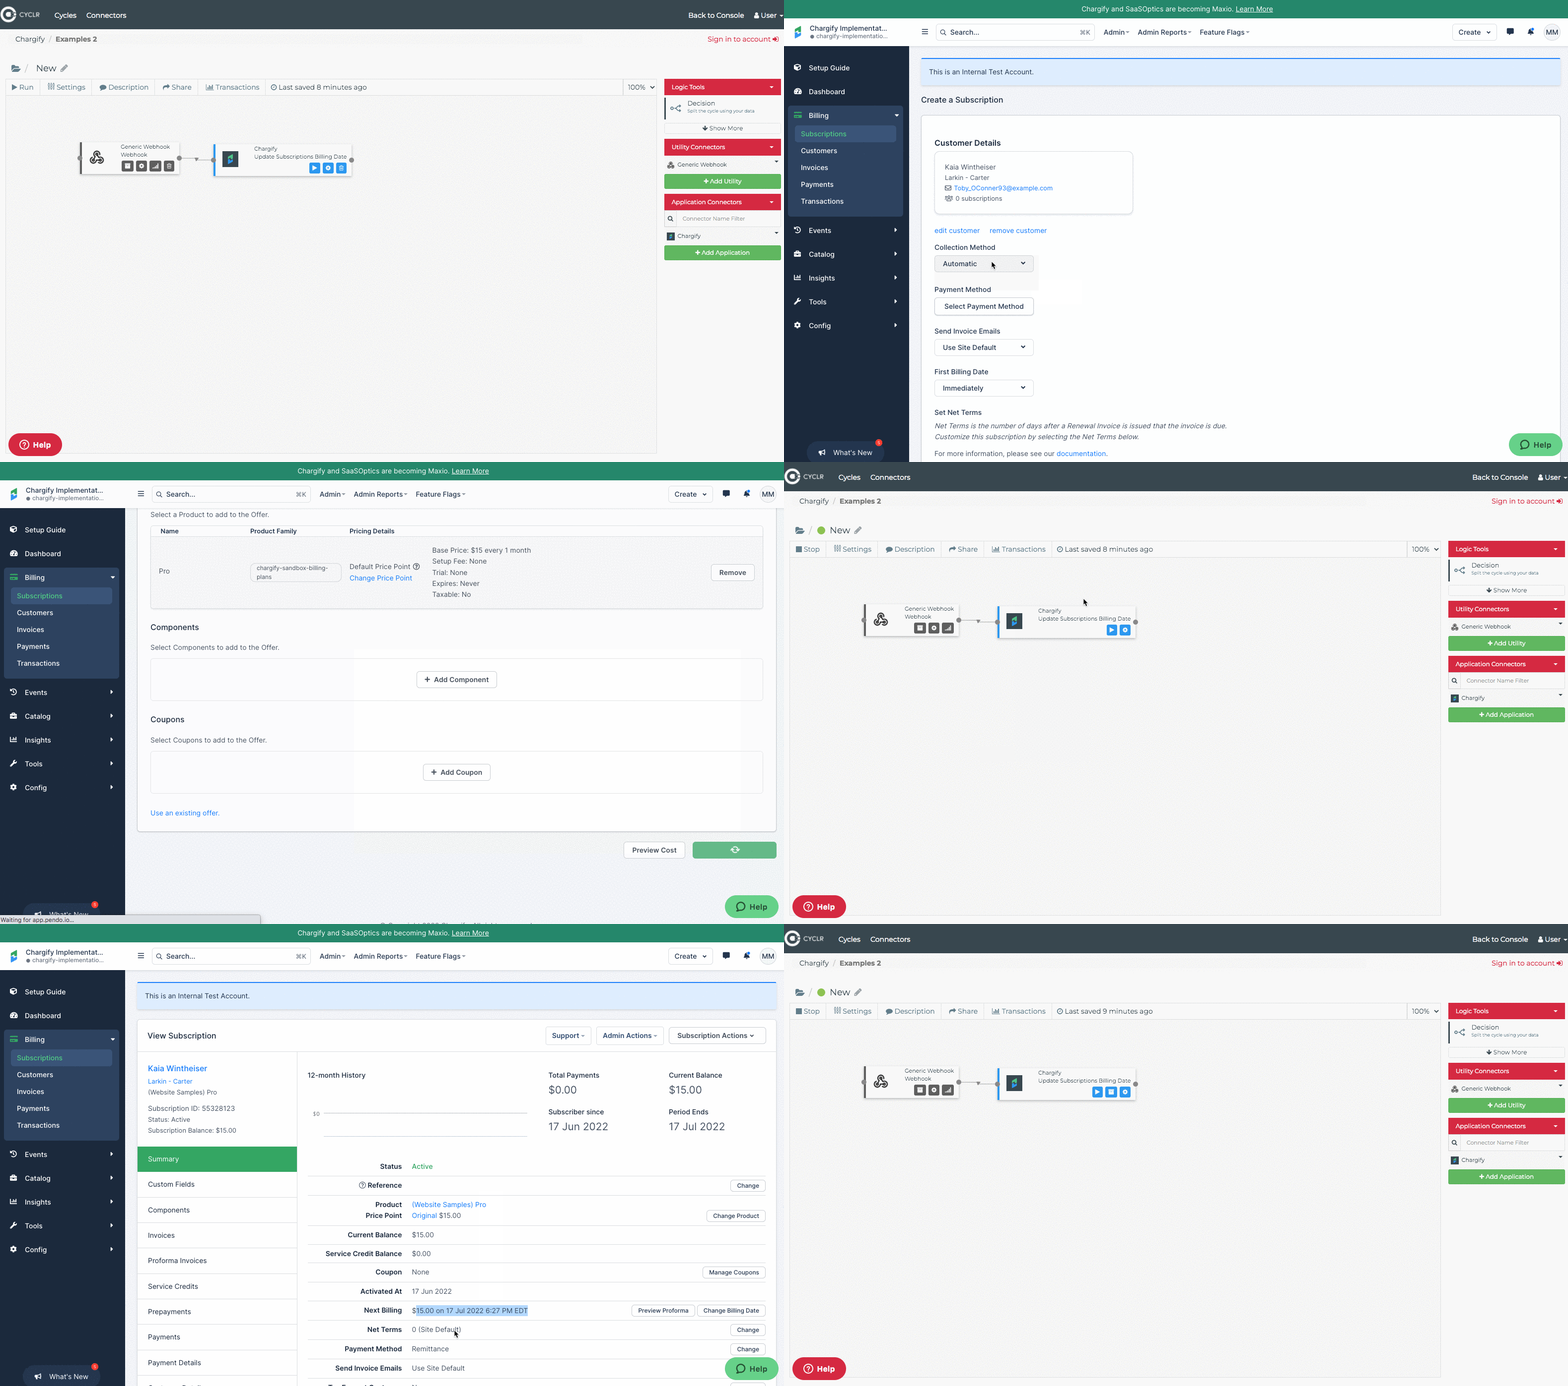
Go to Advanced Billing and perform your real action. Return to Cyclr and wait up to a minute. A spinning icon on a step shows it running in real time. Refresh the Advanced Billing page you were on, such as the subscription page, to see the update.
-
Click the Stop icon
 when you finish testing.
 -
Add steps, edit steps, and map data until the Cycle does what you need.
Note: Maxio does not help debug Cyclr workflows.
Example 2: create a multi-step, multi-system integration
This example chains several actions across two systems: read the subscription, read its custom fields, read the matching company from HubSpot, then update that company in HubSpot. It shows how the single-action pattern in Example 1 extends to a real multi-system workflow. For the flow diagram, see the Cyclr Example 2 diagram.
Complete Set up a Cycle above first.
Configure the Advanced Billing and third-party actions
The recording below walks through building all four steps and mapping the data between them.
https://drive.google.com/file/d/182MEXE-BiLgT9-sS0MCSq3-0Snc_X5kq/previewBuilding a multi-step Advanced Billing to HubSpot integration in Cyclr
Test the cycle
Test this Cycle the same way as Example 1. See Test the Cycle above.
Note: Maxio does not help debug Cyclr workflows.
Example 3: schedule a workflow with batch processing
This example replaces the webhook trigger with a batch job that runs on a schedule and performs a task each time.
Complete Create a new Cycle above first. This example does not need the webhook stage, since the batch job replaces the trigger.
Add the batch job and action
Cyclr can read Advanced Billing objects through the API in bulk. This example uses List New Subscriptions, which reads every subscription created since the last run. Cyclr records the most recent subscription it read and resumes from there on each run.
To add the batch job
-
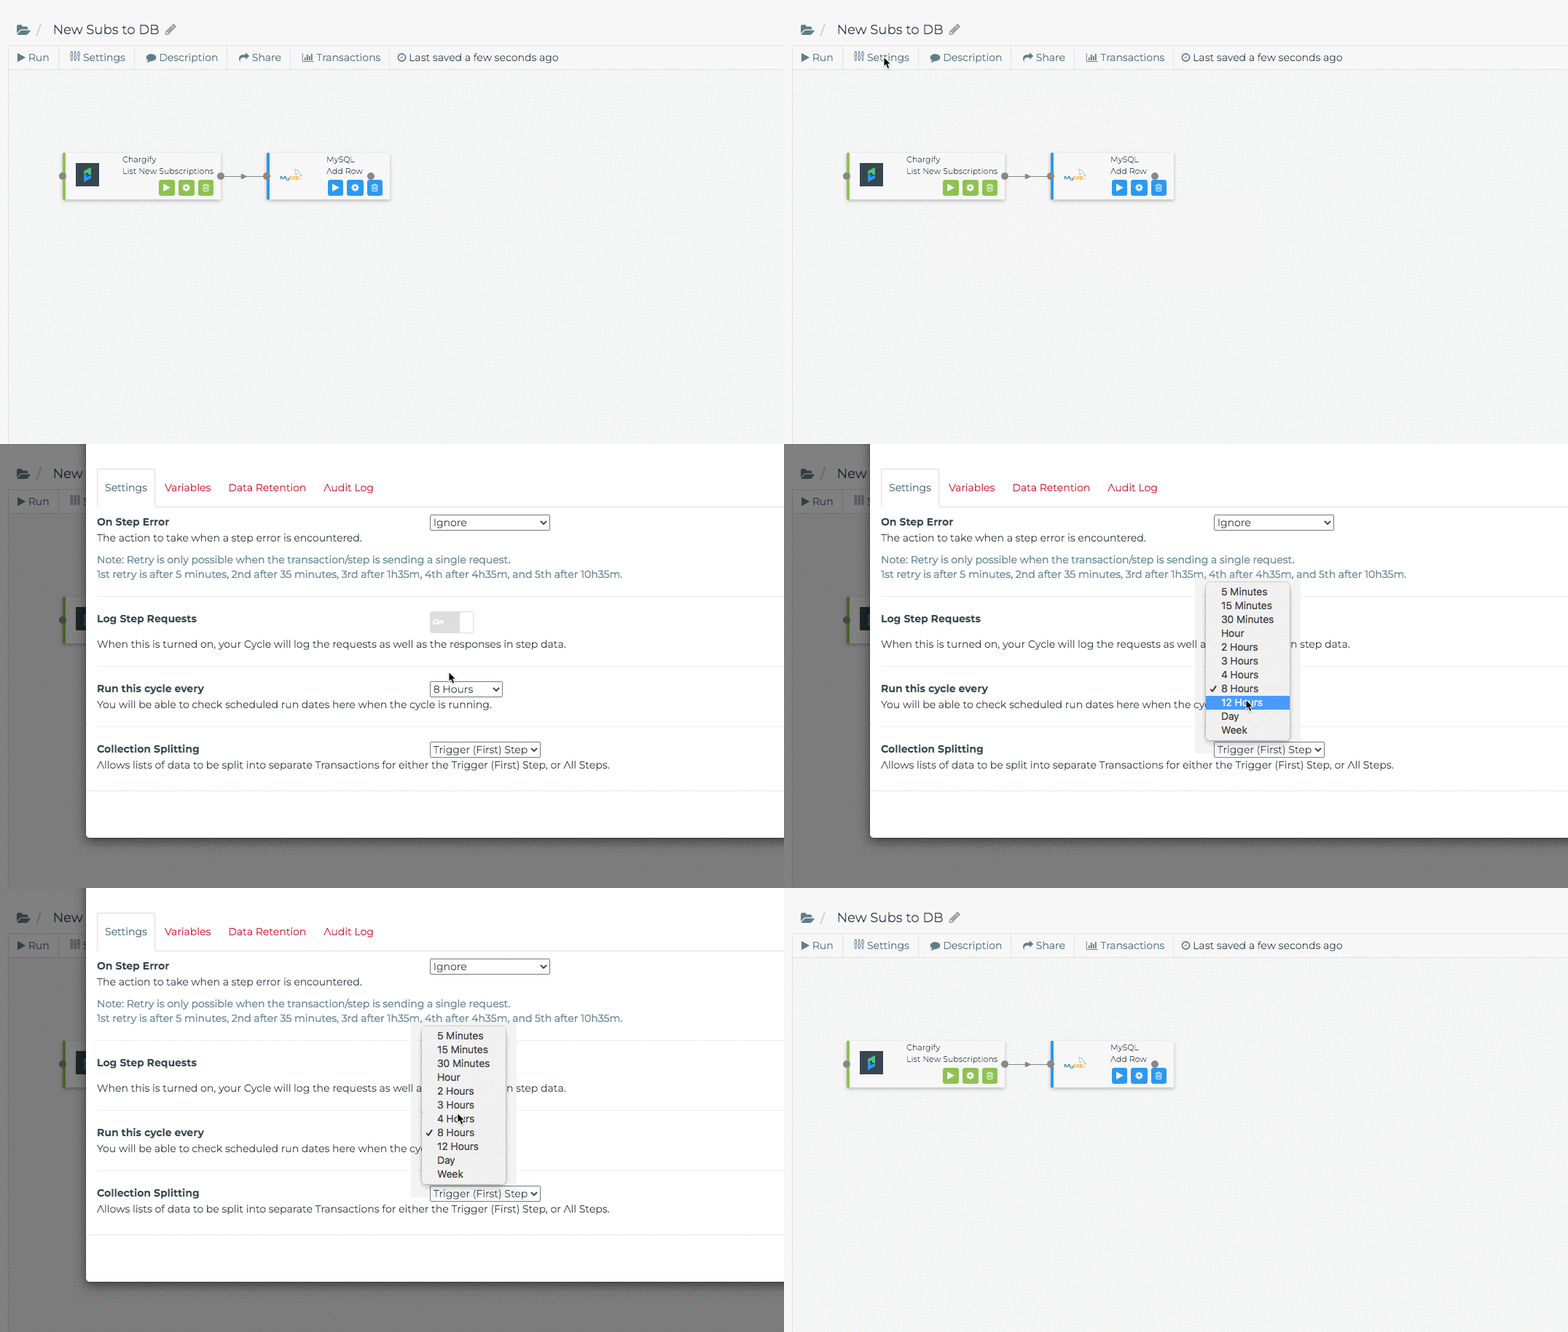
On the main Cycle screen, click List New Subscriptions and drag it onto the template.
-
Set the Cycle to run at an interval. This example uses three hours.
Set the action
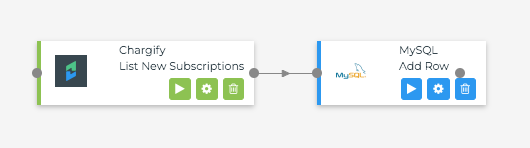
The action can be a single step or a series of steps across any combination of systems. This example points to a single database step.
Test the cycle
Test this Cycle the same way as Example 1. See Test the Cycle above.
Note: Maxio does not help debug Cyclr workflows.
FAQs
How much do iPaaS solutions cost, and which one should I use?
See the iPaaS comparison in Core Resources for Building an Integration, which sets Zapier and Cyclr side by side on cost, capability, and scope.
Can Maxio help me build my integration?
No. Maxio can answer questions about which Advanced Billing webhooks or API endpoints you need, but building the integration is your responsibility.
Can Maxio help me configure an iPaaS?
No. Maxio can answer questions about which Advanced Billing webhooks or API endpoints you need, but the iPaaS implementation is your responsibility.
Still need help?
Reach out and our support team will take it from here.