
Configure the Billing Portal
Applies to: Advanced Billing
Last updated on Sep 19, 2026
The Billing Portal gives your customers a prebuilt place to change plans, cancel, update payment details, and edit their contact information, without you writing any code. Configure it once, test it against a real Subscription, and your customers can manage their own Subscriptions from that point on.
Before you start
| Requirement | Detail |
|---|---|
| Feature | Billing Portal |
| You need | To know which actions you want your customers to take when they self-manage their Subscriptions |
| Code | No |
| Difficulty | Low |
Set the basics
Most of the portal's behavior comes from a single settings page. Work down it in order, and leave the Management Links setting until the next section.
To configure the basic Billing Portal settings
- Go to Config > Settings > Billing Portal.
- Select Enabled for this site. The remaining settings appear underneath.
- Under Subscriber Invitations, choose how invitation emails are sent.
- Automatic invitation emails for new subscribers sends an invitation automatically whenever a Subscription is created.
- Manual invitation emails only sends nothing automatically, so you invite subscribers yourself from the Subscriptions tab.
- (Optional) Set a Portal Link Expiration Time, in seconds, to control how long a portal management URL stays valid. This defaults to 65 days (5,616,000 seconds), and the maximum is 6 months (15,552,000 seconds). Use this if your login flow uses one-click sign-on from your app. This field appears only if Maxio Support has enabled it for your Site.
- Select the features you want your customers to have. They are grouped under Subscription Management, Billing & Payments, and Account & Branding.
- Under Sort Products for Plan Changes, choose the order products appear in when a customer picks a new one. The default is By Creation Date, Oldest First.
- Under Adjust Product Change Strategy, choose how a plan change is billed. See the options table below.
- Skip Management Links for now. The next section covers it.
- Enter a Merchant Name. This appears in the top left of the portal, unless you upload a logo, which replaces it.
- Enter your Merchant Info. This appears on the left side of the portal and on its main login page.
- If you selected Automatic invitation emails for new subscribers in step 3, edit the invitation email template. For prebuilt templates, see the Resources section below.
- Upload a Logo. This is recommended, and it replaces the merchant name at the top of the portal.
- Select Save.
Product change strategy options
| Option | What it does |
|---|---|
| Prorated upgrades and downgrades | Prorates the change in both directions. This is the default setting. |
| Prorate upgrades and no proration downgrades (Delayed Product Change) | Prorates upgrades immediately, but delays downgrades to the next renewal with no proration. |
| Instant product change, no proration | Applies the change immediately without prorating it. |
| Delayed product change | Holds the change until the next renewal. |
Important: Term Subscriptions always receive immediate product changes, whichever strategy you select.
Set login settings
The Management Links setting you skipped controls whether a customer must verify their email address before the portal opens. Choose the option that matches the login method you plan to implement.
Management Links options by login method
| Your login method | Select |
|---|---|
| One-click sign-on | Anyone with the URL can access the associated Billing Portal (less secure) |
| Email-based login | Require customers to verify their email before logging in |
With email-based login, the email address is the one the customer used when signing up, and the password is one they set the first time they open the portal.
Important: While you are still testing, select Anyone with the URL can access the associated Billing Portal (less secure) whichever method you plan to use. It makes testing much faster. Return to this setting and set the real value before you go live.
Test your configuration
Create a real Subscription, open its portal link, and confirm the portal behaves the way you configured it.
To test the Billing Portal
-
Create a test Subscription that mirrors what a real customer would do.
-
Go to Billing > Subscriptions and select the Subscription you just created.
-
Scroll to the bottom of the Subscription and find View Billing Portal Management Link.
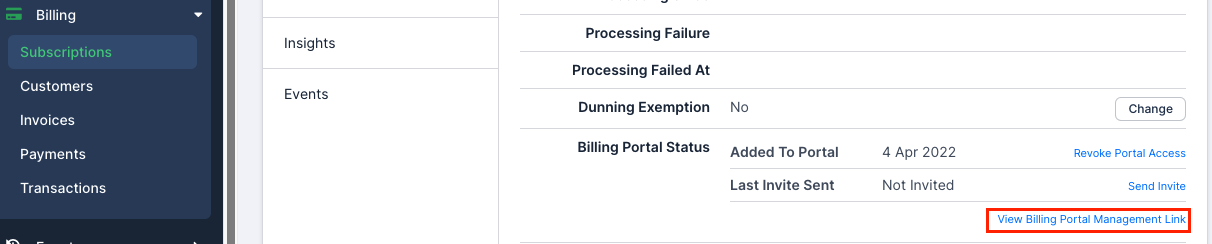
-
Copy the management link, load it in your browser, and work through the portal as a customer would.

-
Adjust your settings and repeat until the portal behaves the way you want.
Add custom CSS
Custom CSS lets you change the design of the portal beyond the logo and merchant name. Maxio Support must enable this feature before the Custom CSS setting appears.
A common use is hiding part of the portal. If the element has a div ID, you can hide it directly.
/* Hide a section */
#div_id {
  display: none;
}
To have the feature enabled, contact Maxio Support.
Resources
Prebuilt templates and themes for the portal and its invitation email are available on GitHub.
Related information
For the full reference on every portal feature toggle, see Configuring Billing Portal Options.
Once the portal is configured, choose how customers reach it in Implement Billing Portal Login for your Customers.
Still need help?
Reach out and our support team will take it from here.