
Design your Subscription Management Flow
Applies to: Advanced Billing
Last updated on Aug 27, 2026
Choosing a subscription management method is only half the decision. You also need to design what happens in your own systems after a customer changes or cancels a Subscription. Work through both parts here, and you finish with a method chosen for your customers, a method chosen for your staff, and a diagram of the workflow that runs after each change.
Before you start
| Requirement | Detail |
|---|---|
| Feature | All subscription management methods: Billing Portal, API, Embeddable Components, Advanced Billing Admin UI, Salesforce, HubSpot |
| You need | An understanding of how your end customers and your staff manage Subscriptions, and your post-management flows, if any |
| Code | No |
| Difficulty | Low |
Choose your subscription management method
Settle the method first, because it determines which implementation guide you follow and which login method, if any, you need to configure.
1. Choose your subscription management method
You most likely have an idea of which method you want to use. Before implementing, review Compare Subscription Management Methods to confirm the method you want supports the subscription types and payment methods you need.
2. Determine your authentication method
If you chose the Billing Portal, decide how your users authenticate into it.
Billing Portal authentication options
| Option | How it works |
|---|---|
| Email invite | When a new Subscription is created, a Billing Portal invitation email is sent automatically, containing a one-time access link. The user clicks the link, signs in for the first time, and sets a password. For each later login, the user signs in with the email address from their Subscription and that password. |
| Login page | On your website, typically in a menu, header, or footer, you link directly to the main login page for your Billing Portal. The user signs in with the email address from their Subscription and their password. |
| In-app button | Inside your web app, a signed-in user clicks a Manage My Subscription button. A new browser window opens and the Billing Portal loads. |
3. Find your guide
Match your answers from the two previous steps to find the implementation guide you need.
Implementation guide by method and authentication option
| If you chose | And authentication is | Your guide is |
|---|---|---|
| Billing Portal | Email invite | Configure the Billing Portal, then Configure an invite via email |
| Billing Portal | Login page | Configure the Billing Portal, then Implement a link from your website |
| Billing Portal | In-app button | Configure the Billing Portal, then Implement one-click sign-on |
| API | Not applicable, because the API runs inside your own app | Build your own Billing Portal with the Advanced Billing API |
| None | Not applicable, because there are no users | Not applicable |
| Advanced Billing Admin UI | Not applicable, because staff sign in to Advanced Billing | These features are prebuilt. Contact your implementation consultant for help. |
| Salesforce | Not applicable, because staff sign in to Salesforce | These features are prebuilt. Contact your implementation consultant for help. |
| HubSpot | Not applicable, because staff sign in to HubSpot | These features are prebuilt. Contact your implementation consultant for help. |
Design your post-management workflow
Designing the workflow that runs after a subscription change is typically the hardest part of an implementation. Use the framework below to break it into pieces you can reason about one at a time.
1. Understand the workflow framework
Most workflows have four parts, whatever their subject.
The four parts of a workflow
| Step | Name | Description |
|---|---|---|
| 1 | Trigger | How the workflow begins, typically an Advanced Billing webhook. |
| 2 | Data | The data you need and where it lives in Advanced Billing. If the trigger gives you everything, continue. If not, make an API request to fetch the rest. |
| 3 | Filters | Optional criteria that decide whether the workflow continues. For example, continue if the Customer signs up to the bronze plan, but stop if they sign up to the gold plan. |
| 4 | Action | The thing you actually want to happen, either an API request back to Advanced Billing or an update to your own database. |
Real workflows get more complex than this, but the four parts are usually still identifiable inside them.
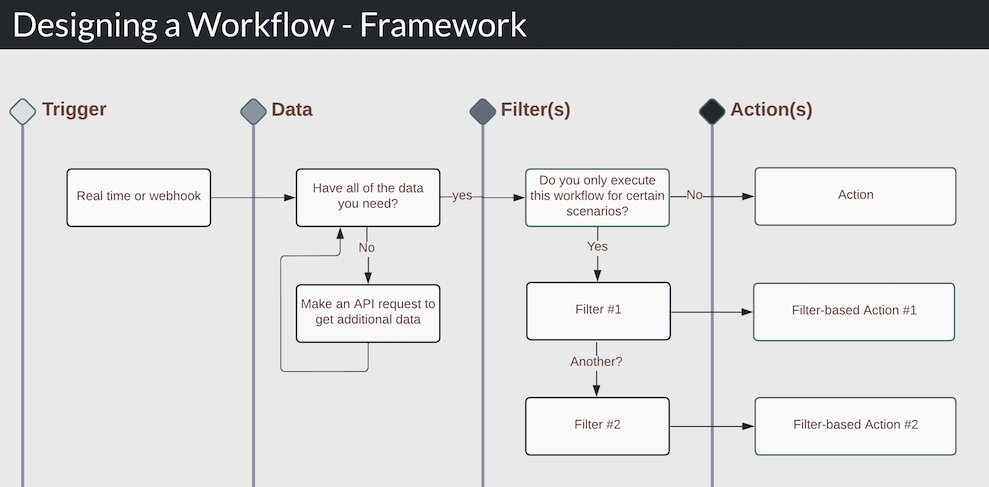
2. Diagram your workflow
Map your own workflow onto the four parts. Depending on your plan and onboarding package, your implementation consultant can advise on which webhooks and API endpoints to use.
3. Select an implementation method
Any workflow can be built in one of three ways.
Workflow implementation methods
| Method | Select if | Example |
|---|---|---|
| No code | You already know the system that powers the workflow for you, or you hire a developer to build it. | You hire a developer. |
| Low code | You already know the system that powers the workflow for you, and it needs only a small amount of code. | Zapier |
| Custom code | You or your team are developers who plan to write custom code. This is the most common choice. | You build an endpoint in your app that accepts Advanced Billing webhooks and runs the workflow. |
4. Start building
For worked examples, see Building Workflows with APIs and Webhooks.
Frequently asked questions
Can Maxio build my workflow for me?
No. Maxio is a product company rather than a professional services company, so building your workflow is your responsibility.
Can Maxio help me determine which API endpoints and webhooks to use?
Yes, depending on your onboarding plan. Contact your implementation consultant.
Related information
To compare the methods themselves before choosing one, see Compare Subscription Management Methods.
Still need help?
Reach out and our support team will take it from here.