
Set Custom Pricing on a HubSpot Deal
Applies to: Advanced Billing
Last updated on Sep 19, 2026
Create and sell subscriptions in HubSpot with negotiated, non-catalog pricing using the Custom Pricing wizard on the Subscription Preview. Finalized prices sync automatically back to HubSpot for accurate reporting, without requiring Advanced Billing console access.
Before you start
Confirm the following before setting a custom price on a deal.
Prerequisites
- The Advanced Billing and HubSpot integration is installed and connected.
- Products and components from Advanced Billing are available as HubSpot products and line items.
- Enable Custom Pricing from HubSpot to Advanced Billing is turned on for your site. See Configure HubSpot Integration Sync Options.
- You have permission in HubSpot to view deals and use the Subscription Preview.
Limitations
- Custom pricing is configured in the Subscription Preview wizard, not by editing HubSpot deal line items directly.
- Volume, tiered, and stair-step ("bracket") pricing schemes are supported, with their own bracket-editing controls in the wizard.
- Metered, usage-based components aren't recalculated by the same line-item pipeline as other components — check with Advanced Billing support before relying on custom pricing for a metered component.
If Custom Pricing is disabled for your site after prices were already set, those existing custom prices remain until someone manually deletes them, but you can no longer set new custom prices or edit the existing ones.
Set custom pricing on a HubSpot deal
The wizard opens from the Subscription Preview and walks you through negotiating a price for a product or component instead of using catalog pricing.
To set custom pricing on a HubSpot deal
- In HubSpot, open the target deal, then add your Products and Components as Line Items.
- Scroll to the deal's Activity section and open the Subscription Preview.
- On the Subscription Preview, select Custom Pricing next to the line item you want to reprice. The wizard opens with that deal's products and components preloaded.
- Use the wizard to set negotiated prices and quantities for products and components. Review calculated totals in real time, and set the billing period, trial (if applicable), and expiration (in days or months).
- Click Create Subscription in the wizard. The subscription is created in Advanced Billing using the custom values you entered.
What to expect
Advanced Billing writes the final line item values and the deal amount back to HubSpot, so reporting reflects your negotiated pricing.
Consider the following examples.
Example 1: Configure custom pricing for a new HubSpot deal
The steps below walk you through creating a new deal in HubSpot and applying custom pricing to both a Product and a Component, and show how to use the Setup Fee and Expiration options.
-
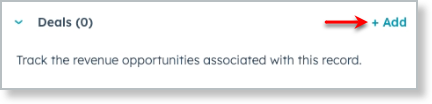
In the right panel of the Contact record, under the Deals section, click Add.
-
Enter the details of the new deal and then click Create. Next, add a Product and a Component as Line Items.
-
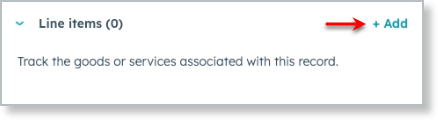
From the right panel, scroll down to the Line Items section and click Add.
-
To configure the Product line item, click Select from product library.
-
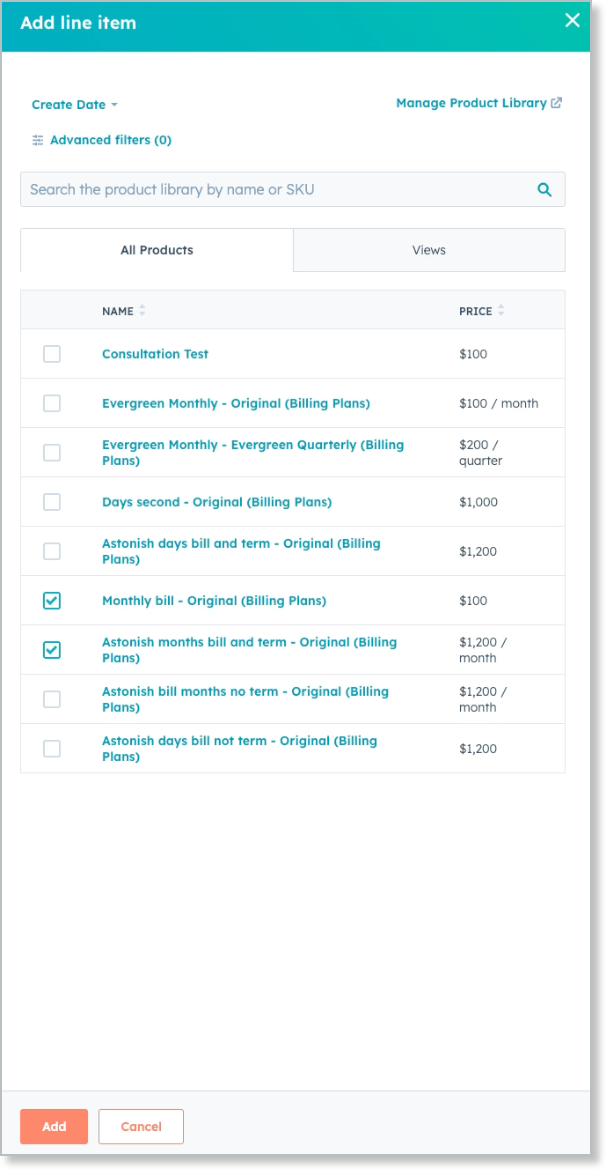
From the Add line item popup, select the Product and Component from the list.
In this example, the Product is "Astonish months bill and term" and the Component selected is "Monthly bill."
-
Click Add.
-
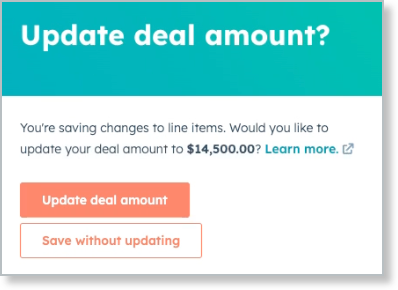
In the Line Item page, click Save. You'll be prompted to update the deal amount.
-
Click Update deal amount.
-
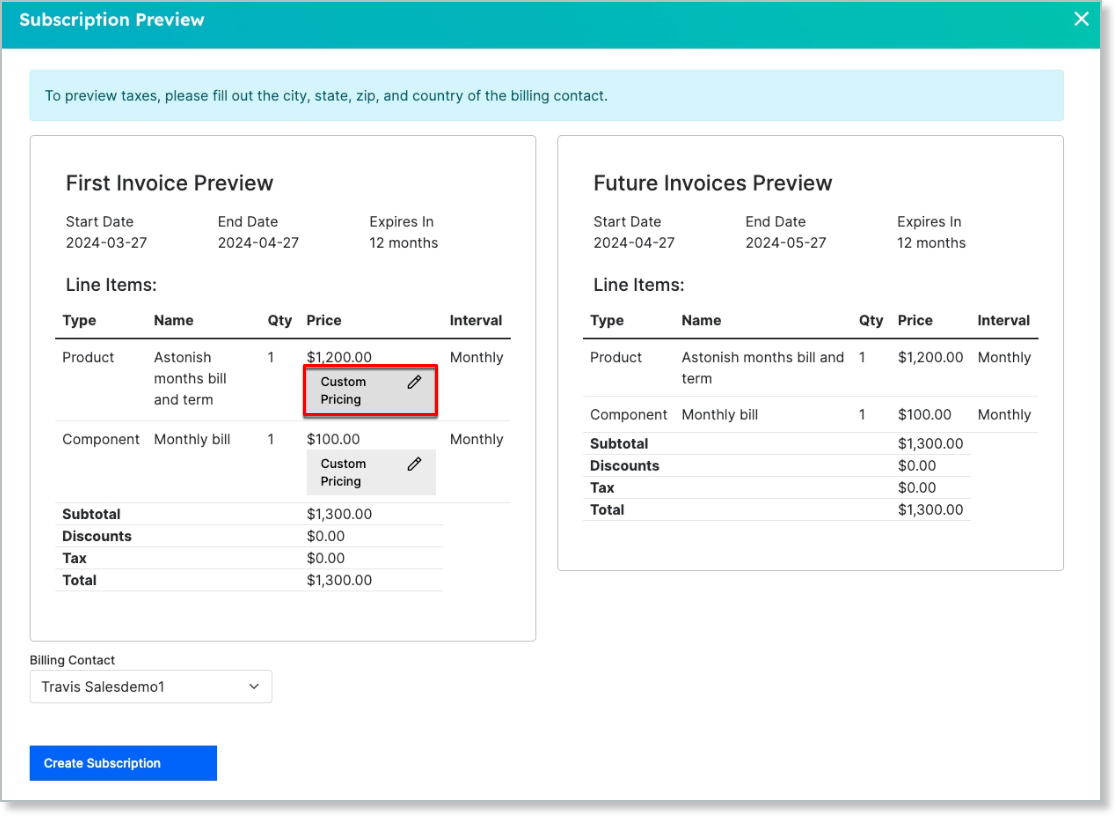
From the Deal page, click Subscription Preview.
-
In the First Invoice Preview, next to Product, click Custom Pricing.
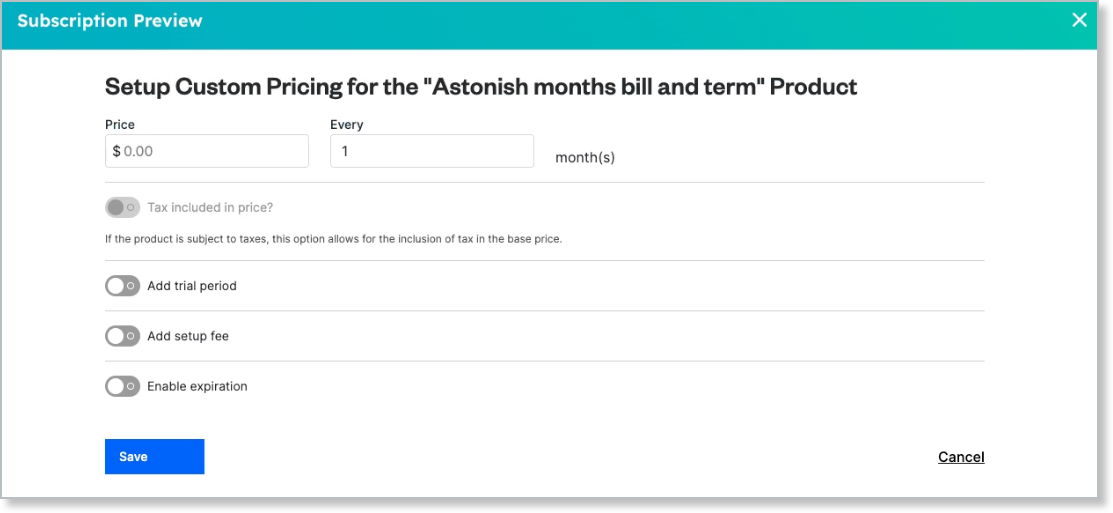
From the Setup Custom Pricing screen, you can edit the price and billing frequency, add a trial period, add a setup fee, or enable an expiration date.
-
From the Setup Custom Pricing screen, do the following:
-
For Price, enter $1000.50 for every 1 month.
-
Toggle Add setup fee to ON and enter a Price of $150 and click Charge setup fee before trial period.
-
Toggle Enable expiration to ON and set it to expire after 11 months.
Your setup should look like the following:
-
Click Save.
From the Subscription Preview, notice the updated items:
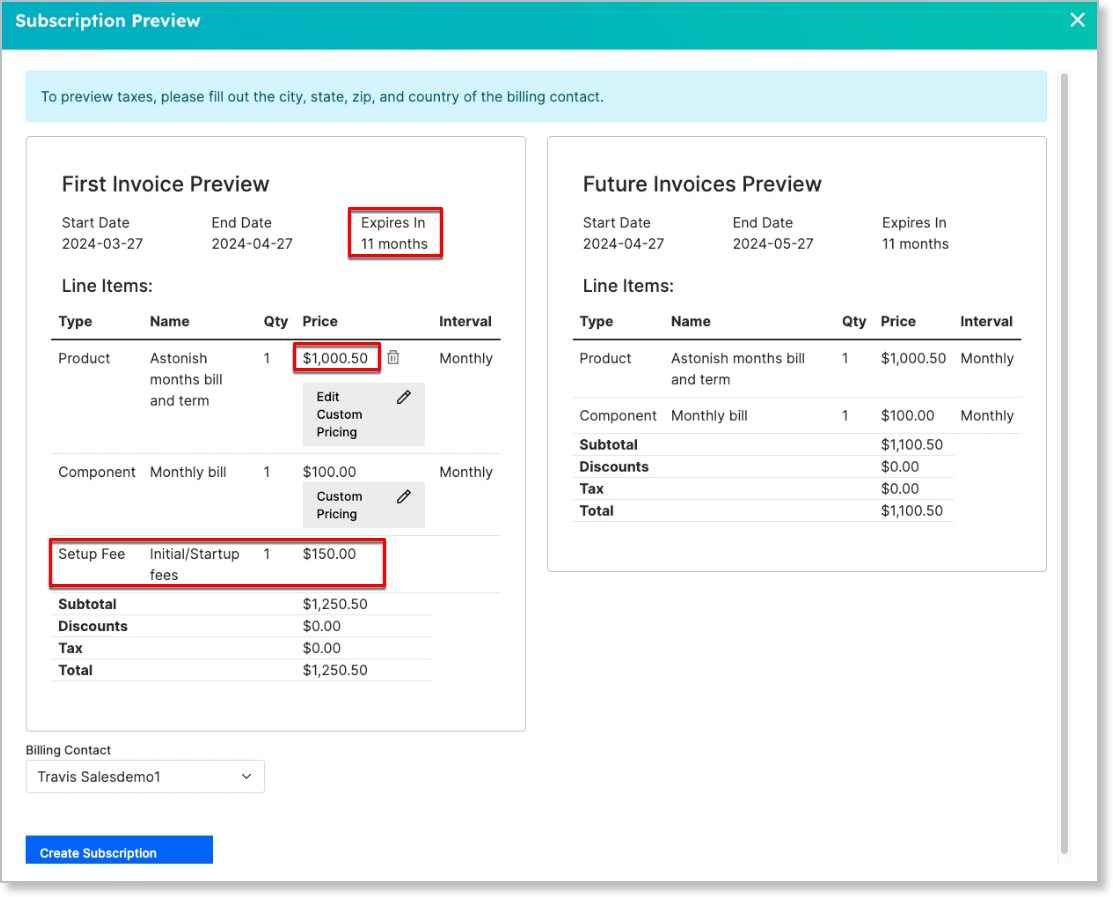
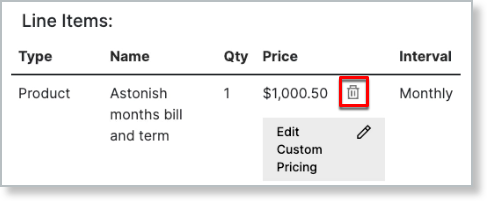
Before you click Create Subscription, double-check your Line Items configuration.
-
-
Close the Subscription Preview to return to the Deal page.
-
Refresh the browser session.
From the right panel, under Line Items, you can see the custom pricing applied to the Product prior to subscription creation.
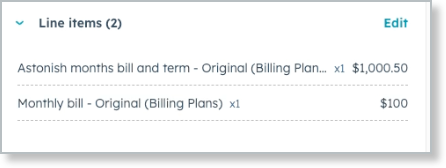
-
Click Edit to see the updated line item configuration.
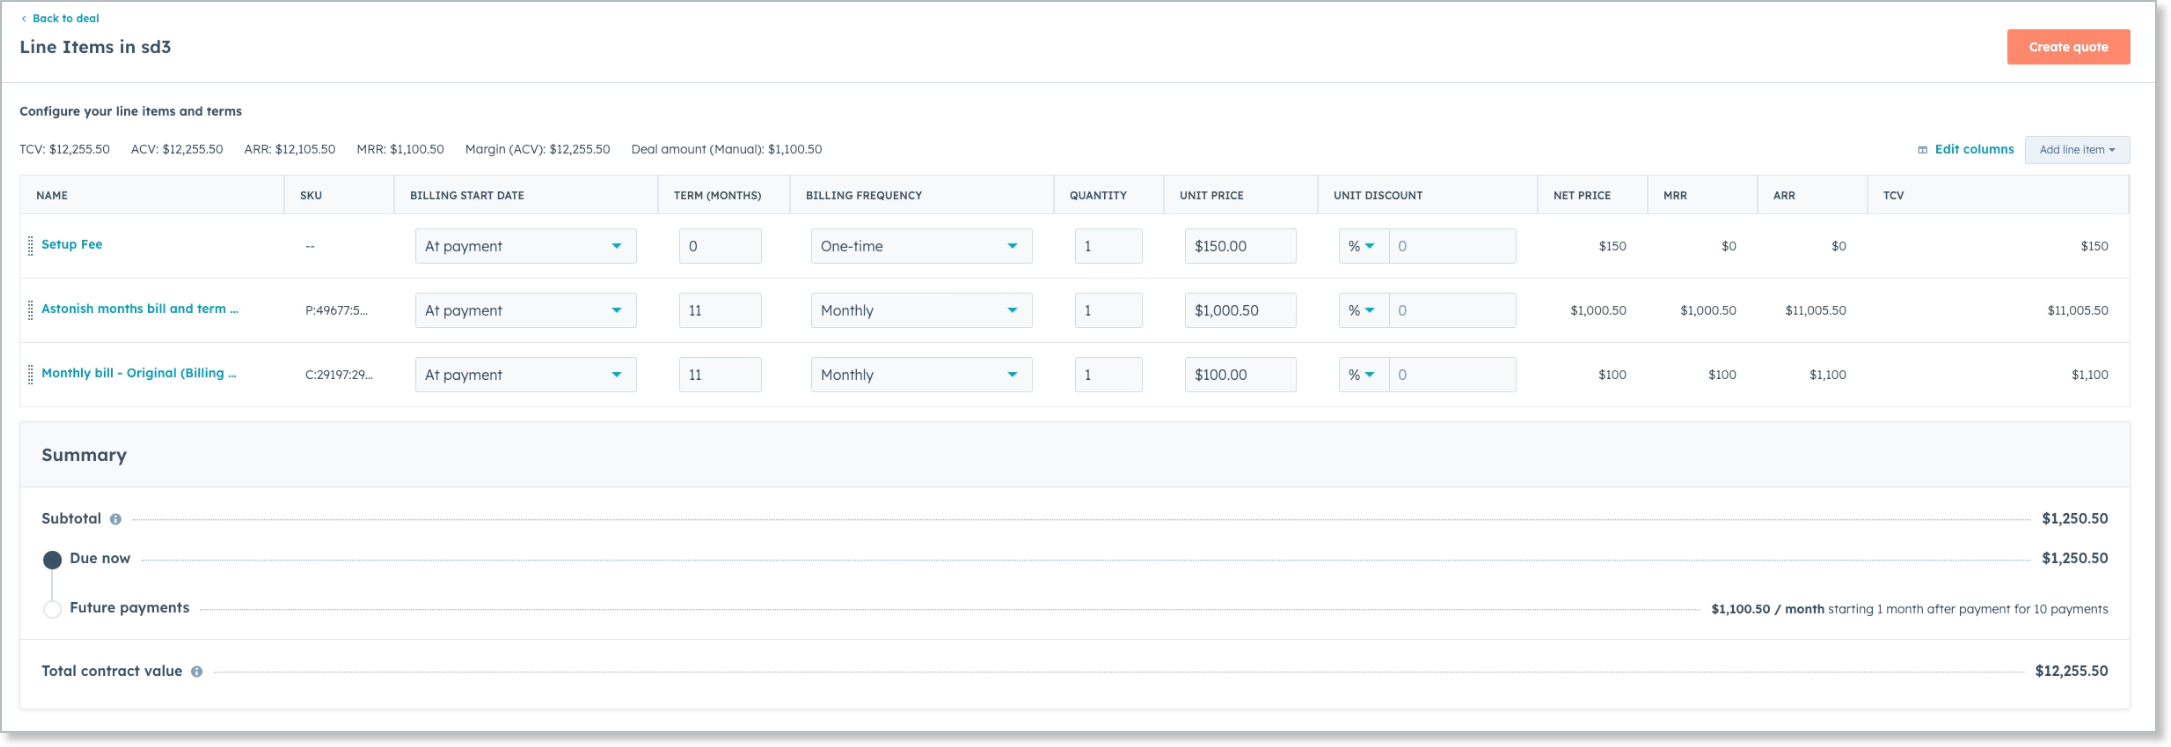
-
After you've reviewed the deal and are ready to generate it, go back to the Deal page and click Subscription Preview.
-
Click Create Subscription.
-
From the right panel, scroll down to the Subscriptions section and click Sync Deal with Maxio.
-
Once the sync has finished, to check the deal directly in Advanced Billing, click Subscription ID from the right panel.
Example 2: Add a trial period and expiration
In this example, you'll configure a Product with a trial period and expiration, then apply separate pricing logic to a Component.
Use trial pricing for introductory offers or freemium subscriptions.
-
From the Deal page, click Subscription Preview.
-
For the Product, click Custom Pricing.
-
From the Setup Custom Pricing screen, do the following:
-
For Price, enter $1100 for every 1 month.
-
Toggle Add trial period to ON and set the trial period Price to $50, lasting 1 month.
-
Toggle Enable expiration to ON and set it to expire after 9 months.
Your setup should look similar to this:
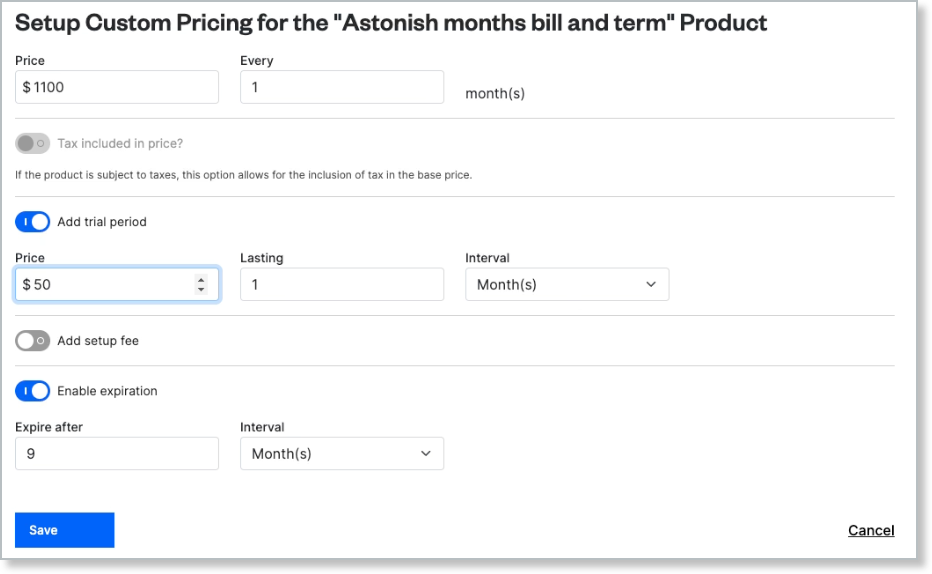
-
Click Save.
The Subscription Preview is updated with your recent changes:
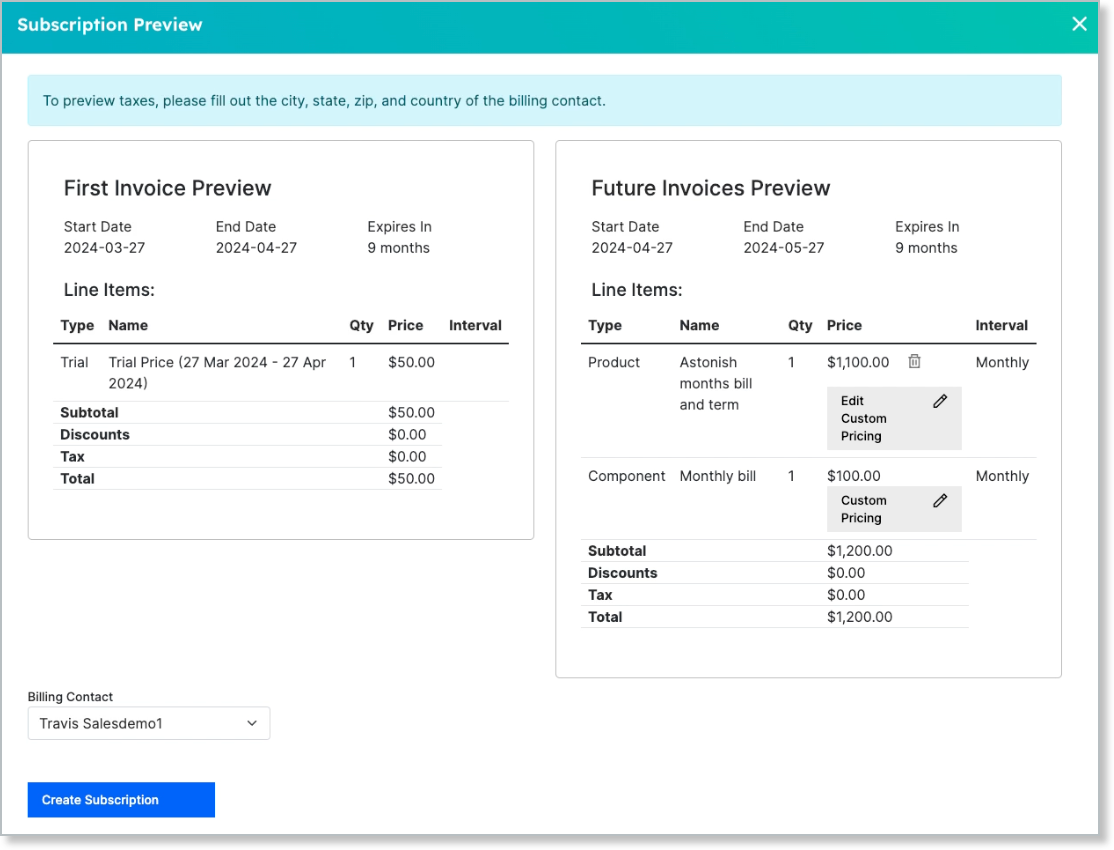
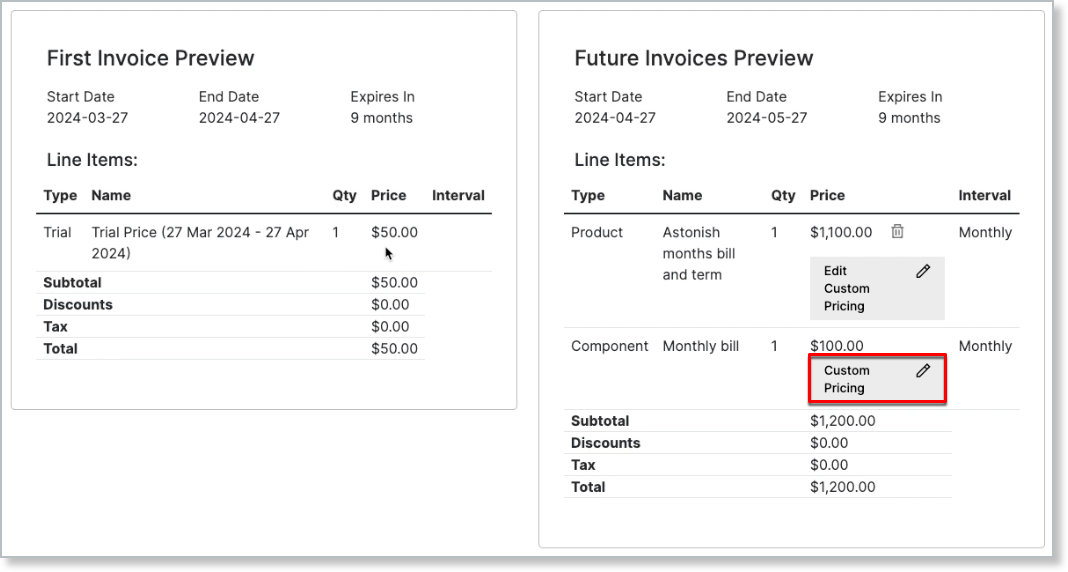
Because a trial period was added, you'll edit the Component custom pricing next.
-
-
In the Future Invoices Preview, next to Component, click Custom Pricing.
-
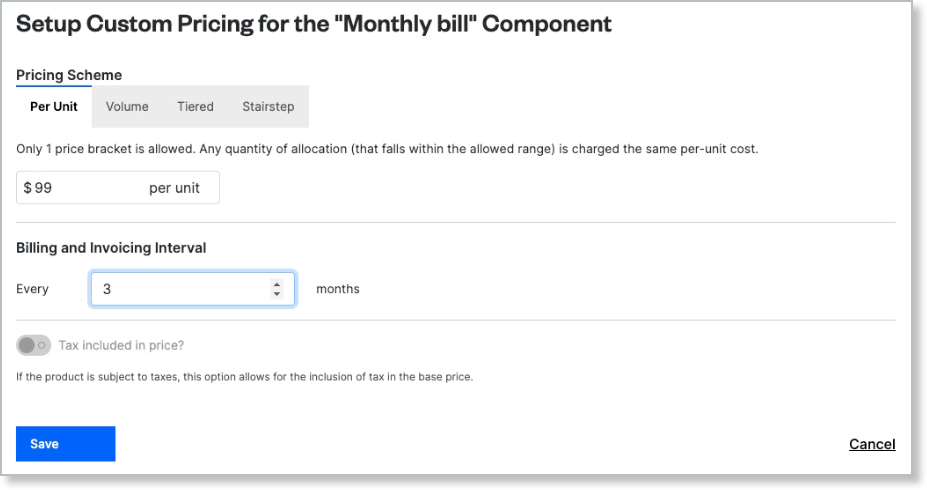
From the Setup Custom Pricing for the Component screen, do the following:
-
For Pricing Scheme, click Per Unit and enter a per unit price of $99.
-
Set the Billing and Invoicing Interval to every 3 months.
Your setup should look like this:
-
Click Save. This returns you to the Subscription Preview.
Set billing intervals for Components independently from the Product to reflect metered or usage-based add-ons.
-
-
Close the Subscription Preview to return to the Deal page.
-
From the right panel, under Line Items, click Edit to see the updated line item configuration.
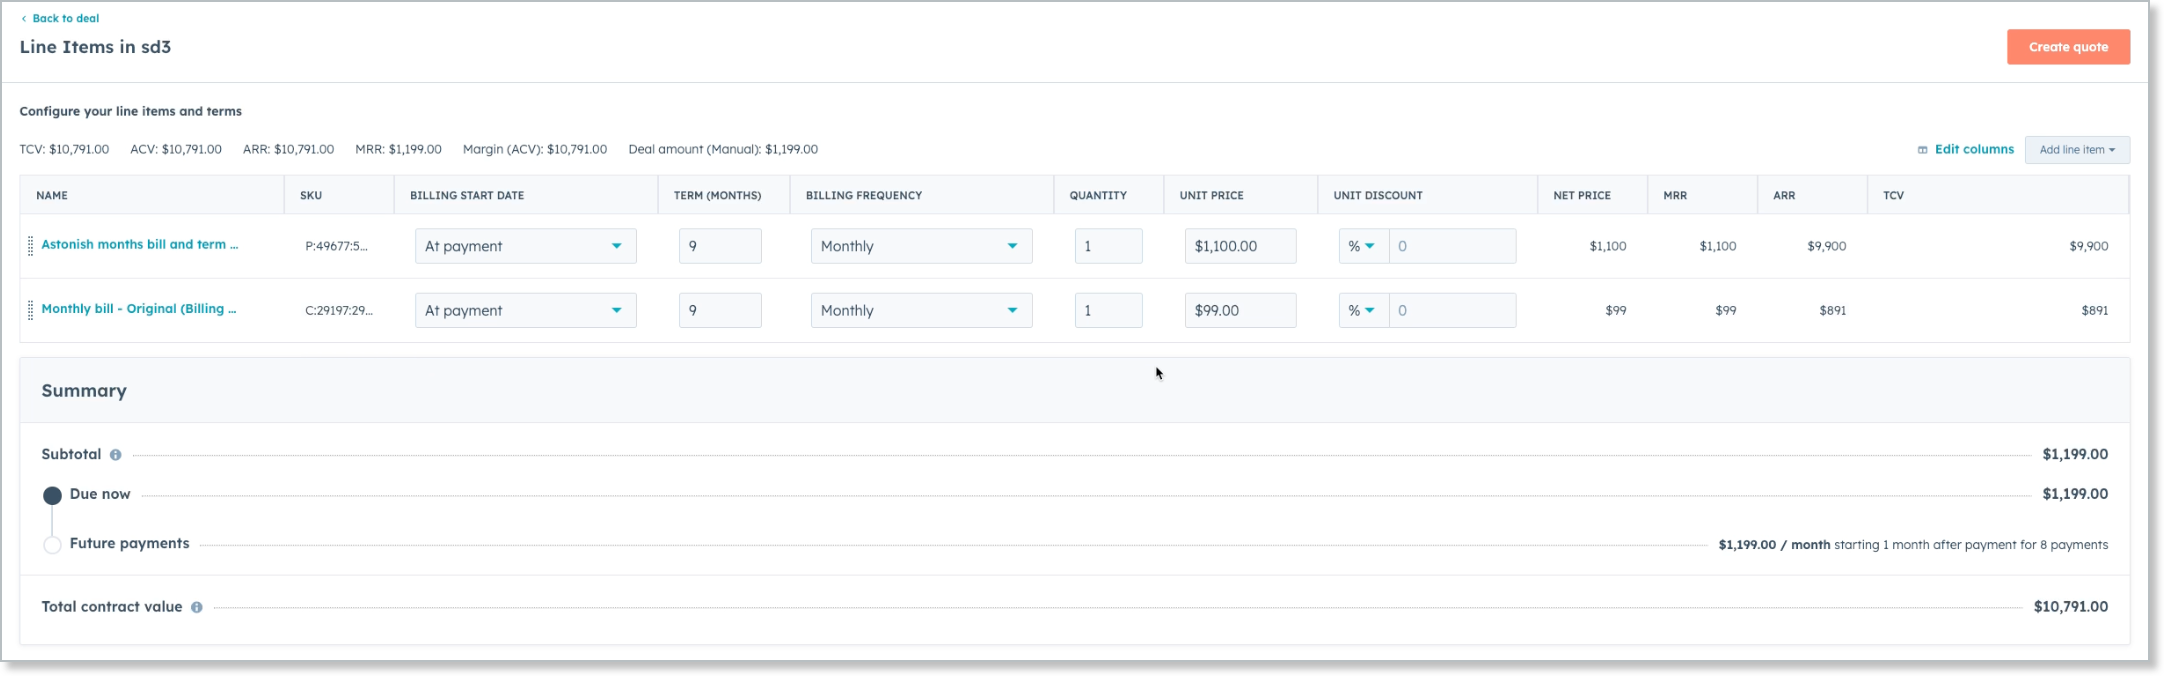
Note the changes to the Unit Price and the Term.
-
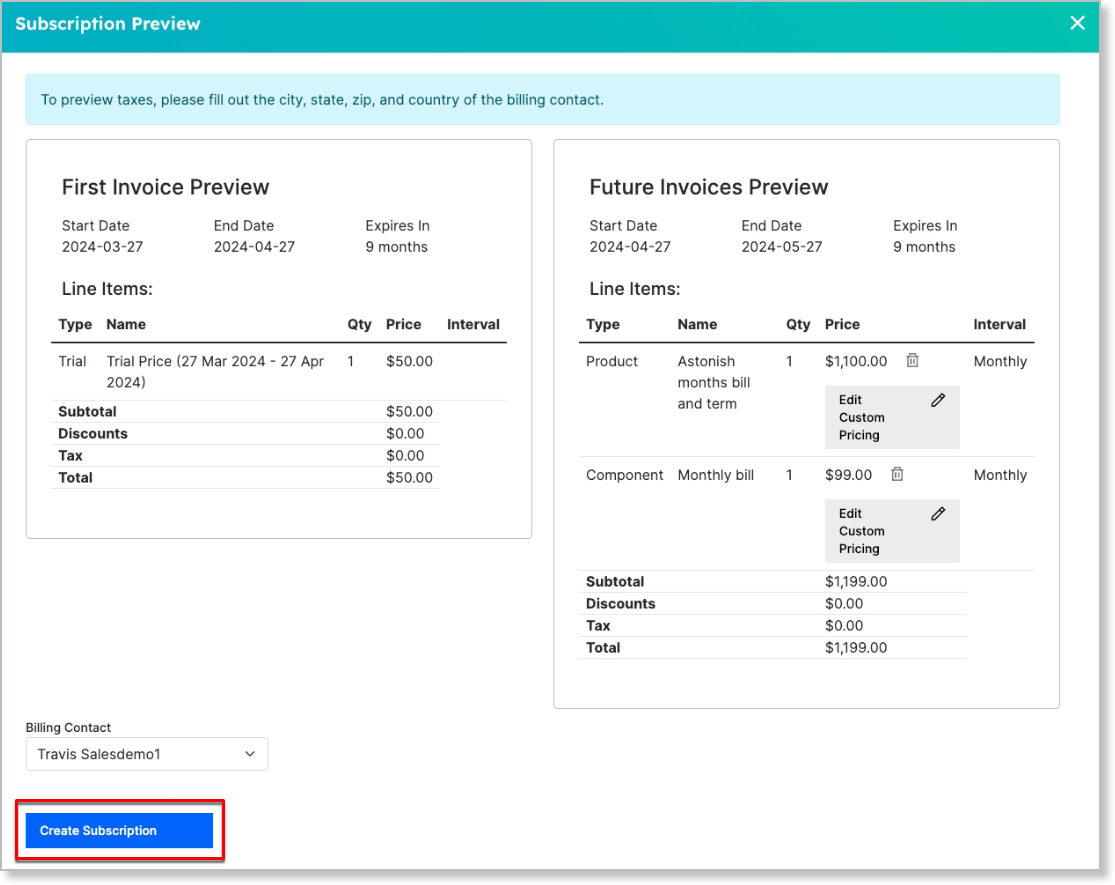
Now that you've reviewed the deal and are ready to generate it, go back to the Deal page and click Subscription Preview.
-
Click Create Subscription.
-
From the right panel, scroll down to the Subscriptions section and click Sync Deal with Maxio.
-
Once the sync has finished, to check the deal directly in Advanced Billing, click Subscription ID from the right panel.
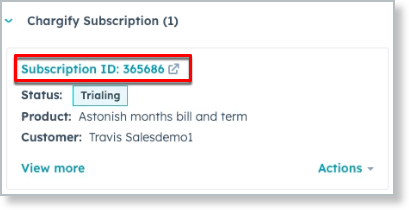
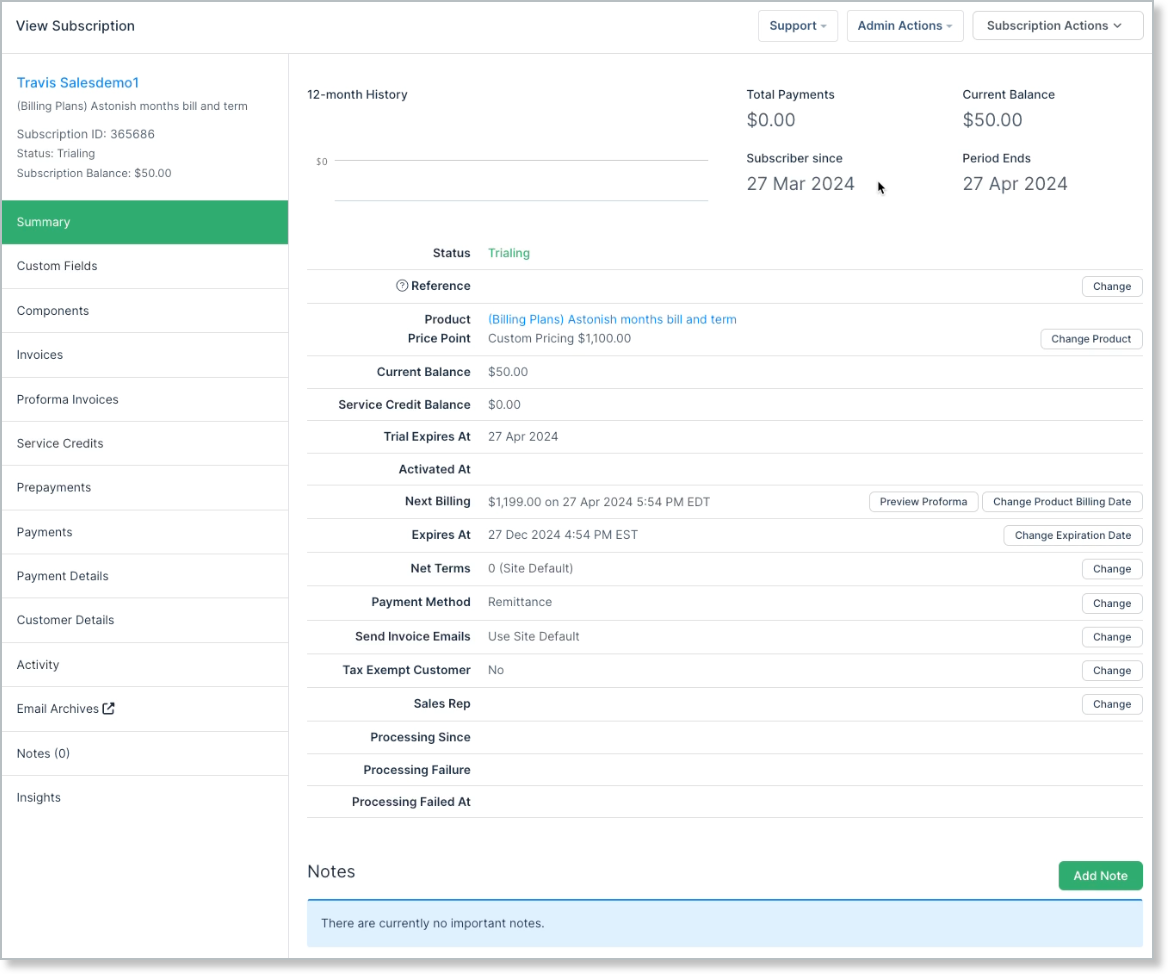
This opens the subscription in Advanced Billing.
Related information
If the Custom Pricing button isn't visible, totals don't match what you expect, or the HubSpot deal amount didn't update, see Troubleshooting and FAQs.
Still need help?
Reach out and our support team will take it from here.