
Configure Send Financial Records for Salesforce
Applies to: Maxio Core
Last updated on Sep 19, 2026
Send Financial Records syncs financial records created in Maxio Platform back into Salesforce. This is a highly configurable tool, best implemented by, or in conjunction with, a trained Salesforce Administrator. Setup doesn't take long, but does require knowledge of Salesforce objects, custom fields, page layouts, views, and Visualforce scripting.
Before you start
Make sure you have installed the managed package before proceeding. Depending on your order workflow and setup requirements, you may need to add custom fields, custom objects, and set form and field permissions within Salesforce. With sufficient expertise, you can also use Salesforce scripts to create Opportunities from these records, to convey complex contract changes synced from Maxio Platform.
Set up Salesforce
Complete the items below to set up Salesforce for Send Financial Records.
Add the Account page layout
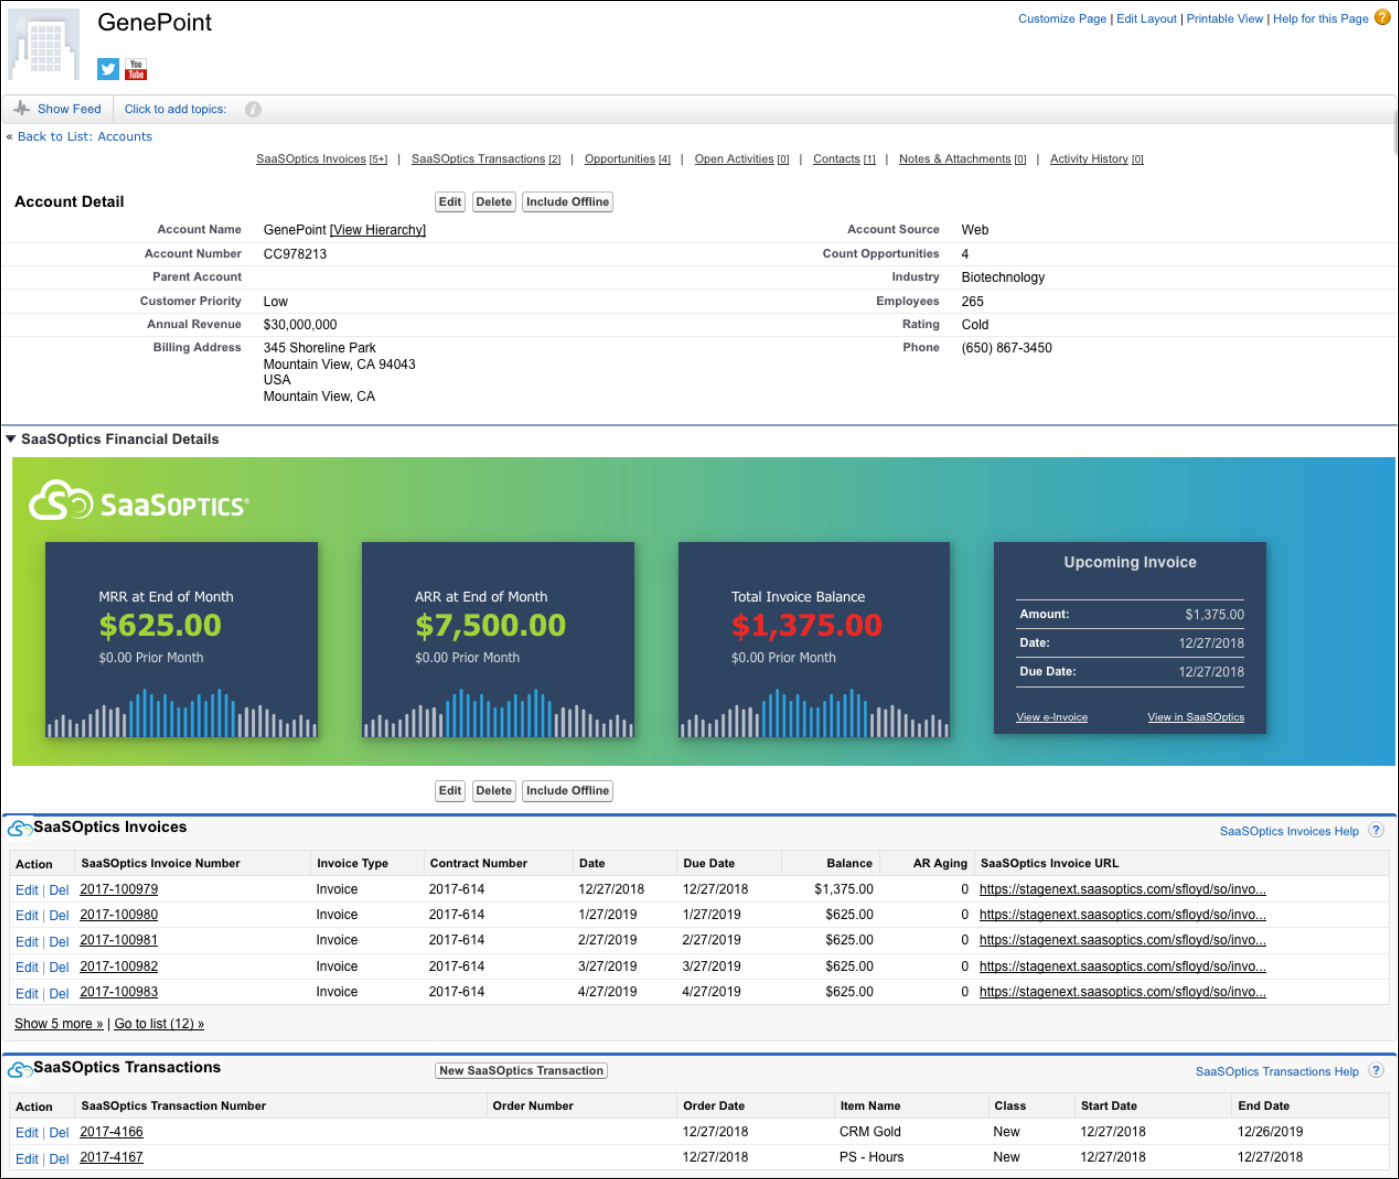
Add Maxio Platform related lists and the Visualforce page to an Account page layout. The Visualforce page displays a snapshot of each Account based on data from Maxio Platform.
The managed package can accommodate both multi-currency and single-currency accounts. If you use a single currency, you may see extra fields in Salesforce that don't populate with data.
To add the Account page layout
-
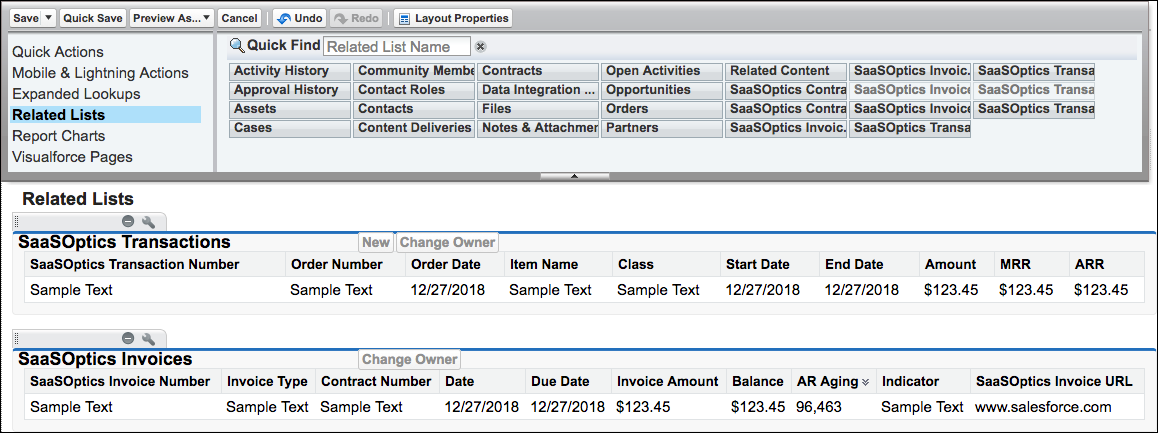
In the Layout panel at the top of the screen, locate and open the Related Lists option.
-
Drag the lists you want to display to the Related Lists section of the screen. We recommend adding only the Maxio Platform Invoices and Maxio Platform Transactions lists.
-
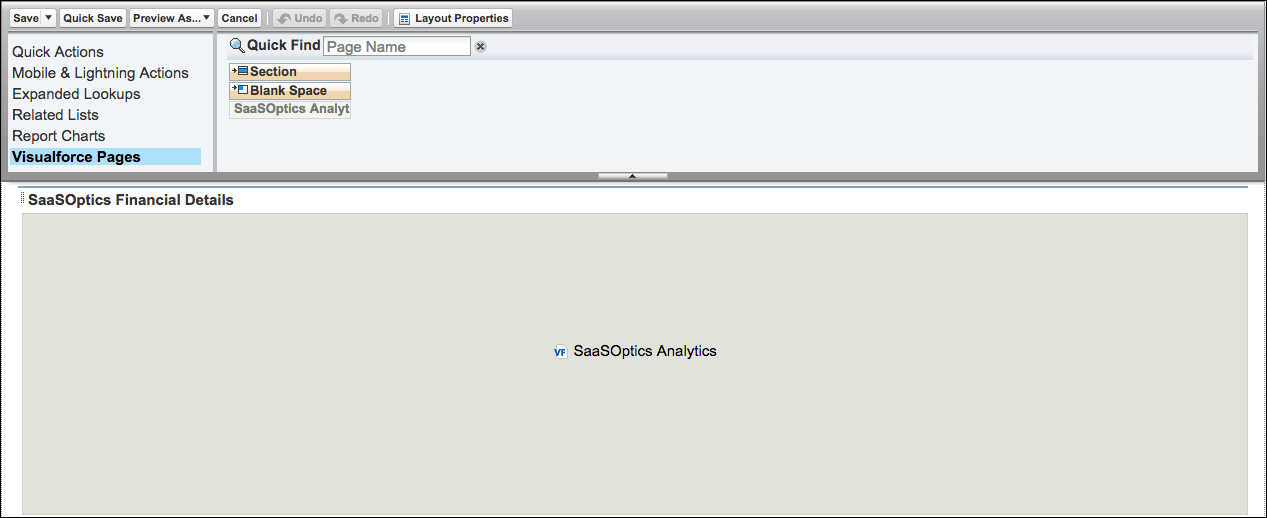
In the Layout panel, locate and open the Visualforce Pages option.
-
Drag Section to the preferred spot in the page layout. Name this section (for example, "Maxio Platform Financial Details"), and configure it as 1-column.
-
Drag the Maxio Platform Analytics page onto the newly created section.
-
Edit the height in the properties so the panel renders properly in your browser window. We recommend a minimum height of 280px.
-
Click Save at the top of the screen and confirm the Visualforce Page and lists display correctly.
Add the Opportunity page layout
You can add related lists to Opportunity page layouts the same way as Account page layouts. Open an Opportunity page layout and complete steps 1-2 above to add lists. We recommend:
- Maxio Platform Invoice Line Items
- Maxio Platform Transactions
Grant record access
Access to the Maxio Platform app is determined by the option selected when the package was installed (Admins only, by profile, or all users). If you installed the package for Admins only, you'll need to give access to other users or profiles so they can see the financial data and use the package's components.
Opening up access to the Maxio Platform app works the same as granting access to any other app, object, or record in your Salesforce org. As a best practice, we recommend granting only read access to the Maxio Platform objects and records. If you need further assistance configuring your organization's security settings, refer to Salesforce's own documentation.
Assign the Maxio Platform Read Only permission set
The package includes a permission set that lets a user view and read all the data in each Maxio Platform object. Once assigned, a user can view all the Maxio Platform financial data in your Salesforce org. This permission set doesn't allow users to edit, delete, or create any Maxio Platform records in Salesforce.
To assign to an individual user
- From Setup, enter "Users" in the Quick Find box and select Users.
- Select the user you want to assign the permission set to.
- Scroll to the Permission Set Assignments related list and click Edit Assignments.
- Select Maxio Platform Read Only from the Available Permission Sets and click Add.
- Click Save.
To assign to multiple users in bulk
- From Setup, enter "Permission Set" in the Quick Find box and select Permission Sets.
- Click Maxio Platform Read Only.
- At the top of the page, click Manage Assignment, then click Add Assignments.
- Select the checkboxes next to the users you want to assign the permission set to.
- Click Assign.
Configure Maxio Platform
Complete these configurations in Maxio Platform to finish setup.
Apply default field mappings
Send Financial Records requires mapping a substantial number of fields between the two systems. Maxio Platform provides a default mapping option to speed up this process, matching the configurations made by the managed package.
To apply default field mappings
-
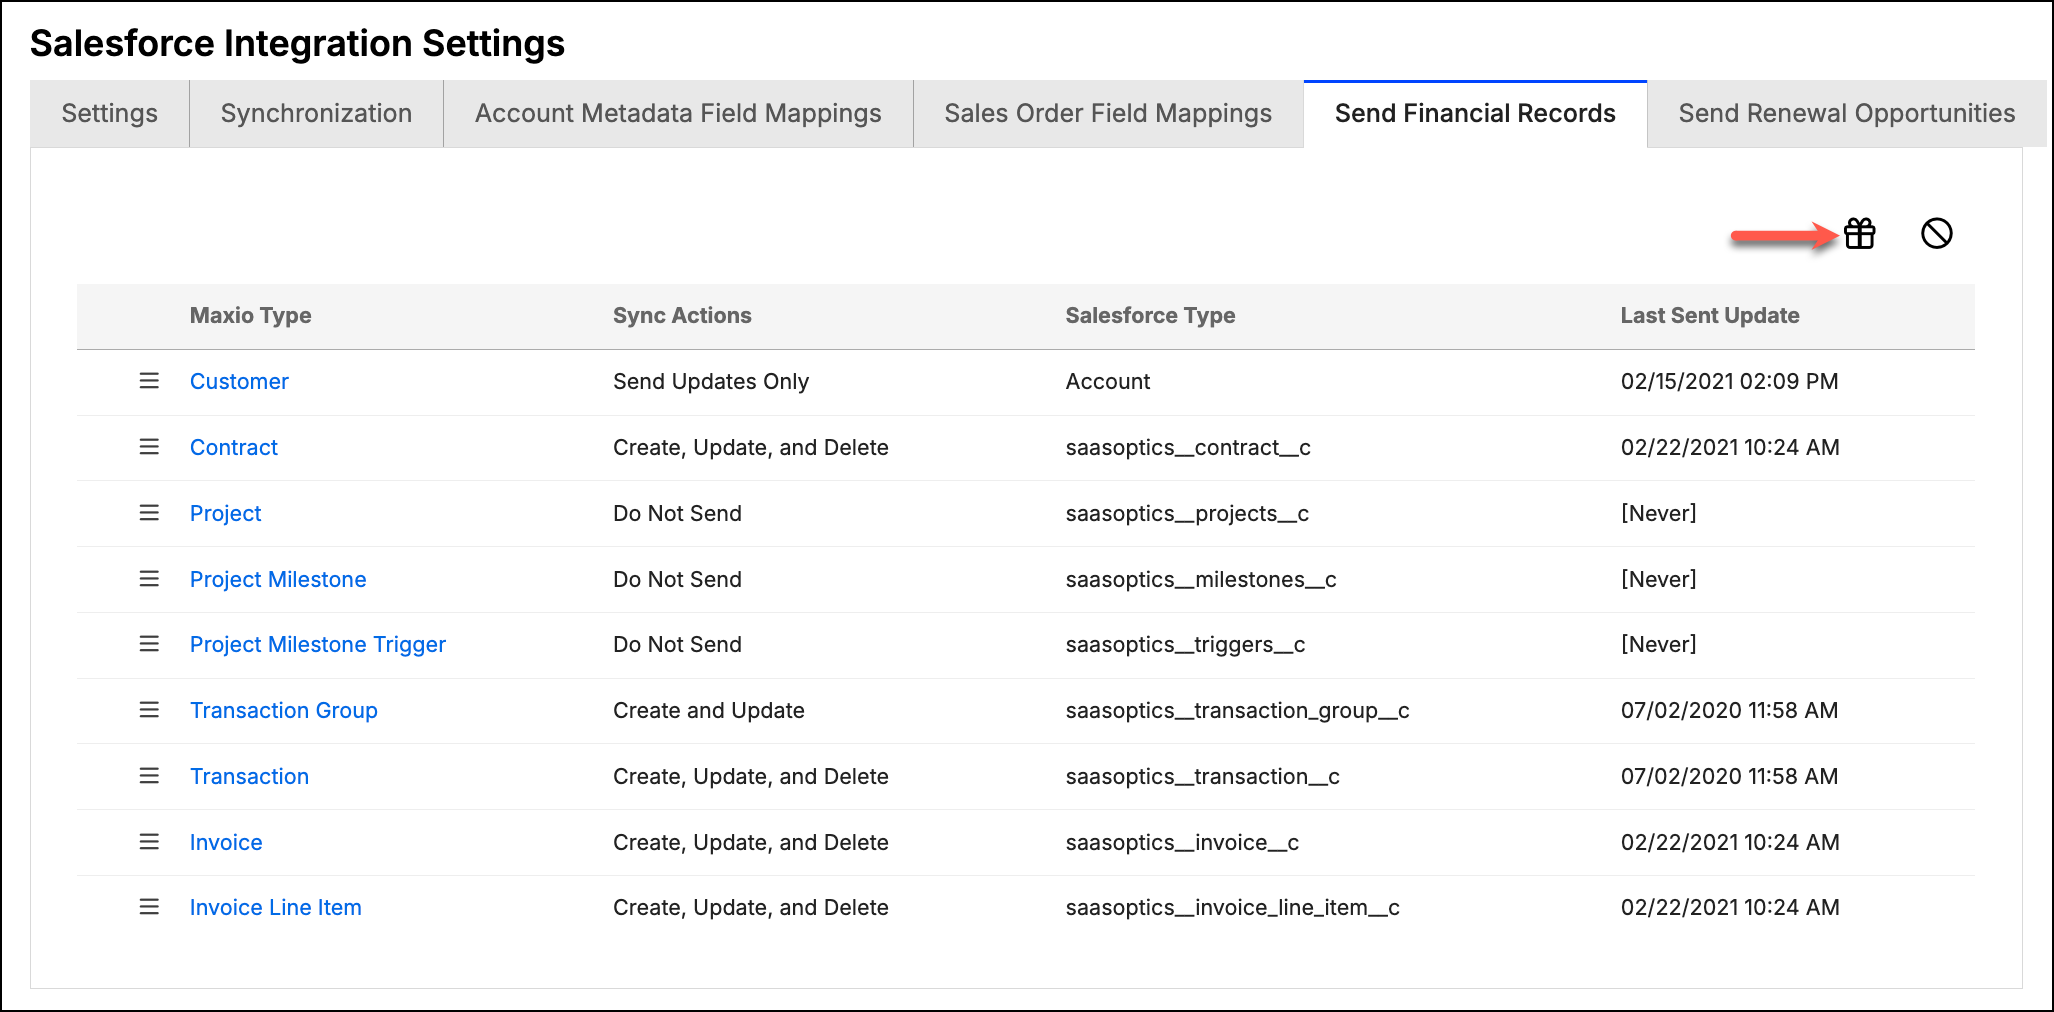
Open the Send Financial Records tab in the Salesforce integration settings.
-
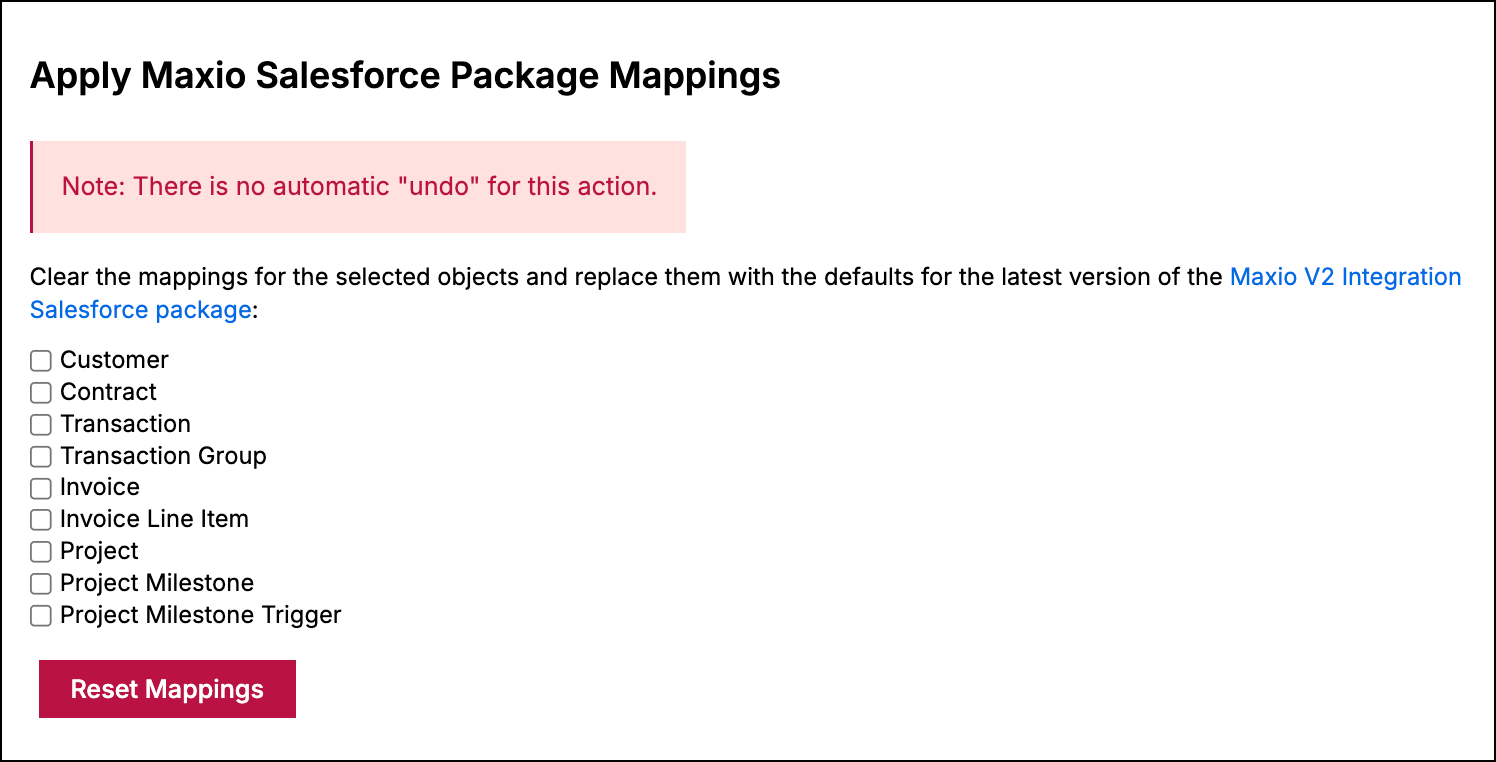
Click the gift box icon in the top-right corner.
-
On the next screen, select the record classes you want to map, then click Reset Mappings.
-
Maxio Platform sets the field mappings to the default values automatically.
Configure each record class
Send Financial Records can sync 11 classes of financial information between the two systems:
- Customers
- Contracts
- Transaction Groups (typically represented as Orders in Salesforce)
- Transactions
- Invoices
- Invoice Line Items
- Payments
- Payment Lines
- Projects, Project Milestones, and Project Milestone Triggers (only shown if Maxio's Projects feature is enabled for your account)
You decide whether to send a class of information, and which Salesforce objects to send it to, through mappings. The integration takes advantage of existing standard Salesforce objects such as Contracts, Orders, and Order Products. There are no standard Salesforce objects for some Maxio Platform financial records (such as Invoices), so you'll need to create custom objects to hold that data. You can also create custom objects for the items mentioned above (Contracts, Orders, and Order Products), if you prefer.
Each record class has its own settings that control its sync behavior.
To configure a record class
-
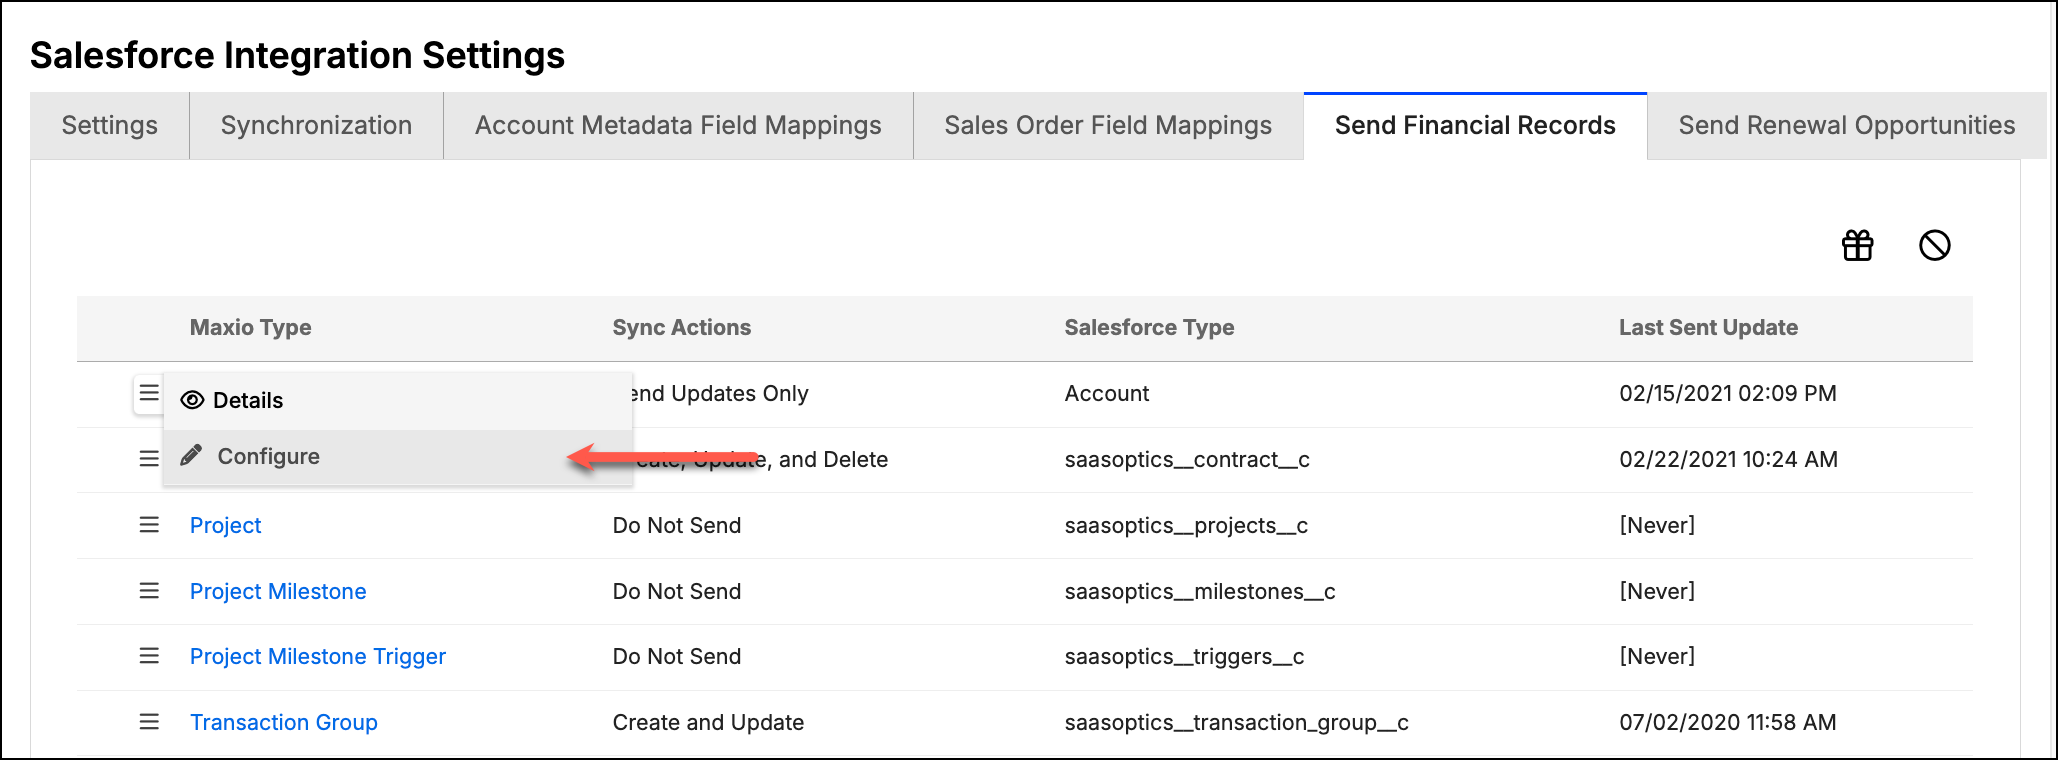
Open the Send Financial Records tab.
-
Hover over the record class's action menu and click Configure.
-
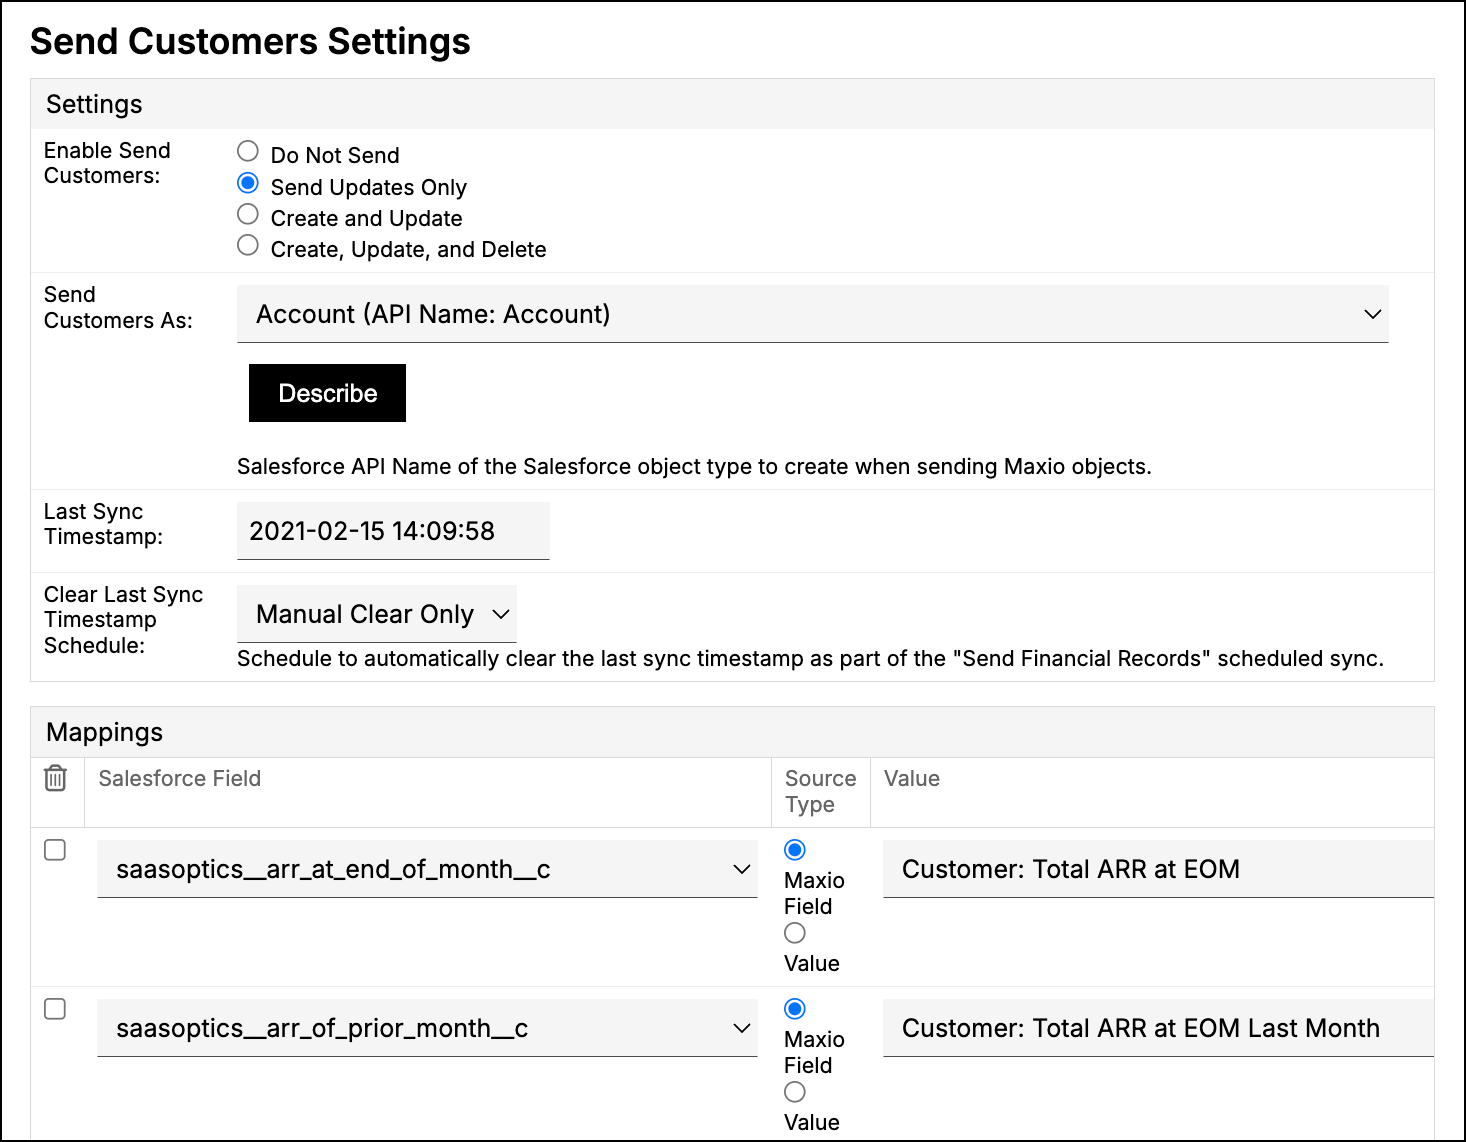
Make the changes you need.
-
Click Save at the bottom of the screen.
Every record class shares these settings:
-
Enable Send {Class}: Do Not Send, Send Updates Only, Create and Update, or Create, Update, and Delete. Transaction Groups is the one exception. It has no Create, Update, and Delete option.
Warning: Use extreme caution before enabling Create, Update, and Delete for any record class. It deletes the corresponding Salesforce record whenever the source record is deleted in Maxio Platform.
-
Send {Class} As: the Salesforce object to use for newly-created records of this class.
-
Last Sync Timestamp: the timestamp of the most recent record sent. You can clear or edit this if you need to reset the sync for any reason, using the format
yyyy-mm-dd hh:mm:ss(for example,2018-04-03 17:53:03). -
Clear Last Sync Timestamp Schedule: a schedule (Manual Clear Only, Nightly Clear, or Weekly Clear) to automatically clear the Last Sync Timestamp as part of the Send Financial Records sync.
Transaction Groups has one additional setting:
- Group Transactions By: choose which of Salesforce Opportunity Id, Order Number, and Contract to group Transactions by. There's no dedicated "transaction group" field or table in Maxio Platform. A transaction group is a collection of Transactions sent to Salesforce together, grouped by the first field you've enabled (in the order shown) that has a matching, non-empty value across a set of Transactions. Grouping is always scoped to a single Contract; Transactions in different Contracts are never grouped together, even if the other fields match. We recommend enabling all three fields to ensure every Transaction record is sent to Salesforce. A transaction group is created once and no additional Transactions are placed in it after that.
Configure custom field mappings
The default mappings applied above should meet most users' needs. Only make custom mappings if you have a specific need the defaults don't cover.
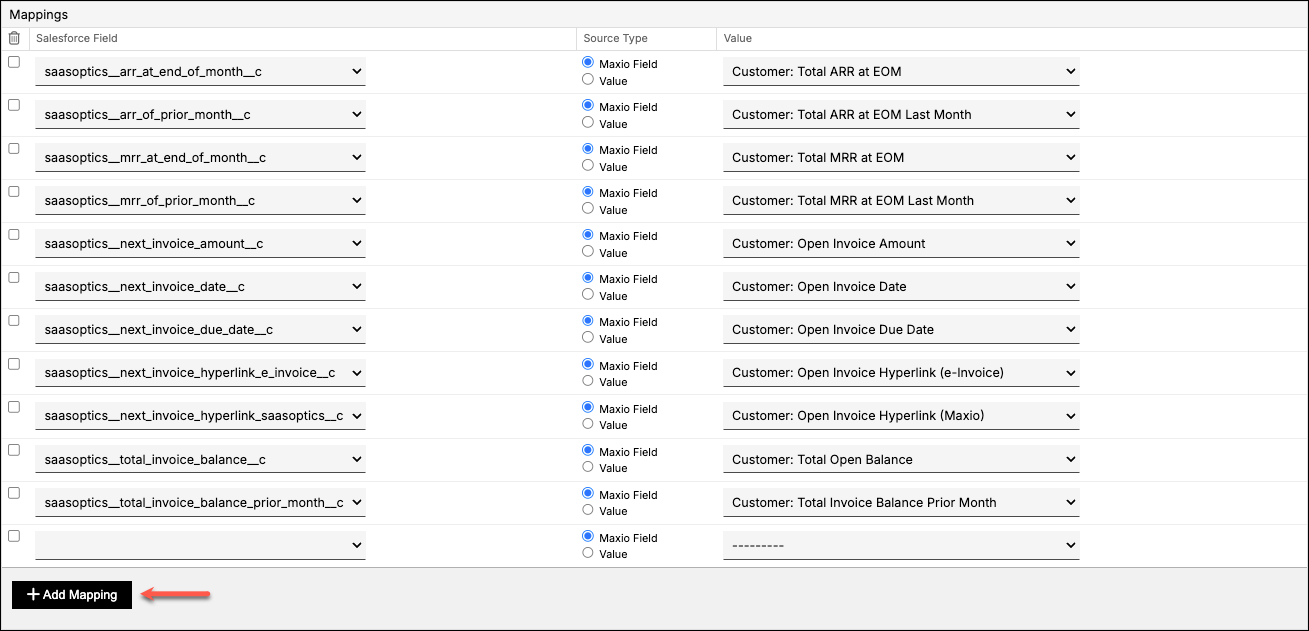
Click Add Mapping to add a row to the mapping list, or check the box under the trash icon to remove an existing row. The installation package includes a set of default mapped fields, so you shouldn't need to create every mapping manually.
Salesforce Field
Enter the Salesforce API name you want to map to Maxio Platform. You only need the API name, since the reference to the object is already established in the settings above. Some Maxio Platform fields have equivalent standard Salesforce fields (for example, Customer Name maps easily to Account Name). Other Maxio Platform fields require you to create custom Salesforce fields.
For standard Salesforce fields, enter the API name with no spaces, for example Name, BillingAddress, or AnnualRevenue. For custom Salesforce fields, enter the API name, which typically ends in "__c" to indicate it's a custom field, for example Maxio_EOM_ARR__c.
Value Source
Select Maxio Field to map the Salesforce field to an existing Maxio Platform field, or Value to enter a literal text value instead. Only use a literal text value to populate text-compatible Salesforce field types.
If you select Maxio Field, the Maxio Platform field's type should match the Salesforce field's type. For example, map a picklist field in Maxio Platform to a picklist field in Salesforce.
Related information
The Send Financial Records Field Mapping Reference for Salesforce lists every mappable field and default mapping for all 11 record classes.
Refer to Understand the Salesforce Integration for Maxio Core for an overview of every module this integration includes.
Still need help?
Reach out and our support team will take it from here.