
Creating Plans
Applies to: Advanced Billing
Last updated on Aug 27, 2026
Advanced Billing gives you fine-grained control over how a Plan behaves, covering everything from pricing and tax settings to address requirements at signup.
When you create or edit a Plan, you can set a number of options:
- Price
- Recurring period
- Initial/setup fee
- Trial type
- Tax settings
- Address requirement
Some of these options are stored on the Plan level, and some are stored on the Plan price point level. See Plan Price Points for more information.
Plan name
Give the Plan a name. Be clear and specific in your naming conventions if you have multiple Plans with similar names.
API handle
Used to specify a unique identifier for this Plan that you can use in API calls. This can help when moving between test and live environments, since you don't have to change the Plan IDs in your code.
Accounting code
The accounting code isn't used internally by Advanced Billing. You can enter a value here to correspond with the needs of an accounting platform.
Description
The description is shown on the Public Signup Pages, if you use them.
Require payment method
This option controls whether a credit card must be present for a signup attempt to be valid. It affects both the Public Pages and the API. If you're using the API for an integration and want to create a subscription without an associated credit card, leave this toggle unchecked.
Creating subscriptions without a credit card only works if there's a zero amount due at signup. Advanced Billing won't create a subscription with a positive balance.
Enable taxes for a plan
This option lets a Plan charge tax. Configure the taxes from the taxes tab after you've set up the Plan.
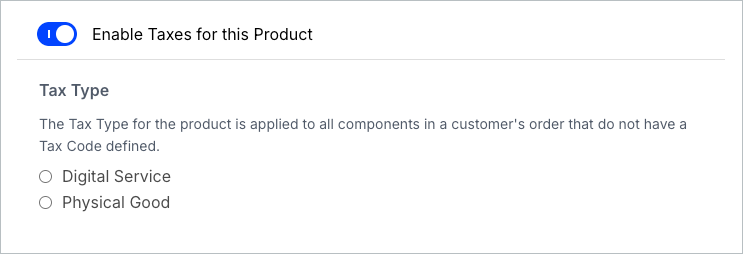
Tax type
Unless specified at the Product level, the tax type for the Plan applies to all Products in a customer's order. Select or fill in the appropriate tax for the type of Plan offered. This is especially important when using the Avalara service to tax based on locale.
Avalara tax settings
If there's uncertainty about which Avalara tax code relates to a Plan, use the View Tax Codes link to view Avalara's tax code search page.
If the Avalara tax codes are in use, there are occasionally situations where tax is only charged on a percentage of the total taxable amount. If a tax amount isn't what you expected, check how much of the purchase qualifies for taxing.
Require a shipping or billing address
Like the credit card settings described above, the "request" option controls the Public Page while the "require" option controls all subscription creations.
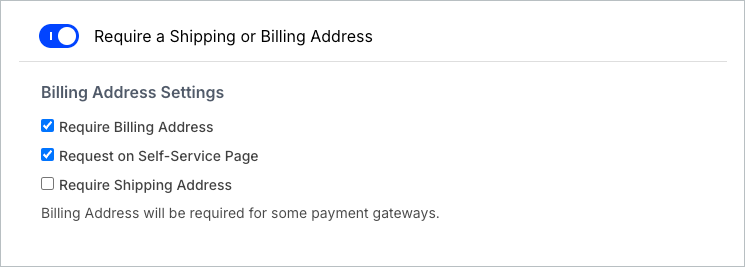
- Require Billing Address: Requires a billing address before a subscriber can purchase a Plan. This only applies to sign-up behavior.
- Request on Self-Service Page: Requires a subscriber to input their billing address when updating their credit card on the self-service page only. This is especially useful when you have AVS (Address Verification Service) controls enabled at your gateway.
- Require Shipping Address: Requires a subscriber to provide a full shipping address when purchasing a Plan. This only applies to sign-up behavior.
Enable URL and return parameter fields
The subscriber is redirected to this URL after successfully updating their card on file via the Self-Service Page. Don't confuse this setting with the redirect after a successful signup page.
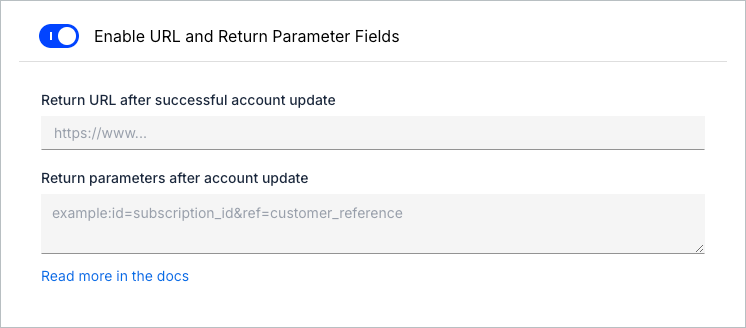
Return parameters after account update
These fields apply specifically to the Self-Service Page customers use to update their payment information. This lets them define a URL, optionally with dynamic parameters, to which the Self-Service Page redirects after a successful credit card update.
Related information
For the corresponding fields relating to Public Signup Pages, see Return URL and Parameters. Public Pages Intro discusses the integration use cases for these values concerning Public Signup Pages.
Still need help?
Reach out and our support team will take it from here.