
Create and Manage Custom Fields
Applies to: Maxio Core
Last updated on Oct 9, 2026
Add your own fields to Maxio objects such as Customers, Contracts, and Invoices from Admin > Custom Fields, which has one tab for each object. Create custom fields one at a time or in bulk from a CSV file, and update or delete them later. Every option on the create and update screens is described here, along with the capacity limits for each object.
Create a custom field
Create a custom field when you need to store a value on an object that Maxio doesn't already have a field for.
To create a custom field
- Go to Admin > Custom Fields.
- Open the tab for the object the field belongs to, such as Customer or Invoice.
- Click the plus (+) icon, Add Custom Field, at the top right corner of the page.
- On the Create Custom Field page, set the options described in the table below.
- Click Save.
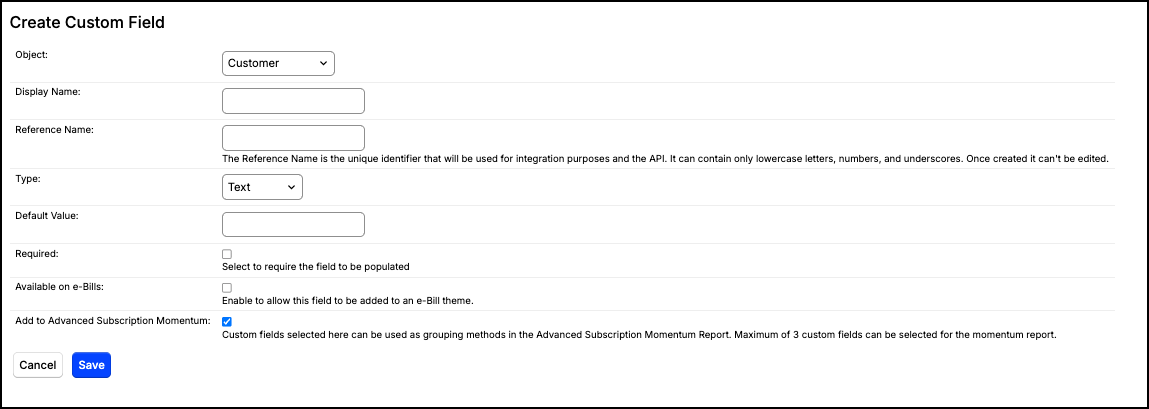
| Option | Description |
|---|---|
| Object Type | Determines the core area in Maxio where this field will live. Choose from any of the objects listed in the Overview. Cannot be changed once the custom field is created. |
| Display Name | The name shown for this field throughout Maxio. |
| Reference Name | The unique identifier used for integration purposes and the API. It must start with c_, followed by a lowercase letter, and can then contain lowercase letters, numbers, and underscores. It cannot end with an underscore or contain two underscores in a row. Cannot be changed once the custom field is created. |
| Field Type | The kind of value the field holds:
|
| Values | (Dropdown fields only) The options a user can choose from. Place each value on a separate line. |
| Default Value | Sets the value of the field upon record creation. Default values can be set for Text, Number, Date, Boolean, and URL fields. Dropdown fields have no default. Dropdown fields do not support defaults. |
| Required | Select to require the field to be populated. When enabled, the custom field must be filled out for all existing and newly created records. |
| Available on e-Bills | (Customer and Invoice objects only) Enable to allow this field to be added to an e-Bill theme. |
| Add Custom Fields to the Advanced Subscription Momentum Report | Check this box to use this custom field for grouping in an Advanced Subscription Momentum Report. You can select up to 10 custom fields for momentum calculations. |
| Include in Auto-Renewal | (Transaction object only) Enabled by default. When enabled, this field's value is copied onto renewal Transactions created by any renewal method: scheduled Auto-renew, a manual Renew, Bulk Renew/Cancel, and Renew at End of Term. Disable it for one-time or onboarding data that shouldn't carry forward to future Transaction terms; the field is then left blank (not set to its configured default value) on the renewal Transaction. |
Create custom fields in bulk
To create many custom fields at once instead of one at a time, use the Custom Field import. The import only creates new custom fields. It cannot update or delete ones that already exist. Fields created through the import behave exactly like fields created through the dialog. For the general import process, see Run an Import.
To create custom fields in bulk
- Open the Admin menu, go to Import, click Create, and select Custom Field as the Maxio Object.
- Click Download Sample CSV next to Import Template to download a template with example values.
- Add one row for each custom field, using the column notes in the table below.
- Under File Source, choose your CSV file, then click Next.
- On the mapping page, map each CSV column to its option, then click Import.
Every row is validated against the same rules as the create dialog above, including the capacity limits, the Available on e-Bills and Momentum Report restrictions, and the URL field's Customer/Contract-only restriction. A row that fails one of these doesn't stop the rest of the file. The import creates every row that passes and shows the specific reason next to each row that fails, the same as any other Maxio import.
Each CSV column maps to one of the options described above. For Required, Available on e-Bills, and Add Custom Fields to the Advanced Subscription Momentum Report, enter true or false. A blank cell means false.
| CSV column | Notes |
|---|---|
| Object Type | Matched without regard to case, so customer and Customer both work. The valid values are Bill, Contract, Customer, Expense, Invoice, Item, Payment, Register, Subscription, Transaction, Vendor, and VendorContract, written as one word. Bill, Expense, Vendor, and VendorContract require the Expenses module to be enabled on your account. |
| Display Name | |
| Reference Name | |
| Field Type | Matched without regard to case. |
| Default Value | For date fields, use YYYY-MM-DD. For boolean fields, use true or false. Dropdown fields do not support defaults, and a value in this column is ignored. |
| Values | (Dropdown fields only) Separate each value with the vertical bar character, or put each one on its own line within the cell. |
| Required | |
| Available on e-Bills | (Customer and Invoice objects only) |
| Add Custom Fields to the Advanced Subscription Momentum Report |
Update a custom field
To edit an existing custom field, click the menu icon next to the field and click Edit. The update screen groups its fields under three headings:
- Definition - Object, Type, Display Name, and Reference Name.
- Values - Default Value and Required. A Dropdown field shows its list of Values instead of a Default Value, and a Boolean field has no Required option.
- Where It Appears - Add Custom Fields to the Advanced Subscription Momentum Report, Available on e-Bills (Customer and Invoice fields only), and Include in Auto-Renewal (Transaction fields only).
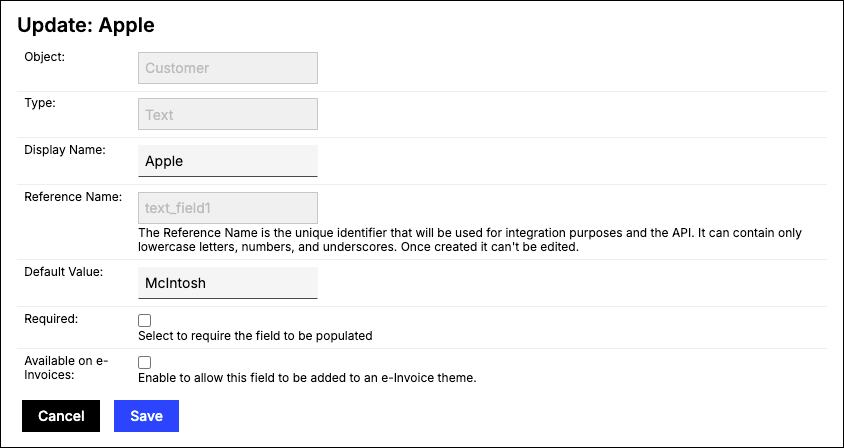
Be aware of the following when updating an existing custom field:
- Object Type - Cannot be changed once a field has been created.
- Field Type - Cannot be changed once a field has been created.
- Display Name - Changing this updates the label of this field as soon as it is saved.
- Default Value - Adding or changing an existing default value only takes effect on newly created records.
- Required - If enabled, all future creates and edits must supply a value for this field. Existing records with NULL values remain unchanged until they are manually updated.
Important: You cannot clear Add Custom Fields to the Advanced Subscription Momentum Report while an Advanced Subscription Momentum report still uses that field as its momentum calculation basis. Maxio blocks the change and lists the reports involved, so update those reports to use a different basis first.
How many custom fields you can create
Each object type in Maxio Core has a maximum number of custom fields. These limits exist because custom fields are stored in a fixed set of database columns. Once those columns are used, you cannot add more custom fields.
How many fields each object allows
The counts below are the fields available for your own use, after any columns reserved for built-in values.
| Object | Text | Number | Boolean | Date | Dropdown | URL | Notes |
|---|---|---|---|---|---|---|---|
| Most objects | 20 | 20 | 20 | 20 | 20 | None | URL fields are available only on Customer and Contract. |
| Customer | 46 | 20 | 20 | 20 | 20 | 4 | Customer carries 50 text columns, four of which are reserved for the built-in Industry, Segment, Subsegment, and Market values. The rest are available for your custom use. |
| Contract | 18 | 20 | 20 | 19 | 20 | 4 | Two text columns are reserved for the built-in Channel and Lead Source values, and one date column for Lead Date. |
Delete a custom field
Deleting a custom field clears its value on every record of that object type, so the data is gone rather than hidden.
WARNING: Deleting a custom field removes its stored value from every record of that object. Maxio takes an automatic backup of your account first and stops if that backup fails, but the field's data cannot be recovered from within the application.
Deleting a field also removes it from any saved list views and billing descriptors that referenced it, and frees its underlying column so a future field of the same type can reuse it.
Maxio blocks the deletion outright if the field is used by an advanced revenue formula. Clear that use first, then delete the field.
Related information
For what custom fields are and when to create one, see the Understand Custom Fields help article.
Still need help?
Reach out and our support team will take it from here.