
Review Item Fields
Last updated on Sep 19, 2026
Item fields are set on the Create Item form, whether you are creating a new Item or editing an existing one.
What the create item form contains
The form is divided into six collapsible sections, all shown open below.
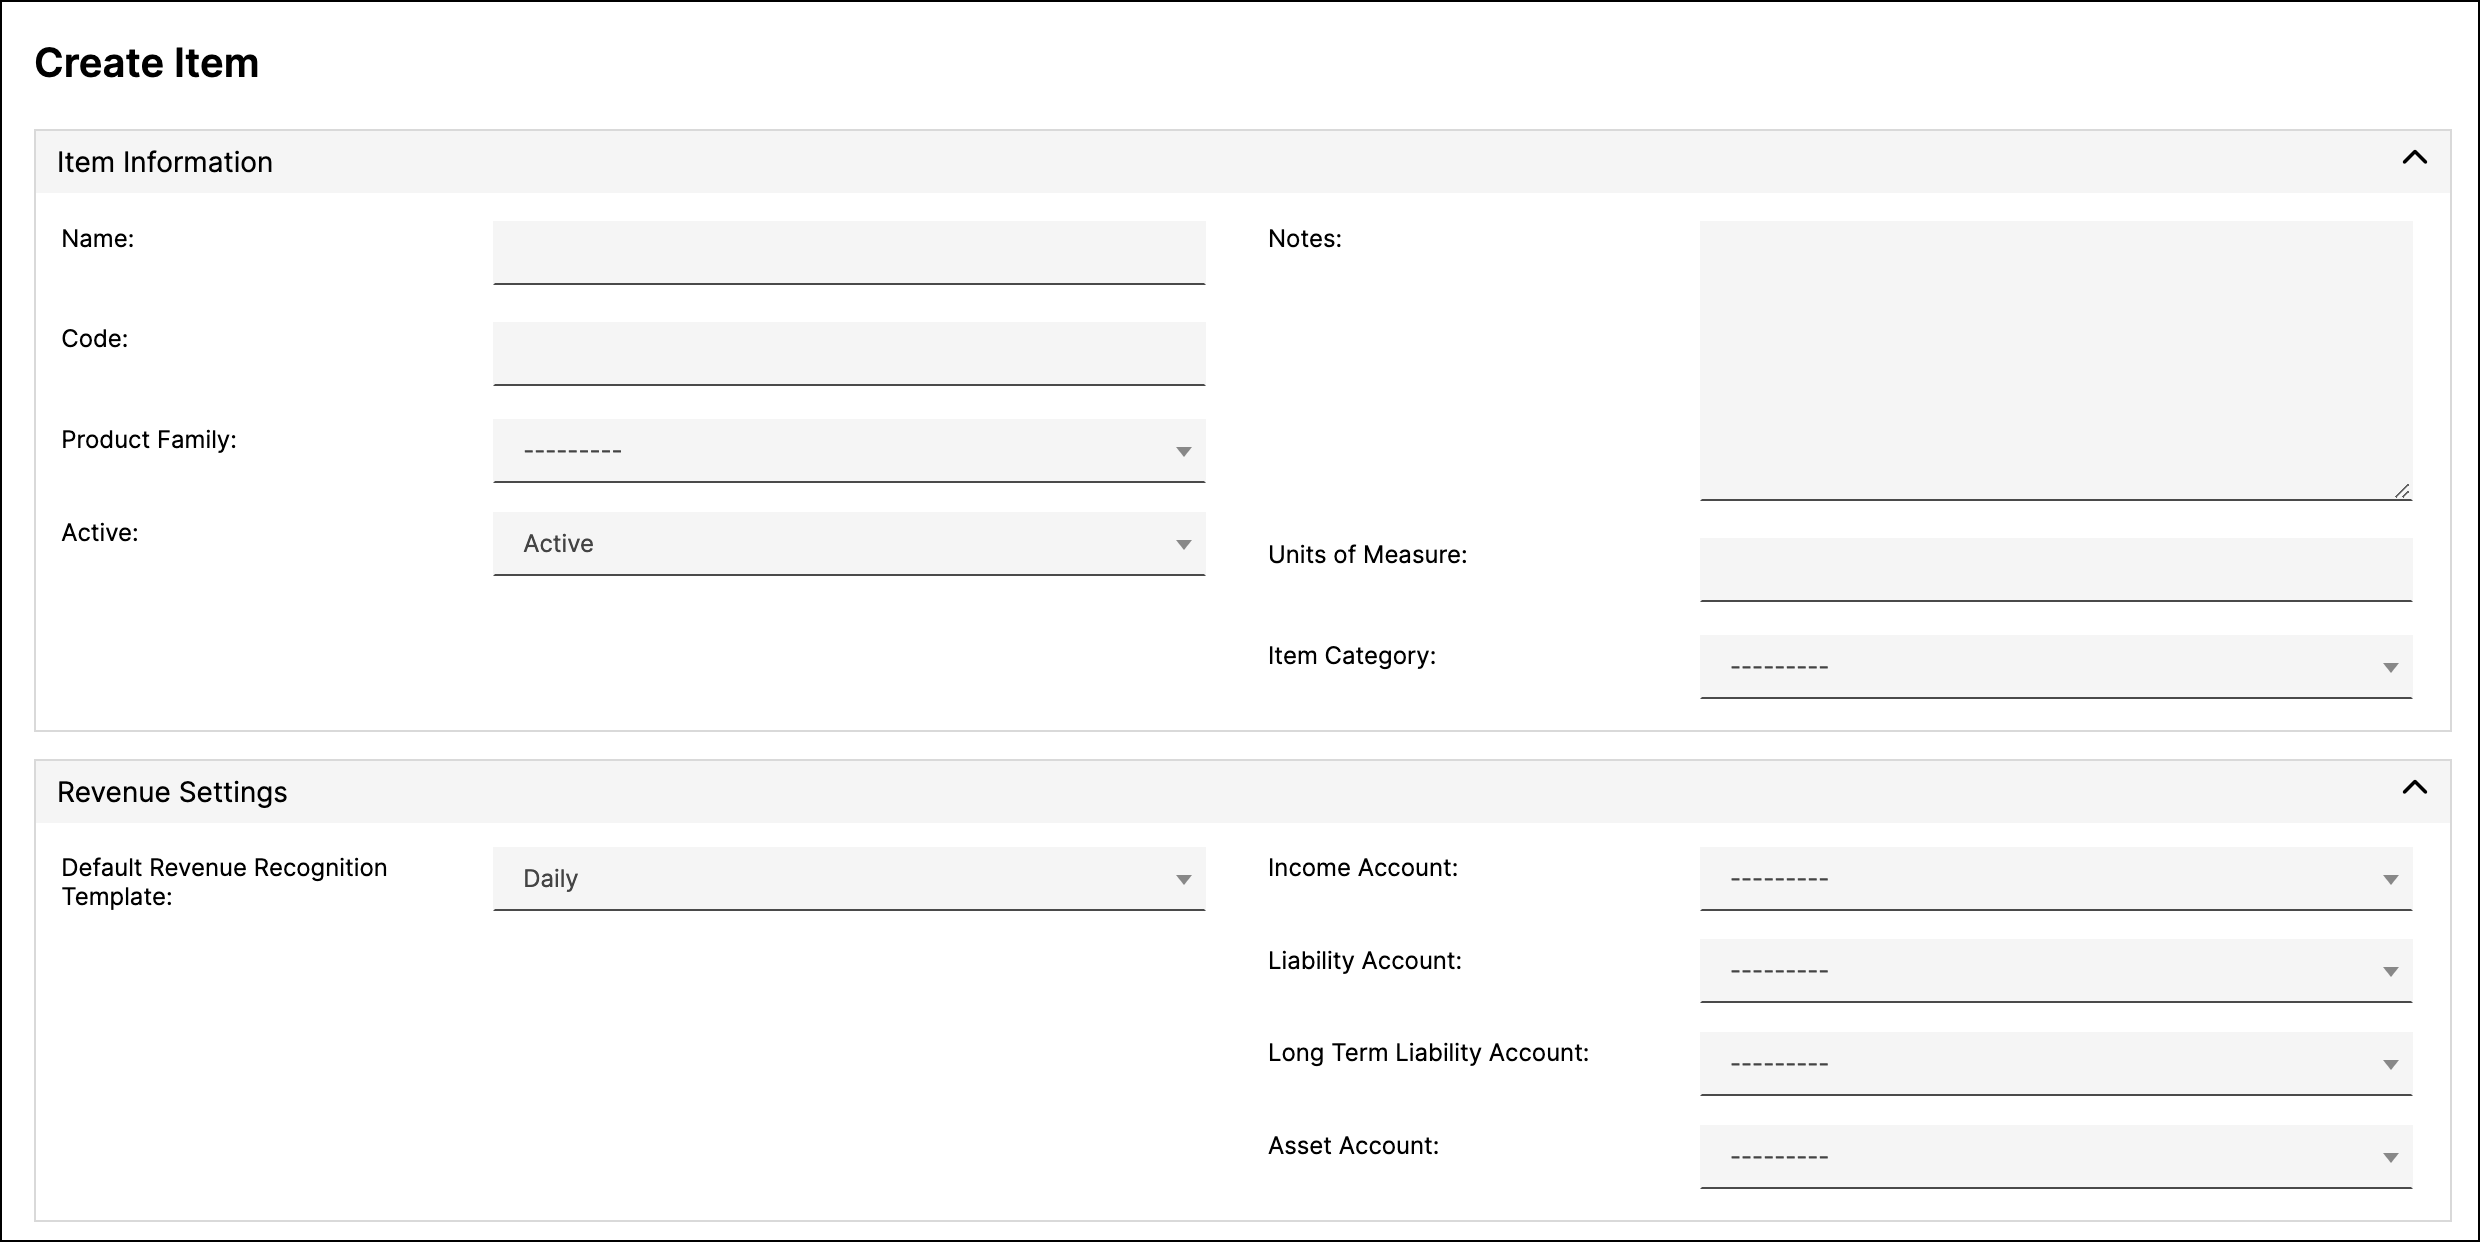
Review the item information fields
Identity and classification, and the only fields required to save an Item.
| Field | Description |
|---|---|
| Name | (Required) Item Names should equate to your invoice line item products, services, or solution items. Each name must be unique. For example:
|
| Code | (Optional) Used for matching Product Codes from Salesforce. This field is matched against the Salesforce Product Code in the process of creating an Order. |
| Product Family | (Optional) Used for filtering in Analytics Reports. An Item can belong to only one Product Family. |
| Units of Measure | (Optional) The unit this Item is sold in, such as seats, licenses, or hours. |
| Item Category | (Optional) A broad classification for the Item. Choose from Business Software, Consumer Software, Digital Services, Physical Goods, or Other. Selecting a category sets a matching default in Item Category UNSPSC Code. |
| Item Category UNSPSC Code | (Optional) The UNSPSC classification code for the Item. Enter up to 8 numeric digits. Defaults from the Item Category you select, and can be overridden. |
| Active | When set to Inactive, the Item cannot be used to create new Transactions or Invoice Line Items, and it no longer appears in the Item pickers when you create or edit an Item Group. All Items remain available in reports regardless of this setting, so historical results are unaffected. This option is enabled by default. |
| Notes | (Optional) A free-form text field available on the Create, View, and Update Item screens. Use this field to log incidental information about the Item. The Notes field is not used in the generation of Transactions or Invoices. |
Review the revenue settings fields
How the Item generates Revenue, and against which Accounts.
| Field | Description |
|---|---|
| Default Revenue Recognition Template | The default Revenue Schedule used when you create a Transaction. See Revenue Recognition methods for more details. |
| Accounts | Select Accounts according to these rules:
|
Review the invoice and billing settings fields
What appears on an Invoice for this Item, and how it is billed.
| Field | Description |
|---|---|
| Default Billing Method | Defines how Invoices are created when you create a Transaction. See Billing Methods. |
| Billing Description | Required when none of QuickBooks, Intacct, or Xero is enabled, and optional otherwise. The default description for this Item's Invoice Line Items, built from fixed text and variables. Select from your library of Billing Descriptions, or edit and create one as needed. See Create and Manage Billing Line Item Descriptions. |
| Is taxable | Marks the Item itself as taxable. This is a different setting from Is sales tax, which marks an Item that is the sales tax. This option is disabled by default. |
| Sales Tax Rate | The tax rate applied to this Item when syncing to Xero. This field appears under Integration Settings, and only when Xero is enabled and the Item has not yet synced to Xero. It cannot be set on an Item that has Is Sales Tax checked. |
Review the renewal management and analytics fields
How the Item behaves at renewal, and how it is counted in Analytics.
| Field | Description |
|---|---|
| Recurrence | Indicates to Maxio that a Transaction must be renewed or canceled when it expires. Choose Recurring if the Item defines a Term of the contract. Recurrence has no impact on Invoicing. This is a pair of choices rather than a check box, and the Create Item form defaults it to Recurring. See the Item Recurrence article for more information on Recurring and Non-recurring Items. |
| Generate MRR/ARR | When a Transaction is created or edited, Maxio generates both an MRR and an ARR value for the Transaction based on this setting and your MRR Tolerance Settings. Generally, select Yes for recurring Items and No for non-recurring Items. For Items that represent a true month-to-month subscription term (duration, not billing method), select No. This sets the MRR to the Transaction Amount. |
| Item Groups | An Item can be added to one or more Create and Use Item Groups, which can be used in Analytics reporting. |
| Use Advanced Billing Start and End Dates | When a Transaction is generated from an Advanced Billing subscription, take the start and end dates from Advanced Billing rather than calculating them from this Item's settings. This option is enabled by default. |
Review the automatic transaction generation settings fields
Whether Maxio creates follow-on Transactions for this Item, and on what schedule.
| Field | Description |
|---|---|
| Default Duration | Transaction End Dates default to this when creating a Transaction with this Item: you specify the Transaction Start Date and Maxio calculates the End Date from the Item's Default Duration. Generally, Recurring Items have a Default Duration other than End Date same as Start Date. Non-recurring Items typically use End Date same as Start Date, meaning they start and end on the same date. Because the default revenue recognition period aligns with the Transaction Start and End Dates, setting this to End Date same as Start Date and setting the Default Revenue Recognition Template to Start to End - Exact Days recognizes the revenue all on one day, the most typical case for non-recurring Items. Some non-recurring Items still need revenue recognized over a period of time. For example, many auditors require certain set-up fees to be recognized over a multi-year period. Those Items are non-recurring but carry deferred revenue, so their Default Duration may be something other than End Date same as Start Date. |
| Enable Create Transactions | Allows Maxio to create Transactions from Invoices synced in from other systems. The settings below are used in the Generate Transaction function. This option is disabled by default. |
| Create Revenue | When checked, a generated Transaction has revenue created using the revenue recognition method of the associated Item. This option is disabled by default. |
| Transaction Start Date | Determines how Maxio assigns the Transaction Start Date. Transactions created from an external system's Invoice Line Items use that system's start date when one is available; otherwise this setting applies.
|
| Transaction End Date | Controls how the Transaction End Date is calculated. Transactions created from an external system's Invoice Line Items use that system's end date when one is available; otherwise this setting applies.
|
| Enforce Start Date After End Date | New Transactions are only added if the preceding Transaction ends before the new one begins. This stops a Transaction whose Start Date falls before another Transaction's End Date from being classified as a Renewal; it is classified as a New Transaction instead. This option is disabled by default. |
| Enforce Same Item in Renewal Links | Renewal links are generated only for Transactions with the same Item as the prior Transaction. If unchecked, a new Transaction can renew another Transaction with any Item. This option is enabled by default. |
| Renew All Open Transactions | Allows a Transaction to renew all candidate Transactions that have not previously been renewed or canceled and that meet the other conditions above. This option is disabled by default. |
Apply changes to existing records
Changing a field on an Item sets the default for new records. Four controls decide whether the change also rewrites the Transactions that already use it. They are not check boxes, and they do not sit in a section of their own: each appears beside the field it governs, staying hidden until you actually change that field.
Three are a pair of radio buttons, Update and Do NOT Update, defaulting to Do NOT Update.
| Field | Where it appears | Description |
|---|---|---|
| Update Transactions' Revenue Schedule | Revenue Settings | Applies the new Default Revenue Recognition Template to existing Transactions using this Item. |
| Update Transactions' Invoices | Revenue Settings | Applies the change to the Invoices of existing Transactions using this Item. |
| Update Transactions' MRR/ARR | Renewal Management and Analytics | Applies the new Generate MRR/ARR setting to existing Transactions using this Item. |
Update Billing Method works differently. It is a list with three choices rather than a radio pair.
- Leave As Is, the default, changes nothing on existing Transactions.
- Replace With This Billing Method copies the Item's new billing method onto them.
- Always Inherit From This Item clears the billing method stored on each Transaction, so they follow the Item from then on rather than holding their own copy.
Important: All four controls are suppressed when QuickBooks or Xero is connected, or when any closing or transaction lock date is set. In those cases changing the Item affects new records only.
Review the integration settings fields
Several other settings are available for Items depending on which integrations you use with Maxio.
QuickBooks
These fields appear only when a QuickBooks integration is connected.
| Field | Description |
|---|---|
| QuickBooks ID | (View only) The unique internal database identifier within QuickBooks. This field is set only for Items that have been synced from QuickBooks to Maxio. There is no interface within QuickBooks to view this ID field. If a QuickBooks ID exists, then by definition the Item was synced to Maxio and not created in Maxio. |
| Is sales tax | If checked, Invoice Line Items from QuickBooks with this Item add to the Invoice's Sales Tax rather than creating individual line items. The Sales Tax is added to the Sales Tax section on the Maxio Invoice. Check this box only when the Item itself is Sales Tax. Do not check it when the Item is a taxable service or product. To make a product or service taxable, use the Is taxable setting instead. For example, an Invoice created in QuickBooks with two line items, a Subscription Item of $10,000.00 and Sales Tax of $600.00, syncs into Maxio as a single Line Item, with the $600.00 represented in the Sales Tax section. |
| GL Account | The general ledger Account this Item is associated with. It renders under whichever GL you have connected, so the surrounding heading reads QuickBooks, Intacct, NetSuite, Xero, or Rillet accordingly. |
Other integrations
AvaTax, Salesforce, and Xero each contribute a field to the Item form.
| Field | Description |
|---|---|
| AvaTax Sales Tax Code | If you have the AvaTax integration enabled, this field displays the Sales Tax Code assigned to the matching Item in Avalara. Leave it blank to use the default Sales Tax Code from Avalara. While this field is editable in Maxio, you must enter a valid Sales Tax Code that already exists in Avalara to be able to sync the Item to Avalara. Any Custom Sales Tax Codes must already be established in Avalara before they can be assigned to an Item in Maxio. For most workflows, assign your Sales Tax Codes from within Avalara after the initial sync brings the Items in from Maxio. This same field is labeled AvaTax Tax Code when managed or linked AvaTax is configured, or plain Tax Code for Numeral, TaxJar, and other providers. When Maxio Invoicing Suite and Billing Portal is enabled and a tax service provider is configured on your Advanced Billing site, a Find Tax Categories link appears next to this field (under whichever of those labels applies) on the Item create and update forms, opening that provider's own tax-category reference in a new tab: Numeral's product categories reference, TaxJar's tax categories reference, or Avalara's Sales Tax Code lookup for managed or linked AvaTax. The link doesn't appear for Sphere, Anrok, or custom tax providers, or when no tax service is configured. |
| Do Not Sync to Salesforce | Transactions and Invoice Line Items using this Item are not sent to Salesforce. |
| Do Not Sync | Controls whether this Item is pushed to your GL. Set it to No and Items created in Maxio sync to and are created in your GL. It governs the Item itself, not its Invoices and Payments. |
| Xero Code | The Item's code in Xero. |
| NetSuite Tax Schedule | The NetSuite tax schedule applied to this Item. |
| Stripe ID | (View only) A link to the Stripe Product. |
| NetSuite ID | (View only) A link to the NetSuite Item. |
| NetSuite Modified | (View only) The datestamp of the time the Item was last modified by the NetSuite sync. |
| Intacct ID | (View only) A link to the Intacct Item. |
| Intacct Modified | (View only) The datestamp of the time the Item was last modified by the Sage Intacct sync. |
Review the remaining item fields
Fields set by Maxio rather than by you, shown for reference.
| Field | Description |
|---|---|
| Source | (View only) The name of the application that created the Item, such as Maxio, QuickBooks, Stripe, or NetSuite. |
| Sync Invoices | If Yes, Invoices from the connected GL with this Item sync into Maxio. |
Related information
For what an Item is and where Items are created, see the Understand Items help article.
To create, change, or remove an Item, see the Add, Edit, and Remove Items help article.
For the Accounts an Item can be linked to, see the Manage the Chart of Accounts help article.
Still need help?
Reach out and our support team will take it from here.